DRO for BP Which One? 2Axis

I doubt that a manufacturer would support modifying a glass scale. It's not for the faint of heart. Once I investigated how it was made, Put tissue and a cover over the thing to keep particles out. I used the mill to cut away enough of one side to get at the scale with a diamond cutting wheel. Made that rough cut. Then used the mill to finish cutting the other 2 sides, making the end square, etc. Did a final trim on the glass. Used the end block with a spacer sleeve to guid the drill bit to drill new holes into the end of the extrusion, tapped the holes. Cleaned it out, trimmed the lip seals to length, drilled and tapped new holes for the clamp screws that keep them in place. Put it all back together.
 
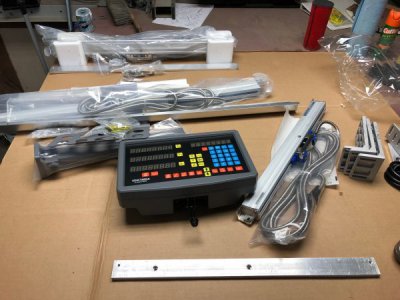
This is the one I bought, installed myself in an hour or so... :

https://www.ebay.com/itm/2-Axis-Dig...e=STRK:MEBIDX:IT&_trksid=p2060353.m2749.l2649

ONE BIG NOTE!!!!!!!!!!!!!!!!!!!!!!!!!!!

The X scale LITERALLY IS 42 inches long !!!!!!!!!!!!!!!!!!!!!!!!!!! And the housing is longer....

It is not needed to be that long, so I recommend sending a question to the seller asking for a shorter X scale. 36 inches should do just fine.

I started a conversation with them once I realized just how long this scale is, they stated I could return the old scale and they could have one made to whatever length I needed..

The readout has many bells and whistles, will do bolt circles and other fancy stuff.

One other note, the brackets they ship with were interesting to say the least, if the scale were shorter they may have worked, but I had the mill running and was trained on how to use the dials so making my own brackets was an easy task...

Reading the manual to figure out all the bells and whistles will come at a later time.

Only $230 shipping included and was quite prompt.

Cheers

Richard
 
Guys I have the 9x42 BP when I do order DRO what information will I need to know?I’m not a mm person so will I need to know the length of each axis travel or can I just type in 9x42 rest be auto fill in?Oh yea going to go ahead with 3 axis,like one posters said it’s not that much more and don’t have to install it so that’s a good ideal
 
Last edited:
You want to size the scales based on the travel of the machine, not the size. That way you have enough travel without having a length of scale sticking out that is useless.

There's a thread around here about it that might be useful, but the basic idea is to move the machine to one end of travel, mark a line across both parts, move to the other extreme and measure between the lines. If you tell the vendor this size they will add a little to give you space for mounting etc.. Most of the vendors also publish a list of standard sizes in mm. Just go to the next size up from your measurement. The exception would be if a longer scale gives you easier mounting options.
 
When I ordered my TPACtools DRO I emailed Tom and he said to just pick the 9x42 option for my Bridgeport. So, if you have the same size table and ordering from him, you can do that. Scales seem to fit my table fine. If you have a different size table or questions about yours I suggest you email him. He's very quick at responding.

Good luck,
Ted
 
Thanks Ted that’s who I be ordering from,for reasons you gave being local seller
 
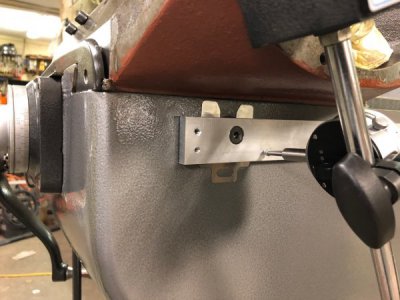
Afternoon guys,well my DRO showed up yesterday so first thing was to check things out see if anything was broken or not.There were two holes punch in the box which went through one of the other boxes that had scale in it.But nothing broken,wiping my forehead now.The table is off the mill so I started on the Y axis first,which that has taken me all day long but thats OK.There were couple pre drill holes which I started to use it but that did not work out for me so I had to flip the aluminum bar over then drill for the two 3/8 holes thats in the knee.I had some SS washers that was very close to same thickness that I use to move the bar out away from the knee acting as a shim but still off.I do have a Shim Kit that with the washers I had to install .012 shims in the front but just the washer in the back which all this got me .002 .Which getting to that point I must have crank the saddle seems like 100 times back/forth.But glad I did so going to mount the scale itself then check it out making sure all is good then drill for the cover.So next will start thinking about the Z axis but going back and reading Technical Ted post I see that is going to be a project in itself.I don't have any think laying around that is thick like what Ted use so will need to pick something up.But going to come up with a plan tomorrow for that.It be nice if I had a working mill to make some brackets or stand off for the scale bar but will have to come up with something.Anyway just a warning,lots of questions will follow and any advice greatly appreciatedIMG_0694.jpgIMG_0695.jpg
 
Well hit a snag already,not major maybe I'm wrong.I mounted the bar then installed the scale all good so far.Next going to mount the guard but it will not fit over the scale and the aluminum bar together,so either I need to cut a filler or make another guard that will fit.Which means that the end caps will not completely cover the ends.Guess the covers were made without using the aluminum bars,oh well:(
 
I put pieces of wood between the knee casting and the cover. Then I painted the wood the same color as the rest of my mill. This worked great. You can probably see this in the pictures in my install post. If you need more let me know and I can post them here.

Ted
 
Back
Top