Dovetail myth regarding pin dimensions.

I assumed that only one part would be measured at a time so just one pair would work.
The method I would choose for the female dovetail would be to wedge a pair of tapered parallels between the pins but measure over the protruding pins and not the tapered parallels.
For the male dovetail I would use a small clamp over the pins and measure over the pins.
If the two dimensions are the same, then the dovetails are the same, but only if the correct diameter pins are used.
Still need two identical pins, and if you want to use "correct" diameter pins, you need two full sets (of two ranges to cover "short" & "tall" dovetails, so four sets instead of two). I think you'll find that many hobbyists only have partial sets or none at all and rely on dowel pins for their needs.

I would rather spend the money on a 2-D CAD package which will have more usage than even one set of Gage Pins.
Two sets would be nice, however using pins +/- equally either side of the "correct" size will yield the same result.
I'm not sure what short and tall dovetails are, can I assume they are different angles?
I don't think that guessing the equipment that the members don't have should prevent any techniques being posted.
A cad package is not always necessary if you just use the 1/3 of the depth formula for the pin diameter, or make the dovetail 3x deeper than your pin diameter.
There are many free cad packages available.
 
Most of is who would be making dovetails also have access to a lathe. It is a fairly simple matter to turn and verify pins of any specific size. They needn't be hardened and ground for a one time use. In fact aluminum would work just fine. If one has only a single set of gage pins, the same measurement will result using one pin a thou infer and one a thou over the target size. As to uses for gage pin sets, I use mine frequently. They are the most accurate way to measure small hole sizes. I also use them in setups rather than gage blocks which I don't have:confused:. I would rank them at no. 3 behind my calipers and micrometers as the most used metrology tool. t some point, I will add plus pins to go with the minus pins which will give me a resolution of close to a half thou (e.g., .1248 vs .1252 or .1258).

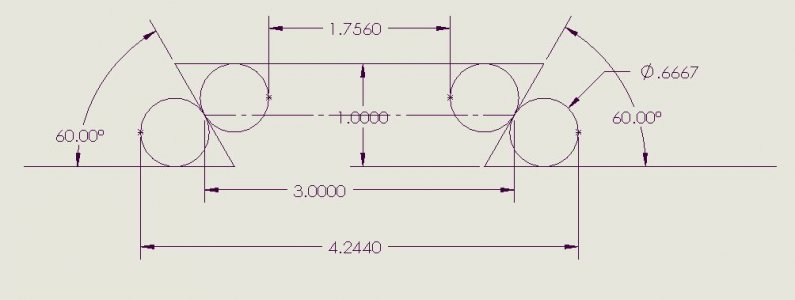
However, I can't think of a use for a dovetail where all three surfaces are in contact. Usually, there is clearance on one of the horizontal surfaces so the height of one dovetail will differ from the other and the contact point of the pins will not be the half way point on one of the pair. In any case, the measurements are not equal as one is an inside measurement and the other is an outside measurement, as the following illustrates. Some math or a CAD program will be necessary.Dovetail Measurement 1.JPG
 
Most of is who would be making dovetails also have access to a lathe. It is a fairly simple matter to turn and verify pins of any specific size. They needn't be hardened and ground for a one time use. In fact aluminum would work just fine. If one has only a single set of gage pins, the same measurement will result using one pin a thou infer and one a thou over the target size. As to uses for gage pin sets, I use mine frequently. They are the most accurate way to measure small hole sizes. I also use them in setups rather than gage blocks which I don't have:confused:. I would rank them at no. 3 behind my calipers and micrometers as the most used metrology tool. t some point, I will add plus pins to go with the minus pins which will give me a resolution of close to a half thou (e.g., .1248 vs .1252 or .1258).

However, I can't think of a use for a dovetail where all three surfaces are in contact. Usually, there is clearance on one of the horizontal surfaces so the height of one dovetail will differ from the other and the contact point of the pins will not be the half way point on one of the pair. In any case, the measurements are not equal as one is an inside measurement and the other is an outside measurement, as the following illustrates. Some math or a CAD program will be necessary.View attachment 429713
The theory is based on the pins being above each other and therefore on the same vertical centreline, just as my drawing shows.
As your sketch shows all the dimensions are from theoretical sharp corners as it should be.
If you bisect the angle and then draw a vertical line through the middle of the angled line the intersection will be the centre of the pin. This will give you the information of the pin position and diameter that satisfies the common position where it can sit in either the male and female dovetails.
These are theoretical dimensions and the male will be cut slightly smaller for the required fit. Reducing the distance between the angles allows sideways clearance and also vertical clearance.
 
Two sets would be nice, however using pins +/- equally either side of the "correct" size will yield the same result.
I'm not sure what short and tall dovetails are, can I assume they are different angles?
I don't think that guessing the equipment that the members don't have should prevent any techniques being posted.
A cad package is not always necessary if you just use the 1/3 of the depth formula for the pin diameter, or make the dovetail 3x deeper than your pin diameter.
There are many free cad packages available.
Short & Tall referring to the depth or height of the dovetail; with your method you need two identical pins based on the height/depth, which means you need different pairs of pins for each different dovetail you make.

Yes, there are free CAD packages available, but having used very good "real" CAD packages for the Mac in the past, none of the free or wed-based solutions are satisfactory IMHO. I currently use MacDraft Pro.
 
OK, I see where you are now. I missed your attached drawing and was misled by the original statement that the contact point be the halfway mark. You still have to subtract the pin diameter from the outside measurement and add it to the inside measurement to compare the two. You also have to deal with the fact that the dovetail heights won't be equal for practical mating parts.

I have a seat of SolidWorks which I feel is nearly essential for my machining. However, there are free options which offer parametric CAD. Fusion 360, if still available, is one. Free CAD is another. When I stated earlier that my three most used metrology tools were my calipers, my micrometers, and my gage pins, I should have included my SolidWorks. Although I had been machining for 35 years without it, It has made my machining much easier, more accurate, and far more enjoyable.


In the absence of a CAD program, Machinery's Handbook has the equations for measuring dovetails with an arbitrary pin diameter. If you don't want to do the math, here is an online calculator that will do it for you, including allowing for clearance. https://mwganson.freeyellow.com/dovetails/
 
Short & Tall referring to the depth or height of the dovetail; with your method you need two identical pins based on the height/depth, which means you need different pairs of pins for each different dovetail you make.

Yes, there are free CAD packages available, but having used very good "real" CAD packages for the Mac in the past, none of the free or wed-based solutions are satisfactory IMHO. I currently use MacDraft Pro.
As I stated previously, the pins can be different sizes providing thaey are of equal difference from the "correct" size.
The previous post by RJ Sakowski states that a pair of pins can quickly & easily be made for one time use so no special gauge pins are required.

The size of a dovetail is usually secondary to the fit.
Traditionally a female part is made and then the male is machined to suit.
For example:
Ream a hole then polish the mating pin on a drill press to suit the fit you need , easier than jig grinding the hole.
With this principle in mind, machine the female vee until it is the size you need but!! not super accurate. ( easier ).
Measure the depth to determine the pin diameter and turn a couple of simple pins.
Measure over these pins and that is the size you aim for when making the mating part.

If you are making lots of different mating dovetails then turning a couple of simple pins adds little to the job and can be used again.
If for example you always make 60 degree dovetails then triple the diameter of the pin gives you the depth the dovetail needs to machined to.
 
OK, I see where you are now. I missed your attached drawing and was misled by the original statement that the contact point be the halfway mark. You still have to subtract the pin diameter from the outside measurement and add it to the inside measurement to compare the two. You also have to deal with the fact that the dovetail heights won't be equal for practical mating parts.
Sorry about the halfway mark reference, I can now see that it is confusing and incorrect. What I meant is the midpoint of the angled face runs vertically through the pin centre. This is what the method is based on.

The method is to wedge the pins apart in the female vee using tapered parallels. The pins extend beyond the dovetail so they can be measured over their outsides to replicate measuring them in the male dovetail.

I would consider and make the heights exactly the same. The final cuts on the male will reduce the width of the angled faces until the required fit is achieved. By removing material from these angled faces automatically allows for some vertical clearance.
If you prefer all the vertical load to be on the top of the female part, then skim the face of the male dovetail last. Or the load to be on the face of the male dovetail, skim the top of the female dovetail. Until then I would consider the geometry to be the same for both parts.
 
Back
Top