Does this fly cutter look right?

D.sebens

H-M Supporter - Silver Member
Joined
Mar 27, 2022
Messages
427
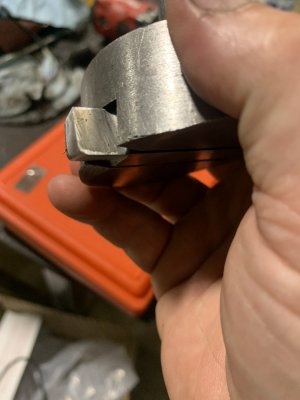
Trying to figure out why my cut is poor with this fly cutter. I ground the tool myself and honed the edge. The finish improved with more radius added to the nose of the tool but you can still feel the ridges even if you feed really slow.

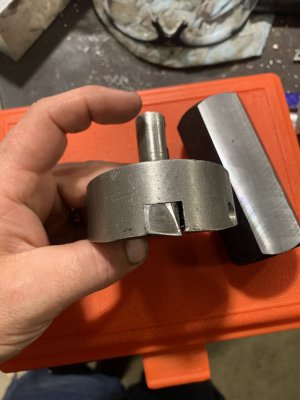
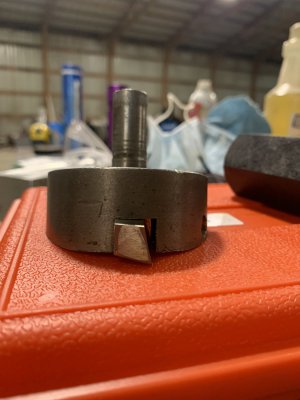
My questions are about which direction the tool is supposed to be and if my grind looks okay.

On the direction, seems like I need to grind a LH tool for it as it lines up more center to the tool but then wouldn’t the set screws be on the wrong side for that?

On the grind question I’m going to guess it’s been 1/16-1/32”. I haven’t measured it. The blank is 1/2”. I honed it after grinding to get it nice and sharp. I’m using a 15 degree rake and about 8-10 degree reliefs.

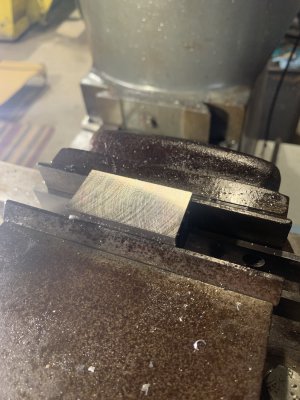
Since you can’t feel the picture, those ridges are pretty pronounced. They are probably just enough to catch a fingernail but it’s really translated in to roughness when dragging a finger down the surface.
 

Attachments

  • IMG_2564.jpeg
    IMG_2564.jpeg
    148 KB · Views: 78
  • IMG_2563.jpeg
    IMG_2563.jpeg
    173 KB · Views: 77
  • IMG_2562.jpeg
    IMG_2562.jpeg
    177.5 KB · Views: 77
  • 71564506652__14DC58DA-AAE0-4413-B529-36E663D28F75.jpeg
    71564506652__14DC58DA-AAE0-4413-B529-36E663D28F75.jpeg
    295.6 KB · Views: 77
Also speed was about 300rpm with aluminum. This fly cutter is set at about 2.5 inches. This number was taken from a feed speed chart.

The fly cutter was way too big for this job this is about testing the fly cutter.
 
Also a third thing. I haven’t actually figured out where the center line is compared to the tool slot. My eyeball says the back side looks more in line but it’s also possible the slot is in the middle.
 
Looks like the bit is a "Left Hand" cutter for a Lathe. For a fly cutter since it typically it rotates clockwise, you would want a "Right Hand cutting bit.

In other words, when looking at picture #2 IMG-563, you would want the cutting edge on the left edge (vs the right edge as shown).

Hope this helps.

IMG_2563-Edited.jpeg
 
The way I understand lathe tools is if it starts on the right and goes left that would be a right hand tool right? I agree I feel like it needs a grind the other way but if I did that the forces would be pushing into the set screws instead of a solid wall.
 
Can't tell from the pictures, but if your flycutter was home made, they may have put the clamping screws on the incorrect side for Clockwise use.
If your mill can run counter clockwise, you could try running it as it is, and see if you get a better finish.

I don't know if my naming convention is correct..... I just refer to bits that cut to the "right" on a lathe as "Right Cutting" bits and Left as Left.
 
I agree I feel like it needs a grind the other way but if I did that the forces would be pushing into the set screws instead of a solid wall.

.....but if you don't then it'll be cutting with the trailing edge....... unless you have a mill that runs backwards..... never seen one of those.

Also, cannot tell from your photos which edge of the slot is on the centre line of the shank.....

Brian
 
.....but if you don't then it'll be cutting with the trailing edge....... unless you have a mill that runs backwards..... never seen one of those.

Also, cannot tell from your photos which edge of the slot is on the centre line of the shank.....

Brian
I thought most mills can run backwards??

That’s how bull gear works on a Bridgeport it spins backwards so you run in reverse or 2. Whatever your switch says.

I run this in the correct direction for this tool to cut which puts me in bull gear(for the speed) and running in the “forwards” direction which is running it backwards since bull gear reverses the direction.
 
One simple test in aluminum,
With the mill off, lower the cutter so it is just touching the aluminum, and turn the cutter by hand to see how it shaves a chip. If it rubs without shaving a chip, your cutting edge is rounded. Obviously it may take some hand strength, but the goal is to shave the thinest chip possible. That may take a little playing with the height of the mill but it will give you a good idea of how it is cutting. A magnifier of some sort may be helpful.
Thank you. I don’t think it’s rounded over. I will test that. My main question is how much effect does it have not cutting on the center line? I will check that. It got significantly better when I added more radius and still cut steel fine (could still feel the cut). If my geometry is good and is non rounded I might try adding more radius.

I don’t know any local machinists to have them look at the tool so it’s ask online and trial and error.
 
Back
Top