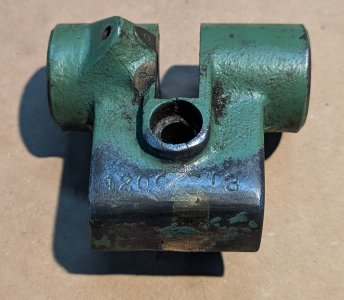
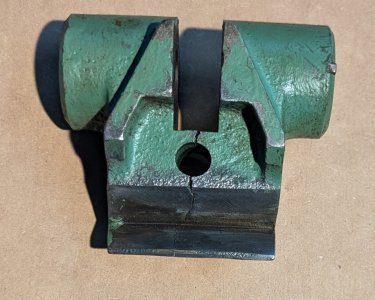
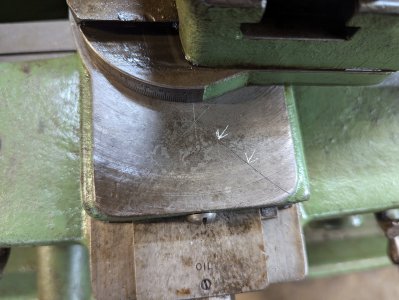
I recently acquired a SB Heavy 10l as a "starter lathe" (very new to machining- been a blacksmith and welder for 40+ years) This machine came with a cracked micrometer carriage stop (looks like someone tried to braze it back together once) and a cracked cross slide (also missing the way wipers). I purchased a "new" cross slide on eBay, and I would like to replace the micrometer stop. I'm not looking for an original SB replacement one, however. Can anyone recommend a micrometer carriage stop of decent (beginner) quality that isn't extremely expensive?
-
Welcome back Guest! Did you know you can mentor other members here at H-M? If not, please check out our Relaunch of Hobby Machinist Mentoring Program!
You are using an out of date browser. It may not display this or other websites correctly.
You should upgrade or use an alternative browser.
You should upgrade or use an alternative browser.
[Newbie] Cracked cross slide and micrometer carriage stop
- Thread starter robsig
- Start date
- Joined
- Dec 6, 2012
- Messages
- 2,708
Because this is a clamp consider brazing the casting then filing or machining the surface to match the profile of the V.
Remember this is not a sliding part, it's a clamp.
Doesn't need to be super strong unless the gorilla attacks it again. It's just a stop.
In fact, while convenient, you really don't "need" a stop. I often just use a sharpie line drawn on the V.
But, consider checking out:
Daryl
MN
Remember this is not a sliding part, it's a clamp.
Doesn't need to be super strong unless the gorilla attacks it again. It's just a stop.
In fact, while convenient, you really don't "need" a stop. I often just use a sharpie line drawn on the V.
But, consider checking out:
Daryl
MN
Last edited:
- Joined
- Apr 21, 2015
- Messages
- 653
FWIW, a micrometer carriage stop is a great beginner project.
I built this one long ago (when Tom's website was still working!):

 web.archive.org
Not a necessity as Daryl said, and I'd be tempted to fix the one you have, too, but since you aren't finicky about keeping it original, I can recommend this design. The only hard part is indexing and engraving the wheel, but that can be done on the lathe with evenly spaced lines on masking tape around the circumference of your largest chuck and a jury rigged pointer of some sort. Just mount a sharp vee tool and use the carriage to scratch lines a few thou deep.
I use mine constantly, but a cheap 1" drop indicator with a magnetic back is a perfectly adequate alternative if you're careful: slap it on the ways with the point touching the saddle (either side) or put it on the saddle with the point touching something fixed (like a mag base placed elsewhere on the lathe). Set a zero and try not to make an off by 0.100" error. That's a good way to make consistent line lengths when engraving the dial before you have a working stop!
I built this one long ago (when Tom's website was still working!):

Micrometer Carriage Stop
 web.archive.org
Not a necessity as Daryl said, and I'd be tempted to fix the one you have, too, but since you aren't finicky about keeping it original, I can recommend this design. The only hard part is indexing and engraving the wheel, but that can be done on the lathe with evenly spaced lines on masking tape around the circumference of your largest chuck and a jury rigged pointer of some sort. Just mount a sharp vee tool and use the carriage to scratch lines a few thou deep.
I use mine constantly, but a cheap 1" drop indicator with a magnetic back is a perfectly adequate alternative if you're careful: slap it on the ways with the point touching the saddle (either side) or put it on the saddle with the point touching something fixed (like a mag base placed elsewhere on the lathe). Set a zero and try not to make an off by 0.100" error. That's a good way to make consistent line lengths when engraving the dial before you have a working stop!
Thank you! This is a project that I will have to digest. I think you complement me with far more skill than is warranted! I am still on the level where "precision measurement" is using a ruler that has lines closer together than a quarter of an inch!
- Joined
- Apr 21, 2015
- Messages
- 653
Heh.Thank you! This is a project that I will have to digest. I think you complement me with far more skill than is warranted! I am still on the level where "precision measurement" is using a ruler that has lines closer together than a quarter of an inch!
There's nothing like real projects to teach yourself, and this one is pretty forgiving (tolerances are NOT tight). Tom does a good job in his videos covering the basics. If engraving the index lines seems like too big a challenge, you can even carefully apply dots of fingernail polish (stolen from SWMBO) around the periphery of the wheel.
But really, engraving lines on the lathe is easier than you might think, you just need to remove the burr/chip that gets pulled up on each line. A sharp tool and final turning pass at the end will do that well.
Go for it!
- Joined
- Nov 14, 2020
- Messages
- 1,856
A woman I worked with was talented and fixing up her house...she came in one day and ask for a peice of material....
18 and three of those little lines past the middle big line!
I cut her a peice of material to her specs and told her I would bring it by, son of a gun if it didn't fit just right.
Point is desire to accomplish helps drive a person, don't be embarrassed we all started at the beginning.
18 and three of those little lines past the middle big line!
I cut her a peice of material to her specs and told her I would bring it by, son of a gun if it didn't fit just right.
Point is desire to accomplish helps drive a person, don't be embarrassed we all started at the beginning.
- Joined
- Apr 21, 2015
- Messages
- 653
Agreed, and I do it all the time, but don't fall asleep with a hard stop! Focusing to cut the power feed before hitting the stop adds a little excitement to keep you awake.A hard stop is handy when using a boring bar. I like to power feed
A drop indicator with a mag-back is a more forgiving way to accomplish the same thing.
- Joined
- Dec 6, 2012
- Messages
- 2,708
We all started at the beginning, and are on this crazy journey. I've got a long way to go. We've all made alot of precision scrap. For a while I was mounting them to the wall as a reminder. But became concerned about structural stability
What animates me is the fallacy that we need to spend huge money to be safe, have fun and do good work. The rules change if you are in this for profit, as it comes down to parts per hour. Mranwhile, take your time have fun and teach somebody.
Daryl
MN
What animates me is the fallacy that we need to spend huge money to be safe, have fun and do good work. The rules change if you are in this for profit, as it comes down to parts per hour. Mranwhile, take your time have fun and teach somebody.
Daryl
MN


