Chasing Backlash

TomS

Active User
H-M Supporter Gold Member
Joined
May 20, 2013
Messages
1,906
Been chasing .003" of X axis backlash on my PM-932 CNC for four days now and haven't made any headway. Haven't checked the Y axis yet. It's time to tap into the Hobby-Machinist brain trust.

I've measured the backlash two ways. One method I used is to mount a .0005" DTI in the spindle and touch off on the vise. My other method is mounting a mag base with a 1" travel DI on the saddle, again touching off on the vise. I preload the dial indicator and set them to zero and also zero the Mach3 X axis DRO. I then jog the table in the opposite direction in .001" increments until the DI needle just begins to move and note the X axis DRO reading which is .003"-.004". For a comparison and to eliminate stick slip I tried the second method using a 1" travel indicator and jogged the table 1/2" and got the same backlash readings.

I've adjusted the gib several times and run the tests and no change in backlash except when I adjusted it too tight. I also adjusted the preload on the ball screw AC bearings. Having .003" to .004" of backlash I added .006" to the shim pack. Backlash is still .003" to .004". If I take shims out backlash increases.

Checked the ball screw for lateral movement with a DI and it's zero.

I installed Linear Motion Bearing double ball nuts a few months ago and was able to cut a pocket that was within .0005" of being round. Haven't tried this again so maybe it's time to retest.

What is considered acceptable backlash? Zero would be nice but I don't think it's a realistic expectation.

Am I checking backlash correctly? From what I've read on the internet I am.

Could it be bad AC bearings? These are the original Chinese bearings that came with the bearing blocks.

Could it be the coupling? I'm using split clamp style double diaphragm couplings with two set screws on each end. Although I don't like to run with rigid couplings, as a test I'm go to either make or buy one to eliminate that possibility.

Thanks in advance for your advice.

Tom S.
 
0 is acceptable backlash and with double ball nuts should be achievable. It sounds like you are setting up correctly. My preference is to use the spindle at the indicator base point

I don't particularly trust the Mach3 DRO for a test like this. With the motor removed, I would put a ''degree wheel'' on the lead screw, preload in one direction then rotate 1 turn in the preload direction, then 1 turn back . The difference on the indicator is the backlash. The degree wheel could be a stiff piece of paper with a single mark on it, just taped to the end of the lead screw or coupling. The larger the diameter the better to get maximum resolution.

Are the AC bearings installed in the correct orientation?

I'll give your recommendation a shot in the morning. I've had the drive end of the lead screw apart so many times in the last four days I can do it with one hand and blindfolded.

For info I cut a pocket and the bore matched my measured backlash. I enabled backlash compensation, or so I thought, and recut the pocket. The bore was .005" out of round! Double checked my inputs ; .003" in X and .0018" in Y. Even tried negative numbers and it locked up the motors.

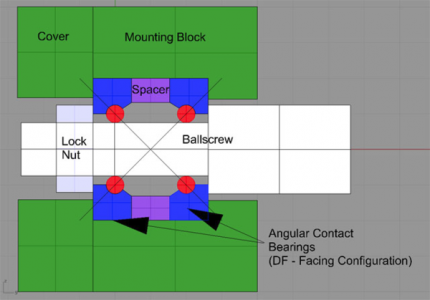
Double and triple checked the AC bearing orientation and confirmed they are installed back to back. Whats interesting is I measured bearing bore depth, cover spigot height and bearing widths to calculate the preload shim pack. Put everything together with the calculated shim pack (.005" bearing preload) and had .0125" of backlash. Hmmm! I think the inner races were contacting each other. Added a .015" shim and ended up with .003" backlash. Added another .005" shim to the shim pack and still had .003" backlash.

I adjusted the gib until it stalled the motor then backed it off until the motor ran the full length of travel without stalling. Didn't want the table too loose and giving me false readings.

Tom S.
 
Do you have enough clearance between the outer races? They should have a spacer between them.
 
Do you have enough clearance between the outer races? They should have a spacer between them.

The bearings drop into the housing. Haven't measured the clearance but my guess is about .002" loose. No spacers but I'm adjusting preload with shims between the outer races. Is that what you are referring to?

Tom S.
 
I'm adjusting preload with shims between the outer races. Is that what you are referring to?

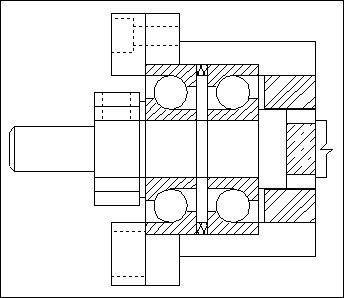
OK, yes. I guess I would have to see how the assembly goes together to really understand. Normally I would expect the outer races to have a fixed spacer between them, then set the preload with a nut on the lead screw to tighten the inner races against each other. I would think the outer races would be tight axially in the housing, maybe set with shims, but tight. 0.002 radial play seems a bit loose, but shouldn't really affect the axial play of the lead screw. Normally the support bearing on the other end of the lead screw is pretty loose in the bore, but it is supposed to float axially.

upload_2017-1-30_22-23-1.png

And a bit better picture of the bearings

upload_2017-1-30_22-25-57.png
 
Last edited:
OK, yes. I guess I would have to see how the assembly goes together to really understand. Normally I would expect the outer races to have a fixed spacer between them, then set the preload with a nut on the lead screw to tighten the inner races against each other. I would think the outer races would be tight axially in the housing, maybe set with shims, but tight. 0.002 radial play seems a bit loose, but shouldn't really affect the axial play of the lead screw. Normally the support bearing on the other end of the lead screw is pretty loose in the bore, but it is supposed to float axially.

View attachment 225211

And a bit better picture of the bearings

View attachment 225212

Your second picture closely resembles my setup. The only difference is the bearings are recessed in the bore about 1/16" and there is a spigot on the cap that fits the bore and locates the cap. The shim pack serves the same purpose as the spacer. Yes, the support bearing floats in the housing..

Thanks,


Tom S.
 
Well your advice about not trusting the Mach3 DRO's was right on. I set up a disk on the ball screw, installed and aligned a pointer, preloaded the ball screw in one direction, zeroed the DI, then reversed screw rotation exactly one turn. I have .007" of backlash, not .003" to .004"! For reference the DRO read .0043".

Before running the test above I adjusted the X axis gib using the Bridgeport method. I ended up with .0015" of indicator movement and called it good. Before adjusting the gib my backlash was .005". I'll back the gib off a bit.

I tried measuring ball screw rotational torque using my in/lb torque wrench. My lowest setting is 50 in/lb and the screw turned easily. I even backed off the torque wrench setting one full turn and still didn't work. Suffice to say rotational force of the ball screw in less than 25 in/lb.

Although they are Chinese origin I don't think the AC bearings are the problem. Also rechecked ball screw longitudinal movement. Still zero. Don't remember off hand what the preload is but it's probably around .010". I know it's way too much but I am chasing an unknown and with preload set at about .005" I had backlash. I wanted to see if increasing preload would change anything and it didn't. If I go below .005" preload backlash increases to about .012". Maybe more using the degree wheel test.

I'm kind of at a loss as to how to approach this. I've measured it a dozen different ways using three different dial indicators and adjusted the AC bearing shims pack thickness more times than I can remember. I thought it might be the coupling but setting the jog at .0001" and carefully watching rotation in both directions I can see the coupling and ball screw rotating in unison. If I was chasing a couple of tenths then I might dig deeper but .007" of rotational lag would be quite noticeable.

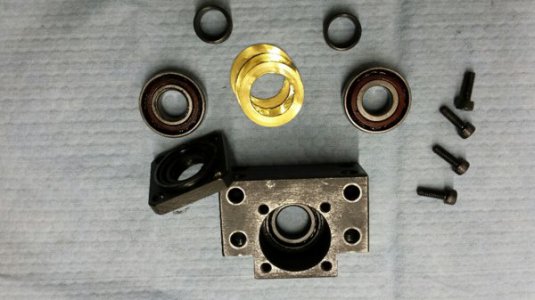
Here are a couple pictures of the driven side bearing housing components. The two cylindrical items at the top are seal/compression sleeves. The grease seals run on the OD and the length is such that when the bearing lock nut is tightened the sleeves and AC bearing inner races are compressed against the shoulder on the ball screw.
20170131_120026_resized.jpg

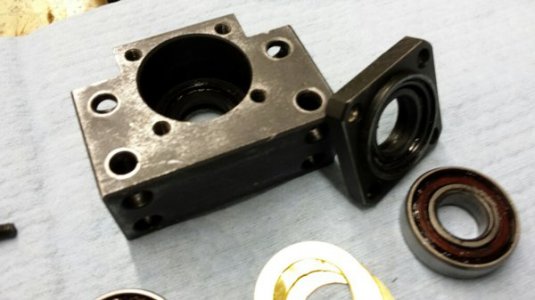
This shows the register on the cap better than the picture above.
20170131_120040_resized.jpg
 
Given that the backlash changes with the shim packs, and the leadscrew/table/ballnut seems to have 0 backlash, then it would seem that the problem is in the AC bearing area. Now the question is how to fix it.

I would be threading the lead screw for a preload nut even if it requires a redesign, but I have very little patience for this kind of adjusting system. If that doesn't fix the problem then I would be tweaking the ball nuts or mounting system.
 
Maybe I missed something but I do not see how the ball nut was eliminated as a possible source?
 
Back
Top