Centrifugal Start Switch and Drum Switch Retrofit

I don't know why there are screws missing from the drum switch, maybe because it's Chinese. The more I look at this, I think the black hot wire attaches to the lower right spot with a jumper up to where it shows 5. Then on the left side it shows a jumper from 4 down to the lower left spot and then attach the white neutral wire. Then attach the other wires as shown. It also shows jumpers at 6 and 3 down one spot from each. Maybe I answered my own question. Then perform a bench test. I hope I can get more screws at a local hardware store.
Just a FYI,
You have your switch upside down in comparison to how i have the diagram drawn
The internal jumper wires are shown for the drum switch in the diagram
 
Just a FYI,
You have your switch upside down in comparison to how i have the diagram drawn
The internal jumper wires are shown for the drum switch in the diagram
At first, I wasn't sure about which way the wires should be attached because the cover fits in either direction. Then I noticed the outside of the cover shows the two directions of rotation which should be at the operating handle of the switch.

So if the cover is removed from the switch and flipped over the diagram inside is the way I wired it.

As I was wiring the switch, I notice the numbers from the diagram are faintly molded onto the black plastic next to the wire conection locations.

So, I know I wired it correctly, but if I turn the handle one way nothing happens, and if I move it the other way I trip my breaker.

I had an electrician look at it and he unhooked everything and wired the motor without the switch to make sure the motor worked. Because new doesn't always mean it will work, but it truned on and worked just fine.

This electrician only does residential & commercial, and he doesn't work with motors.
 
my motor will wire up different than your motor for a couple different reasons
first, my motor has a sinpak ssr switch wired in, you will not have this feature
second, my motor has different pairing numbers

stand by, i'll work up a diagram for your situation
 
At first, I wasn't sure about which way the wires should be attached because the cover fits in either direction. Then I noticed the outside of the cover shows the two directions of rotation which should be at the operating handle of the switch.

So if the cover is removed from the switch and flipped over the diagram inside is the way I wired it.

As I was wiring the switch, I notice the numbers from the diagram are faintly molded onto the black plastic next to the wire conection locations.

So, I know I wired it correctly, but if I turn the handle one way nothing happens, and if I move it the other way I trip my breaker.

I had an electrician look at it and he unhooked everything and wired the motor without the switch to make sure the motor worked. Because new doesn't always mean it will work, but it truned on and worked just fine.

This electrician only does residential & commercial, and he doesn't work with motors.
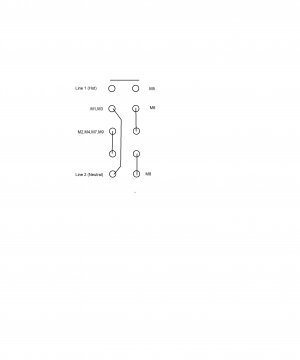
here is a diagram of your switch with the motor connections (M1,M2,M3, ect. as well as the line connections (Line 1, Line 2)

Motor diagram.jpg
this diagram is when the switch is in the center position, internal jumpers are shown

let me know how this works for you

NOTE: invert this drawing if your switch is mounted with the handle on the bottom of the switch
 
Last edited:
here is a diagram of your switch with the motor connections (M1,M2,M3, ect. as well as the line connections (Line 1, Line 2)

View attachment 379565
this diagram is when the switch is in the center position, internal jumpers are shown

let me know how this works for you

NOTE: invert this drawing if your switch is mounted with the handle on the bottom of the switch
Thanks again Ulma Dr. I'll wire it up when I get home later today and test it out and I'll post a comment on how it went. Have a Great Day!!!
 
Mike you missed a terminal
M5 goes to the other terminal across from Line 1 (hot)
Everything else looks ok
-M
Thank you very much, Mark!!! I just now wired it up per Ulma Dr's diagram, and yes, nothing, not even a popped circuit breaker. I was about to ask another question of the Dr, and then I read your comment. So, attaching T5 as you mentioned was the final Key to finish off my Three to Single phase Bridgeport convertion.

I'm so very happy to be a New Member of such a fine group of enthusiasts.
 
Thank you for joining us, how about some pictures? Some of the machine would be nice, but I'm interested in the car......:)
 
Back
Top