-
Welcome back Guest! Did you know you can mentor other members here at H-M? If not, please check out our Relaunch of Hobby Machinist Mentoring Program!
You are using an out of date browser. It may not display this or other websites correctly.
You should upgrade or use an alternative browser.
You should upgrade or use an alternative browser.
Building an RC Pulse Jet Powed Airplane.
- Thread starter Flyinfool
- Start date
- Joined
- Apr 29, 2019
- Messages
- 2,250
OK it has been a while since I posted.
Not much happening with COVID doing its thing.
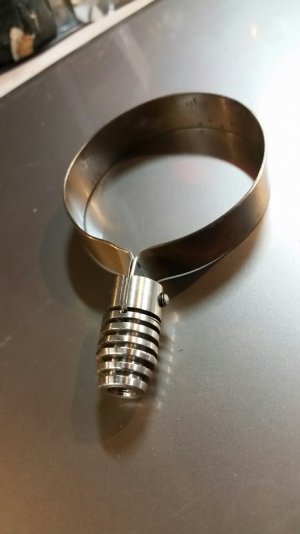
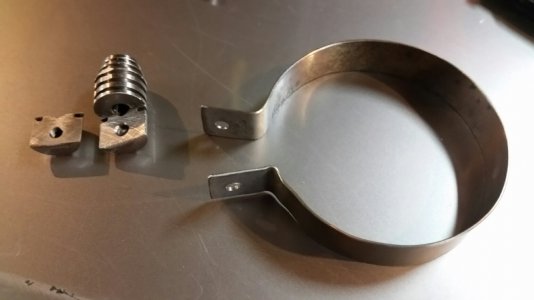
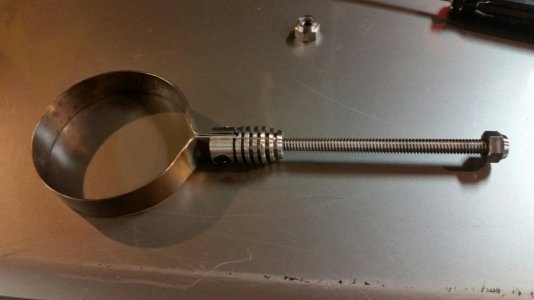
But I did get all of the TI parts made. It was a learning experience.
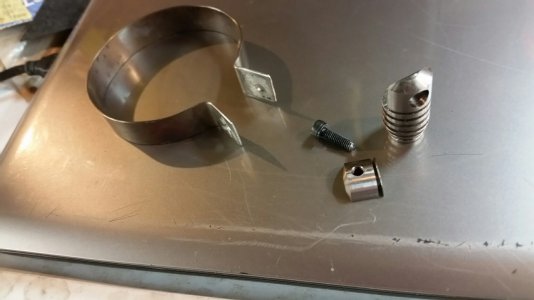
The only parts that are not TI are the sheet metal band (321 Stainless) and the black screw that is mounting the band (Steel).
All of the small parts came out of that initial bar of 16mm, Grade 2, I bought. The washer and the flat strap are out of a small piece of 2mm thick sheet, grade 5. I did a lot of cleaning up swarf along the way, putting small batches in separate bags so as to not risk anything exciting. It is now all safely at the dump and burried. Most of the tools were HSS with a few brazed carbide lathe tools that were resharpened and diamond honed.
The finned part I finally got right on the 4th try. Most of the issue was in order of operations, I got to a point and then realized I could not hold the part for the next OP.
The final order that worked was with the full bar in the lathe, turn the top taper and cut the grooves for the fins with a 1/16 parting blade. The fins are also 1/16 thick.
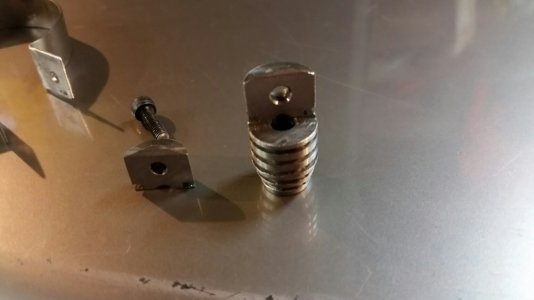
Then over to the mill to cut the .081 wide slot in the top for the 2 thicknesses of the band to drop into.
Then spot drill and drill the clearance hole for the 4mm screw half way thru the part.
Tap drill thru for the 4mm screw.
Using an end mill, c'bore to hide the head of the 4mm hex socket head cap screw.
Back to the lathe, turn the taper on the bottom of the part and part off to a bit over length.
Turn the part around and back in the chuck to face off to length, drill and tap the bottom mounting hole.
Back to the mill again to make the final .010 wide cut to the bottom of the .081 slot to free the "nut" part.
Finally tap the nut for the 4mm screw.
I can make anything more dificult.
The 1/4 20 threaded rod was made on the lathe, by facing then center drill and add a lice center to support the end.
Then turn down 5 inches of the 16mm rod to .245. with a LOT of spring passes with a freshly sharpened cutter to get the whole length the same diameter. (I sure wish I had a follower rest)
Due to the center I could not turn it down all the way to the right end.
I then single pointed the thread leaving some unthreaded at both ends. Again a lot of spring passes with a very sharp bit.
I then parted off the end with the center, then the other end.
I slid it into a piece of thin wall aluminum tube to chuck it up to face and chamfer both ends.
The nuts were made by milling the hex onto the end of the bar first, long enough for both nuts.
Then the whole bar into the lathe to drill and tap, and turn the little shoulder, and part off twice.
Then the nut went back in the chuck to face and chamfer the other side.
I used a piece of steel that had a 90° c'sink in the end and a hammer to slightly close the top of the nut to make it self locking and able to still handle high heat.
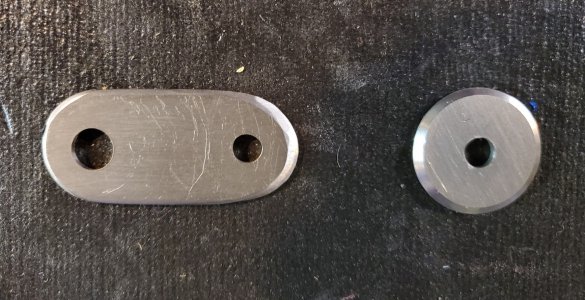
These are the glorified washers that will go on the top and bottom of the wing, the long one is also the attach point for the catapult release.
These were made out a 2mm x 100mm x 100mm sheet of grade 5 TI.
First I made the round one, on the drill press I used a 1.25 dia hole saw to rough it out. Worked great since I needed a 1/4 dia hole in the center anyhow. I then took a chunk of scrap in the lathe and drilled and tapped 1/4-20, I used this as a mandrel to hold the disc for truing the od to final size and putting on the chamfer, one side only. Done easy.
For the oval part I bandsawed out the blank, drilled the 2 holes and the rest was done on the belt sander. The outside shape is not at all important so I did not bother to set it up on the rotary table to make the ends perfect, and they are not, but it goes on the bottom of the wing so no one will ever see it.
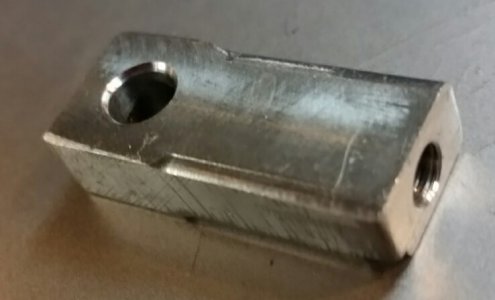
This is the front motor mount.
With the bar mounted horizontal in the mill, I milled the top flat, then side milled the 2 short sides, and the top (side near the thru hole) then drilled the through hole. then put the corner radius on 2 of the edges.
Then to the band saw and cut it off a bit long.
Back to the mill, layed it flat on parallels with the round side up and milled the final side and put in the final 2 corner radii.
Then stood it up to finish miil the bottom to final length, and drill and tap #10/32 thru to the cross hole. The threads are just a bit short as I ran out of tap length but it will be fine.
I am now deep into building the test stand, With some luck It will be done by the end of next week and I can see if I can actually get this monster to light up. I will try to get some video of this. It may be exciting, I have never set up or run any kind of pulse jet before, I am betting I will start some fires before I get it working right and figure out the correct fuel flow rate.
Not much happening with COVID doing its thing.
But I did get all of the TI parts made. It was a learning experience.
The only parts that are not TI are the sheet metal band (321 Stainless) and the black screw that is mounting the band (Steel).
All of the small parts came out of that initial bar of 16mm, Grade 2, I bought. The washer and the flat strap are out of a small piece of 2mm thick sheet, grade 5. I did a lot of cleaning up swarf along the way, putting small batches in separate bags so as to not risk anything exciting. It is now all safely at the dump and burried. Most of the tools were HSS with a few brazed carbide lathe tools that were resharpened and diamond honed.
The finned part I finally got right on the 4th try. Most of the issue was in order of operations, I got to a point and then realized I could not hold the part for the next OP.
The final order that worked was with the full bar in the lathe, turn the top taper and cut the grooves for the fins with a 1/16 parting blade. The fins are also 1/16 thick.
Then over to the mill to cut the .081 wide slot in the top for the 2 thicknesses of the band to drop into.
Then spot drill and drill the clearance hole for the 4mm screw half way thru the part.
Tap drill thru for the 4mm screw.
Using an end mill, c'bore to hide the head of the 4mm hex socket head cap screw.
Back to the lathe, turn the taper on the bottom of the part and part off to a bit over length.
Turn the part around and back in the chuck to face off to length, drill and tap the bottom mounting hole.
Back to the mill again to make the final .010 wide cut to the bottom of the .081 slot to free the "nut" part.
Finally tap the nut for the 4mm screw.


I can make anything more dificult.
The 1/4 20 threaded rod was made on the lathe, by facing then center drill and add a lice center to support the end.
Then turn down 5 inches of the 16mm rod to .245. with a LOT of spring passes with a freshly sharpened cutter to get the whole length the same diameter. (I sure wish I had a follower rest)
Due to the center I could not turn it down all the way to the right end.
I then single pointed the thread leaving some unthreaded at both ends. Again a lot of spring passes with a very sharp bit.
I then parted off the end with the center, then the other end.
I slid it into a piece of thin wall aluminum tube to chuck it up to face and chamfer both ends.
The nuts were made by milling the hex onto the end of the bar first, long enough for both nuts.
Then the whole bar into the lathe to drill and tap, and turn the little shoulder, and part off twice.
Then the nut went back in the chuck to face and chamfer the other side.
I used a piece of steel that had a 90° c'sink in the end and a hammer to slightly close the top of the nut to make it self locking and able to still handle high heat.

These are the glorified washers that will go on the top and bottom of the wing, the long one is also the attach point for the catapult release.
These were made out a 2mm x 100mm x 100mm sheet of grade 5 TI.
First I made the round one, on the drill press I used a 1.25 dia hole saw to rough it out. Worked great since I needed a 1/4 dia hole in the center anyhow. I then took a chunk of scrap in the lathe and drilled and tapped 1/4-20, I used this as a mandrel to hold the disc for truing the od to final size and putting on the chamfer, one side only. Done easy.
For the oval part I bandsawed out the blank, drilled the 2 holes and the rest was done on the belt sander. The outside shape is not at all important so I did not bother to set it up on the rotary table to make the ends perfect, and they are not, but it goes on the bottom of the wing so no one will ever see it.

This is the front motor mount.
With the bar mounted horizontal in the mill, I milled the top flat, then side milled the 2 short sides, and the top (side near the thru hole) then drilled the through hole. then put the corner radius on 2 of the edges.
Then to the band saw and cut it off a bit long.
Back to the mill, layed it flat on parallels with the round side up and milled the final side and put in the final 2 corner radii.
Then stood it up to finish miil the bottom to final length, and drill and tap #10/32 thru to the cross hole. The threads are just a bit short as I ran out of tap length but it will be fine.

I am now deep into building the test stand, With some luck It will be done by the end of next week and I can see if I can actually get this monster to light up. I will try to get some video of this. It may be exciting, I have never set up or run any kind of pulse jet before, I am betting I will start some fires before I get it working right and figure out the correct fuel flow rate.
- Joined
- Apr 29, 2019
- Messages
- 2,250
I finally finished building the test stand for my pulse jet engine Filled it with fuel. charged all the batteries, ready to go outside and clamp it to the picnic table for testing, and it started to rain........... Expecting rain and/or snow for the next week..........
- Joined
- Apr 23, 2018
- Messages
- 6,856
I wonder how small a pulse jet can be made and still work. Since 200 mph is too quick for me, and loss of visual contact can be less than 5 seconds in any direction, I'm thinking a thimble-sized 1/2-A would be fun.
I hope you post video when you maiden that speed sled!
I hope you post video when you maiden that speed sled!
- Joined
- Apr 29, 2019
- Messages
- 2,250
There are smaller pulse jets like the Dynajet. My pulse jet is around 18 lbs of thrust the Dynajet is around 3 lbs. Speed is not so much dependent on the power source as on the aerodynamics of the air frame.
The same supplier of this airplane has another model (Virus) that will cruise at around 300 MPH. I was not sure my reflexes were up for that so I got this "slower" version that only does 250 MPH.
The same supplier of this airplane has another model (Virus) that will cruise at around 300 MPH. I was not sure my reflexes were up for that so I got this "slower" version that only does 250 MPH.
- Joined
- Apr 29, 2019
- Messages
- 2,250
Here is some more info on the smaller Pulse jets.
There are being flown on control lines and are built for speed with the small dynajet pulse jet.
This is the same size PJ on an airplane that was not built for speed.
And this is an example of this plane and engine combo that I am building.
There are being flown on control lines and are built for speed with the small dynajet pulse jet.
This is the same size PJ on an airplane that was not built for speed.
And this is an example of this plane and engine combo that I am building.
- Joined
- Apr 23, 2018
- Messages
- 6,856
I watched the pulse jet control line video a couple years back. Still had the same thoughts watching the old boy hold on tight on the control while literally running around the center pole. Three laps is all it took to go from 200 mph and generating lift to falling out of the sky- not good glide characteristics. I am sure your delta jet will give you enough glide to line up for a good approach to land.
Control line................. Might as well plug an electric plane in with an extension cord and eliminate expensive batteries. I've flown rc for almost 40 years, always wondered why control line continued after the invention of radio control.
