Atlas 10f Reverse Gearbox Bearing

louosten

Registered
Registered
Joined
Oct 11, 2013
Messages
90
Greetings to All;

I just discovered that the bronze bearing in my reverse gearbox is worn (and loose)...probably should not run the machine in this condition. I did not see a post for this repair (pressing old bearing out, and new one in). I did see a few Ebay posts for used gearboxes at the princely sum of $200 or more.

Has anyone made this repair, and if so what was the source of the bearing material? Thanks in advance!

Lou O.
 
Lou,

According to the 10F Illustrated Parts List, there are no bushings in the Reversing Gear Box.
 
Robert;
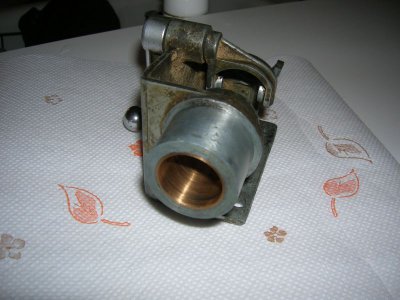
You're right about no bushings shown in the parts list, but there clearly is a busing in the housing, as evidenced by the following pics:
gearbox1.jpg

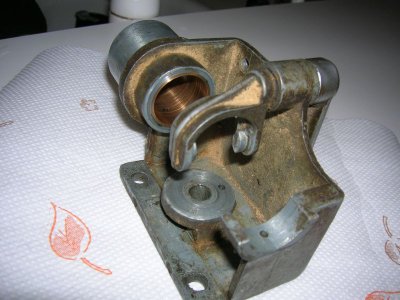
As near as I can determine, it measures 1" ID x 1 -1/8" OD x 1 3/4" L. Don't know what the housing is made out of, but it should be able to be heated and the old bearing/bushing pressed out with the correct tool. A new one with the above measurements may need some tweaking to fit, but it seems possible. I think this 10F I'm working on had a train wreck in a previous life, and the bearing took on some unwanted loads...here is a pic from the other side:

gearbox2.jpg

Any advice on this proposed repair would be welcomed!

Lou O.
 
Just watched a Kieth Fenner video on youtube where he does a boat housing of some sort (very similar) He tig welded a round disk near to the end of the bushing inside of it as it cooled it shrunk the bushing and he pressed against the disk to get bushing out. It is a thought anyway
 
The gearbox casting is Zamak.

The following has been edited.

I would use a hydraulic press (don't use a hammer). Remove the selector first and make a support block long enough to sit across the press rails. Bore the block through 1.125" +.005/+.010. Counterbore to the diameter of the casting that holds the bushing +.005/+.010 to a depth of at least 1". Make a piloted driver to push with. The larger diameter to do the pushing would be about 0.010" under the diameter of the hole through the casting (1.115" if the hole is 1.125") and the pilot (smaller diameter) about 0.990". Or use your bearing and bushing removal and installation kit if you have one. Warm the support block and housing to about 175 F for both removal and installation, and work quickly. Use an oven or hot water, not an open flame. The installer should have the same smaller diameter pilot but about 1-1/4" to 1-3/8" for the larger diameter so that it will stop with the end of the bushing flush with the housing. If you have to make the removers and installers, make the 1" nominal diameter pilot about 3/4" long and the larger diameters 1/4" to 1/2" long.

If you don't have access to a press, you could also use the above parts but drill through the installer and remover for a piece of 1/2" to 3/4" all thread. And make a drilled through shouldered washer for the bottom of the support block. The support block thickness will have to be increased to give room for the old bushing as it exits the housing. But you could make it out of heavy wall tubing.
 
Last edited:
Just curious, I hope the bushing is not placed in the mold prior to the casting being made!
Pierre
 
Well, I am not certain whether or not I ever saw a photo of a gearbox housing at that approximate angle. But if I ever did, it didn't have a bushing in it, as that I think I would remember. The parts list does not show a bushing. And I don't know of any other case where Atlas used bushings in steel or Zamak parts where the bushing wasn't shown as a replaceable part.

Correction - Bushing 9-26 is called out on the 9" and early 10" (pre-10D) parts lists.
 
Last edited:
hThere is a video shows how to remove a bushing where he repairs the QC Box on an Atlas lathe.
Approx. 13 minutes in he shows the process.


The process involved turning a Stepped Part( I think he used a Washer in some places) that fit inside the bushing with a LIP that was just smaller than the OD of the bushing.
Then a 2nd part (he uses a socket here) was turned to place on the opposite end that supported the casting.
Both parts were center drilled for a bolt.
As the bolt is tightened the Lipped part pulls the bushing thru the casting.

The Zmak MUST be fully supported as it is very easy to break it.

Look up his video It may help.
 
Last edited:
I'd be super careful if you intend to heat that zamak with an open flame torch.

I don't have a lot of experience with zamak, but the few scrap bits I've toyed with melted pretty quickly when hit with a torch...
 
Back
Top