-
Welcome back Guest! Did you know you can mentor other members here at H-M? If not, please check out our Relaunch of Hobby Machinist Mentoring Program!
You are using an out of date browser. It may not display this or other websites correctly.
You should upgrade or use an alternative browser.
You should upgrade or use an alternative browser.
ARC-170's Craftsman 101.07403 lathe restoration thread
- Thread starter ARC-170
- Start date
- Joined
- Dec 25, 2011
- Messages
- 10,552
I would. But first mark the pieces so that after cleaning, you can put everything back exactly as it was. And one of the few places on an Atlas where you should use grease instead of oil is on the scroll where you can't later get oil in reliably. My 6" Pratt-Bernerd has a grease fitting for that.
- Joined
- Dec 25, 2011
- Messages
- 10,552
I'm not really sure what the generic description would be. I would suggest looking on the manufacturer's web site and on machine tool suppliers sites for something where they specifically describe it as good for use in 3-jaw and 6-jaw chucks. Buy one tube or other container of it and never use it for anything else. It might even be described as chuck grease. 
- Joined
- Oct 17, 2018
- Messages
- 966
43. CLEANING THE CHUCK (con't)
I soaked it in Simple Green for a few days. Got it nice and clean.
So I did some research on what to use for lubrication. The chuck lubrication debate rages on the internet!
Moly-graphite grease seems to be a popular choice. Some people don't like grease because it attracts swarf. Others use oil, but sparingly so it doesn't fling off. Others use spray graphite. My machinist colleague at work says any machine grease is fine for my application, which is occasional hobby use.
The MOLO states: "Keep the chuck clean and do not oil excessively--a light film on all working parts is ample." It also states that "...sticky jaws indicate that the chuck should be taken apart for a thorough cleaning." It goes on to say "When reassembling, do not apply too much oil. Oil collects dust and chips which sooner or later clog the chuck mechanism."
My take is this: If you are using your machine for production then what type of lube you use is more critical than if you are a hobbyist. Use either oil or grease, depending on your situation. And no matter what, clean your chuck once in awhile.
44. TAKING APART THE CHUCK
I took the 3 socket screws off the back, but the plates won't separate. Are they press fit? Is it just the oil film keeping it together?
Couldn't find any decent instructions for doing this. There's a thread on this site, but it completely skips removing the scroll plate. I will make a few attempts while I await all your wisdom!
- Joined
- Oct 17, 2018
- Messages
- 966
I would. But first mark the pieces so that after cleaning, you can put everything back exactly as it was. And one of the few places on an Atlas where you should use grease instead of oil is on the scroll where you can't later get oil in reliably. My 6" Pratt-Bernerd has a grease fitting for that.
The parts are marked with numbers. They are hard to see until you take the parts off.
After doing some research, it seems there are many opinions and no real consensus on what to use. So I went to the MOLO and it says to lightly oil the parts.
I think I can get oil in between the parts and let it soak in. That said, I still may apply a light coat of moly-graphite grease to the scroll.
- Joined
- Oct 17, 2018
- Messages
- 966
43 & 44. CLEANING & TAKING APART THE CHUCK
This was not too hard after all. I loosened the 3 cap screws. I tapped the back plate loose using a wood dowel and a hammer. I then loosened the two screws on the inside, then flipped it over and gently worked the cover plate out. The chuck key gears (the ones the chuck key go into and that turn the scroll) came right out. I had to work the scroll out as well by flipping the chuck upside down and working the scroll out. There is nothing in the exploded parts view that shows a chuck.
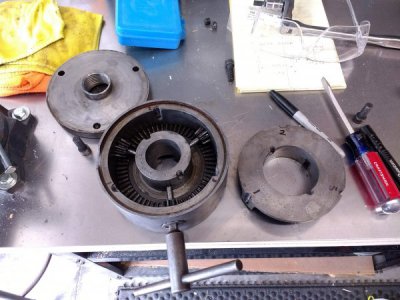
Here's a picture of the chuck pieces:

Upper left is the cover. Middle is the chuck with the scroll and chuck key gears. Right is the inner cover. The two set screws that hold it can be seen to the right of the blue box at the top.
I used Simple Green to clean everything. It wasn't too bad at all; no swarf or grease blobs.
I used way oil to lube all the parts as I put it back together. It's now mounted on the lathe. I'll need to run it and spin the oil off. I can put a cover (probably a box of some sort) over it so the oil doesn't get flung all over the place.
I tightened the cap screws to 31 lb-ft.
The chuck was made by Tralmond Mfg. Co. in Ashburnham, Mass, according to a logo on the chuck. It had a date of Sept, 1942 stamped on the inside.
This was not too hard after all. I loosened the 3 cap screws. I tapped the back plate loose using a wood dowel and a hammer. I then loosened the two screws on the inside, then flipped it over and gently worked the cover plate out. The chuck key gears (the ones the chuck key go into and that turn the scroll) came right out. I had to work the scroll out as well by flipping the chuck upside down and working the scroll out. There is nothing in the exploded parts view that shows a chuck.
Here's a picture of the chuck pieces:

Upper left is the cover. Middle is the chuck with the scroll and chuck key gears. Right is the inner cover. The two set screws that hold it can be seen to the right of the blue box at the top.
I used Simple Green to clean everything. It wasn't too bad at all; no swarf or grease blobs.
I used way oil to lube all the parts as I put it back together. It's now mounted on the lathe. I'll need to run it and spin the oil off. I can put a cover (probably a box of some sort) over it so the oil doesn't get flung all over the place.
I tightened the cap screws to 31 lb-ft.
The chuck was made by Tralmond Mfg. Co. in Ashburnham, Mass, according to a logo on the chuck. It had a date of Sept, 1942 stamped on the inside.
- Joined
- Oct 17, 2018
- Messages
- 966
42. MOUNTING THE LATHE (con't)
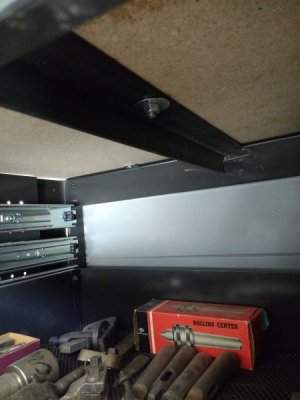
Here is what I've done for now:

This is a picture looking up from below the table. I removed a few drawers from my work bench.
I used 3/4" MDF (don't judge! ha!). I braced it with a piece of 1/8" thick angle iron. The bolts for the headstock go thru the lathe, drip pan, MDF and angle iron.
I'm going to try turning some light cuts and see how it goes. I still need to place the machine where I want it.
Here is what I've done for now:

This is a picture looking up from below the table. I removed a few drawers from my work bench.
I used 3/4" MDF (don't judge! ha!). I braced it with a piece of 1/8" thick angle iron. The bolts for the headstock go thru the lathe, drip pan, MDF and angle iron.
I'm going to try turning some light cuts and see how it goes. I still need to place the machine where I want it.
- Joined
- Dec 25, 2011
- Messages
- 10,552
44. TAKING APART THE CHUCK
The only thing that I know of that Atlas ever published that is specifically on chucks is a 2-page bulletin that is in Downloads at:
There is only one exploded view of the 3-Jaw chuck. It is drawn as a view from the front of the pieces. Unfortunately, it does not actually show the spigot that sticks out the rear of the front half of the split chuck body. When assembled, it extends through the hole shown in the center of the scroll and into the hole bored in the center of the rear half of the body. On lubrication, it only mentions oil. However, without removing the rear half of the body (unlike the scroll threads), it is not really possible to get oil onto the bearing surfaces of the spigot and scroll. That is why I suggested grease at this location only.
More expensive chucks have a grease fitting accessible from the outside of the chuck that somehow delivers grease to this location.
- Joined
- Apr 23, 2018
- Messages
- 6,868
An oiled up Chuck will sling oil for days on end, so be prepared. Wipe it down often. I started using grease and like that it runs cleaner and doesn't pick up much swarf.
