Another single point threading question, sorry guys.

Moderatemixed

H-M Supporter - Diamond Member
H-M Lifetime Diamond Member
Joined
Nov 25, 2015
Messages
335
The background..... a quick history. I decided to make a drawbar to hold a new to me Albrecht Drill Chuck in my Mill. Day 1, 6 hours, 3/8” thread (via Die) perfect, 1/2” thread (via Die) not straight. Morning Day 2, 3/8” thread (via Die) perfect, 1/2” thread, light single point, finished by Die, not straight again. Afternoon, 3/8” via single point, perfect. 1/2” via single point perfect, except......

The material was reduced from .500 to .492 Threads are perfect but the finished diameter is .464 and the nut is loose fitting. So what happened? How do I account for loss of diameter when threading? Thoughts anyone? Yes, this is my first time single point threading but how did I mess up SO badly.

Regards all, and thanks in advance.

Cheers.

Derek.


Sent from my iPad using Tapatalk
 
Is it an adjustable die, or was the die off center? For nice threads, I would nearly always single point to finish size, but a little undersize on OD rarely makes any difference in thread fit; for long threads I use a Geometric die head held in a aloris holder. Button dies are a poor proposition on lathe work, even with a well fitting holder that positively centers and guides the die.
 
I'll jump in, but others may also. First guess, your diameter reduction is you went too far when single pointing. Maybe you went to a chart depth of cut. There are two ways to get there, get close and thread your chuck on (sneak up until you get the fit you want), second get some thread wires and measure them. The first yields matched parts, the second yields a "standard" thread. Following up with dies yields a thread of the die tolerance, if they are not straight, you are not holding the die perpendicular to the lathe axis – lots of die holder videos out there.
 
I think from doing some reading that the answer may be that I went too deep with the thread cutter. I’ll measure the minor diameter and get back to the string.


Sent from my iPad using Tapatalk
 
Check to see if your threading tool is ground to a 60° taper. If it is, it shouldn't reduce the major diameter when you get to the proper pitch diameter. It would only reduce the major diameter if taken well past the spec pitch diameter as it will be cutting down the crest. When properly done, the crest should not be touched by the tool so the major diameter that you initially machined would stay the same.

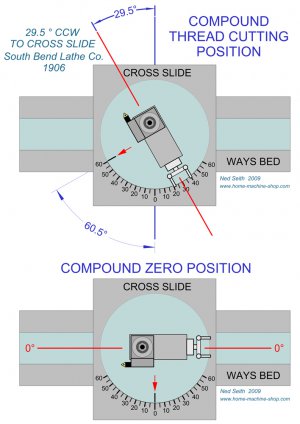
Also, if your are using the modified flank method for infeeding, check that your compound is set to just under 30°, 29.5° is most commonly used. Note the diagram below. If you have a smaller import lathe, most have a limited scale protractor that only goes up to 45° or 50° so if you set the mark on the compound to 29° on the protractor it's wrong & can cause the same issue you are having, it needs to be set at 60.5°. If you did have it set this way it would probably be more obvious as the threads would look funny.

Compound_Thread_Angle.jpg
 
The lathe is an Atlas 10F. I do have a tail stock Die holder so perhaps I should be starting with single point and then finishing with the Die. The dies I used on drawbars 1 and 2 were fixed jaw and I think that I simply started the threads crooked. I measured the minor thread diameter and it is 17.5 thou (.0175) undersized but the major diameter is .4630 29 thou (.0290) undersized. Suggests to me that as I cut the threads deeper, the cutter was peeling OD material at the same time.


Sent from my iPad using Tapatalk
 
I'd also suggest practicing your thread cutting on scrap material until you get all the kinks worked out.
It will be worth it!
Keep at it.
-brino
 
Forget about all the formula crap; start threading on a full size OD and cut until the thread is nearly sharp, then try a nut and take light finish cuts until the nut or gauge fits, then file off the crests to remove burrs, take one more cut to remove burrs from filing; the thread is finished!
 
Forget about all the formula crap; start threading on a full size OD and cut until the thread is nearly sharp, then try a nut and take light finish cuts until the nut or gauge fits, then file off the crests to remove burrs, take one more cut to remove burrs from filing; the thread is finished!

This is how it's usually done. We kept a set of test nuts (shop made, not grade 2) for general threading. Hobbyists seem to get all wrapped up in the precision of the thing. Working in a job shop, just get the damn thing threaded and finish the job.
 
This is how it's usually done. We kept a set of test nuts (shop made, not grade 2) for general threading. Hobbyists seem to get all wrapped up in the precision of the thing. Working in a job shop, just get the damn thing threaded and finish the job.
Amen!!!!!
 
Back
Top