An Unwanted Project

I just found this video that explains how stabilizers work. Apparently I have a few options available. He even shows the loose chains that older tractors like mine have. So yeah, I'll have to get some turnbuckles. That'll fix me right up. I've been putting up with these loose chains far too long. I can't believe I never addressed this earlier. Although, until my Case tractor broke down I wasn't using this tractor as much. The Case tractor is quite a bit larger and has a different kind of hitch entirely.

 
The older tractors ex. Ford used extra bars that had attachment points under the rear wheels. At least that is what 9n, 8n, and Jubilees has. I have the original set for my 8n but that a back burner project


Sent from my iPhone using Tapatalk
 
The older tractors ex. Ford used extra bars that had attachment points under the rear wheels. At least that is what 9n, 8n, and Jubilees has. I have the original set for my 8n but that a back burner project


Sent from my iPhone using Tapatalk
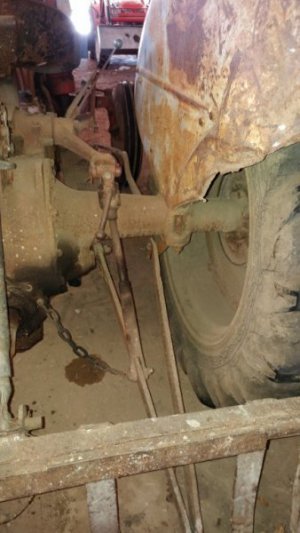
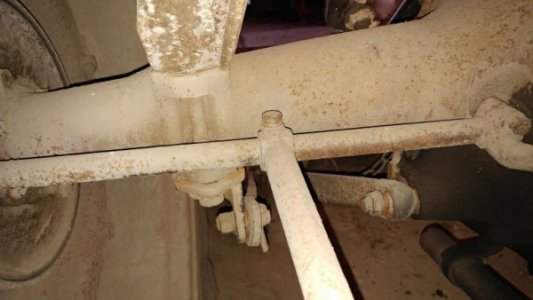
Interesting because the Ford 8N operator's manual and the IT shop manual don't mention the extra bar and its mounting bracket. The bracket is a fairly simple L shape bolted beneath the fender bracket and the arm is also fairly simple 23/8" x 2 or 2-1/2". Neather the bracket nor the arm appear to be home made. Knowing the previous and only other owner of the tractor, it would not have been on his skill set to make this. I suspect that it was an option available when the tractor was purchased. Here is my setup.

Sway Arm  .JPG

Sway Arm Bracket .JPG
 
Mine doesn't have those sway bars or brackets. But it might have originally. I bought this tractor from my brother-in-law. He had fabricated a massive frame that mounts under the tractor to hold a massive snow plow on the front. And the frame he fabricated was bolted on at the bottom of the rear fenders where that sway bar mount would have been. I took that frame off this tractor. I'll try to post pics of it later if I can.

In any case, I rigged up a temporary solution that seems to be working for now.

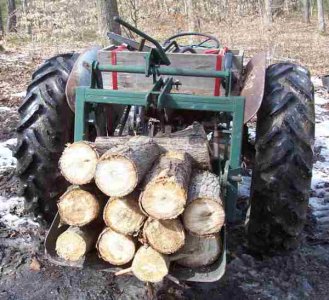
I've been getting firewood in this digging bucket.

290210

And I have been noticing it banging back and forth as it yanks on those chains. And that's why I broke my tractor. I can't believe I'm such an idiot. Ok, scratch that, It actually easy to believe I'm an idiot. I've secretly known this for years. :grin:

It's a good thing I joined this forum or I might have remained an idiot until the day I died.

But now thanks to you guys I'm working smarter.

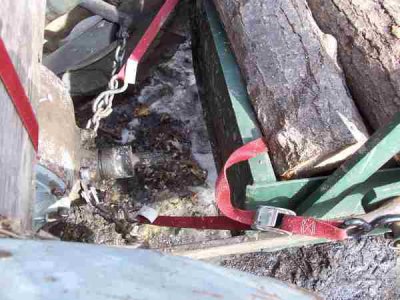
I rigged up a temporary solution using motorcycle tie-down straps.

290211

These are actually working quite well. In fact, you can see in the above photo that both chains are dangling loose which means that the tie-down straps are keeping the bucket centered. It still sways a little bit, but it isn't yanking the chains anymore. No more clanking.

So thank you guys for saving my tractor from future neglect and abuse.

I'll work on obtaining a more permanent fix in the future, but these nylon tie-down straps seem to be working for now. No more chain yanking.
 
It's funny the way we build an affinity with a particular hammer :)

Stuart

It is a joy to use. It's extremely well balanced and feels good in the hand.

I'm building a new workshop and had to drive a lot of 20 penny nails. Using my "regular" nailing hammer I had to tap those 20 penny nails about 5 or 6 times to drive them home. The hammer just wasn't heavy enough. But with this baby it was 1, 2, 3 and that nail is set. So it has become my favorite 20 penny pusher. :grin:

It's light enough that it doesn't feel like a sledge, but heavy enough to get the job done. Very ergonomic as they say. :grin:
 
Several years ago I had to make some "anti-sway" chains for a small tractor doing a too big job. Won't go into details about those days. I started with chains, then went to crossed chains. As in the right chain attached to the left side of the axle gear. And the left vice versa. Eventually ended up with flat bars on a couple of rigs that I kept hitched up for a long time at a stretch.
The reasoning for the crossed links was the size of the created triangle came out closer to even, nearer 45 deg. I wanted 30 deg or less, but went with what I had. I "theorized" it put less stress on the tractor frame. Might be worth considering. That is the point to the post. Those anti-sway bars kept things well centered up when set tight. Just watch out that they mount near the same point as the hitch.
I made a number of mods on the FarmAll "A" trying to adapt several "3 point" implements. Never got around to the hydraulics, but the hitch worked well enough. Biggest problem I ran into was the final drive was actually at the end of the axle, almost inside the wheel hubs. Made for some weird looking hookups.
On the hammer, I usually thought of it as B&O RR, but I'm into trains so figured it was my bias there.
Bill Hudson​
 
On the hammer, I usually thought of it as B&O RR, but I'm into trains so figured it was my bias there.

A fellow train enthusiast. :grin:

I have a whole bunch of trains in the attic in N-scale, HO-scale, and G-scale. The G-scale trains are the common Bachmann Big Haulers. I think I have 5 or 6 sets, along with a few extra cars.

All the ones I have are old steamers

Let me check my list. Here's what I have in G-scale.

2 Liberty Bells

Bachmann-Big-Haulers-Liberty-Bell-Limited-G-Scale.jpg


1 Gold Rush

1_4ba5977c70a77944395f034df7943791.jpg


1 Royal Blue

bachmann-royal-blue-scale-train-set_1_94d4a1f541d91949b309ab1c204011f2.jpg


and 2 Silverton Flyers

silverton-flyer-177-bachmann-electric_1_d3912c26573055563c61aef54912d64f.jpg


I'm attracted to the old steamer. I bought these at a flee market and got them really cheap.

I've been wanting to set up a garden train railroad in my front yard. But real life projects keep getting in the way. :grin:
 
NMRA 2520 Life : Officially, since 1971, unofficially add about 6 more years

I work mostly in HO, occasionally doing something with N or O scale. Early on, I would have liked large scale stuff like that. But as I grew older, went to sea, and then started working for a living, life kept pushing other things in the way. Now that I'm retired, I'm in a wheel chair and this layout is only a quarter done. The machine shop I've built up over time shares the space and my time with my railroading, which chews up even more time than working. Yeah, well... I have been acquiring a piece of brass here and there over the years. But mostly storing it away for use when I retired. Now that I'm retired, I can't do much with it.
My workshop and layout are in a separate building so in cold weather I only get over there when it's warm. I'm a "died in the wool" southerner, if it's less than 70F, it's cold. If it's less than 60F, I stay inside under a blanket, freezing. If it's raining, Wife won't let me out. You probably would be like my dad-in-law, running around here in the dead of winter in a T-shirt. He's in Maine, that's a bit of difference in perspectives.
My railroading goes back to childhood. Over 50 years ago I made the transition from toys to models. A long story, bits and pieces told on http://www.hudsontelcom.com/. Might be worth your while to look around at a few of my trevails that held up my railroading. On the other hand, it's near the end of winter and you're pretty busy. Some day when it's too rainy to work will be better.
Bill Hudson​
 
Nice web site Bill,

I had started an HO scale layout about 40 years ago. But then I had to move and never finished it. The layout was a model of the Union railroad in Pittsburgh PA. It was a fairly small layout but it was complete with a steel mill, a round house, and a coal mine. Here's some photos of the plans for the layout:

In the following picture the brown and green area in the middle is a mountain. There is an entire coal mine diorama in the loop in the brown area. The coal mine is not shown in this drawing.

Below in the pink area is the steel mill with an animated rolling mill. The tiny track is N-scale track used to simulate a small industrial train about the side of a typical fork lift to move stuff around inside the steel mill.

Below that is the "yard" and to the left the roundhouse. This layout is as cramped as HO scale will allow for. In fact, it's actually cramped to the hilt. I used all flex track and make curves as small as my engines and rolling stock would permit. Far tighter radius than used on a typical HO layout.
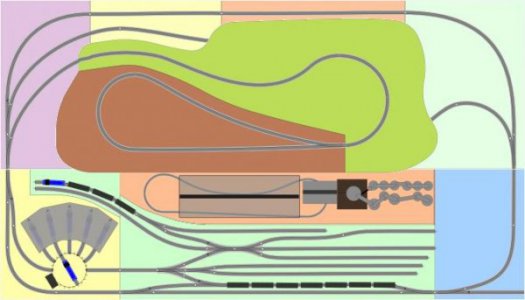
290312

The coal mine mountain lifts off to expose a tunnel underneath. The tunnel allow for hiding one train. So you can have one train go into the tunnel and a different train come out. Nice little optical illusion trick.
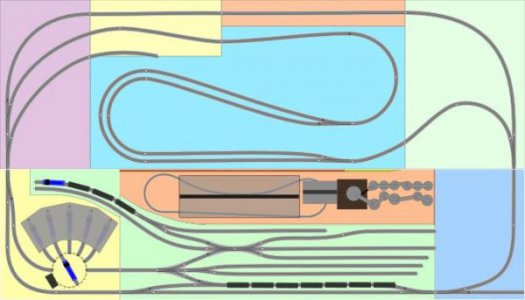
290313

I have all the parts necessary to build this layout in the attic. It was half built at one time but I had to disassemble it to move and never got around to putting it back together again. I should probably sell all this junk because I'm never going to put this back together again.

In fact, at this point if I were going to mess around with model railroading I would rather focus on the outdoor garden train. I have big ambitions there too.

Here's my initial Garden Train plan (not too ambitious)
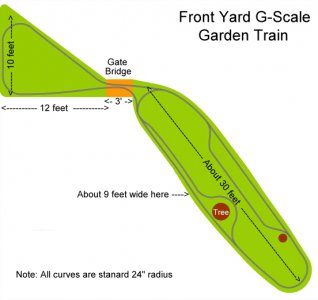
290315

Then I got carried away, :grin:

This is designed based on the terrain in front of my cottage. The gray is pathways. The orange represent draw bridges.
It's a crazy layout. I would love to do it, but I can't find much time to work on it.
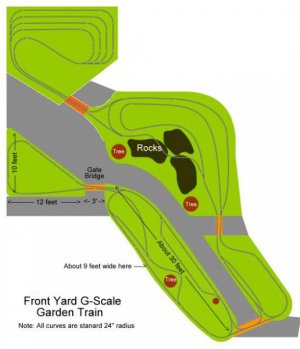
290316

I have too many pokers in the fire, I think the fire went out a long time ago. :grin:
 
Back
Top