Aluminum Sticking To Tool

HBilly1022

Registered
Registered
Joined
Dec 22, 2015
Messages
561
Yesterday was the first time I turned aluminum and thought it was awesome to work with until I started to bore a hole. The tool kept jamming with Aluminum and then would just rub on the surface instead of cutting. I tried difference turning speeds and spraying WD40 into the bore but nothing seemed to work. I kept getting a tapered bore because of it. I had to keep pulling the tool and grinding the Aluminum off the tool and eventually gave up. I finished the bore bore by wrapping emery cloth around a drill bit and running that through the bore until I got it close enough for my little project.

What is the cure for this issue?

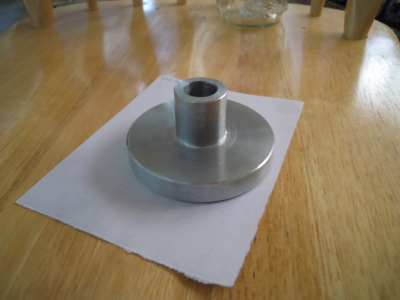
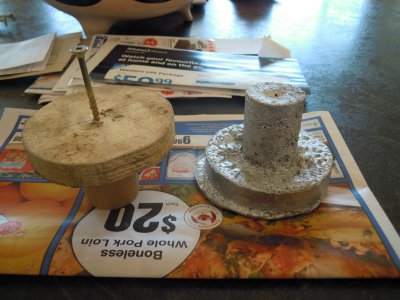
Here's a pic of my first ever casting attempt and my first aluminum turning project.
DSCN2100.JPGupload_2016-2-24_10-57-39.png
 
Good looking part. The possible problem with metal sticking on your tool could be a condition of the recently cast aluminum, not clean enough or something.
I second the use of Bees Wax on the tool. It may be of help.
Good job on solving the boring problem with your intuition.
 
That condition you're referring to is called a Built Up Edge (BUE), a common issue when working with aluminum. The material actually welds onto the cutter, adversely affecting your tool's edge and geometry and scratching up your finish. The best approach is to increase your cutting speed and maintain a feed that is sufficient to produce coiled chips, not long stringy ones. If using carbide there are some PVD coatings that will reduce this but getting the speed and feed correct is still the key.

Oh, nice job by the way!
 
I do a little aluminum casting my self. I generally do lost foam. Your project looks very similar to some that I have done.
As far as the aluminum what Mike said is correct. Fast and steady feed with sharp tooling. Additionally the lubricant. I like to spray them down before and often during operations. I also find that if I stop and let the piece cool down some I can usually accomplish what I need done.

However with all that said, I have ran into a great variation in the castings I have worked on and some just are sticky. I have not figured out the solution to it yet but I think it is perhaps the source of my aluminum and the temperature I pour it at. I have had issues at every phase. My biggest issues are usually at the band saw. I have tried various teeth counts and lubricants. Some times it will blow through it like it is butter and others I have to put the blade back on 5 or 6 times as it yanks them off.

Good luck. I had a wood working hobby for many years but after casting a gear for a camper that I could not find a part for I have spent a lot of time and money for machinery so I could cast items.
 
Good point, Gwarner, and I should have put in that coolant is important. WD-40 is fine for boring but the specialized aluminum cutting fluids work better. I use A-9 but there are others. Coolant often changes the chip from stringy to coiled so it ejects from the bore better. Aluminum requires a pretty fast feed to create the chips you want and I suggest feeding as fast as you need to get the chips to coil. Aluminum coils tend to be smaller than steel but they will coil when you get it right. Go fast - I usually bore aluminum near 2000 rpm.
 
Mikey; the thing I find weir d about this is that when I was turning the outside and taking heavier cuts, everything went well but and when I first started the bore cut, it too went well. However when I started taking lighter cuts to sneak up on the finished ID things went sideways. I started with a small carbide boring bar that I had to grind down to get it into the bore but I noticed the bar was flexing as it went into the bore. Can't get a uniform ID when that is going on so I went to plan B and made a boring bar out of an old engine inlet valve. That was a lot stiffer and I couldn't see any flex, even though I knew it had to be happening when the bore was still tapered. Maybe the smaller DOC had something to do with too. Next time I'll try increasing the feed and watch for chips and I'll see about getting some Bees wax too.

GW; I too have been woodworking for a few years and only recently caught the metal working bug. I now have too many hobbies and not enough time for all of them. I told the wife I'm going to have to retire again so I have more time. In the last few months I've acquired a metal lathe, milling machine, built a forge and started metal casting. I might try the lost foam method next. I cast this part in a metal pail full of sifted wood ashes. I think I added too much water and that the escaping steam caused all the porosity. Maybe the lost foam method will avoid this issue.
 
Good point, Gwarner, and I should have put in that coolant is important. WD-40 is fine for boring but the specialized aluminum cutting fluids work better. I use A-9 but there are others. Coolant often changes the chip from stringy to coiled so it ejects from the bore better. Aluminum requires a pretty fast feed to create the chips you want and I suggest feeding as fast as you need to get the chips to coil. Aluminum coils tend to be smaller than steel but they will coil when you get it right. Go fast - I usually bore aluminum near 2000 rpm.

Guess I better get some cutting fluid if I'm going to keep turning aluminum. I was also running lower rpms than you stated but I was using HSS for a cutter (well it was actually an old engine valve). The valve initially cut very well but just like the carbide, it fouled up quickly.
 
A lot of boring bars have geometry problems that do not allow free cutting. There needs to be enough relief below the cutting edge so the entire bar below the cutting edge clears the bore. Sometimes just turning the bar to a slightly more negative cutting angle will clear the bar away from the bore. Better yet, grind it correctly. Also, make sure your boring bar is cutting on the center of the work, height-wise.
 
"Maybe the lost foam method will avoid this issue.
Lost foam is not with out its own issues, but when it comes to making one off parts that have no draft I can't think if a better way to do it short of a 3d printer or a CNC.

The gear I started with had internal teeth and no draft at all. I tried sand, plaster etc... with no success.After reading about lost foam I went down and cut the gear using my craftsman router recreator in some foam. Glued on a sprew. Filled a bucket with sand from the granddaughters sandbox around the part and my first pour came out not perfect but better than any I had been able to do.

Just to let you know what a bug it is. I have 6 sets of those gears now(Just in case). My neighbors used to come over when they heard the roar of the burner to see what was going on. Now they don't even seem to notice.
 
Back
Top