Aligning a mini-lathe

The contact point for your headstock IS that front rail. Still, with the machining tolerances of import machines there may be enough play to shift the headstock enough to align it ... maybe. If not, then I would file enough material from the contact point of the headstock where it touches the rail so I can move it. As for vertically shimming the headstock, this is rarely necessary and I would not do it unless there is a major error. The reason for this is that once you do it then aligning the spindle centerline with the tailstock becomes problematic vertically, right? Since there is no provision for aligning the tailstock vertically, I would leave vertical alignment alone.

The reason for suggesting a very short 4" stick out is to limit deflection. Using a long rod will defeat the purpose of this test. 4" is short enough that a sharp properly ground HSS tool will take a 0.001" deep cut with very minimal deflection, thereby giving you a very accurate test. My Emco lathe is aligned this way and a tenths indicator cannot detect any deviation. My Sherline lathe has been aligned like this maybe 50 times or more, probably more, and I can get the headstock aligned to zero deviation using this method.

Over the years, I've tried just about every headstock alignment method I've ever heard of except for using a MT test bar; I don't trust the stacking tolerances part of that method but that is just my personal bias. This test cut method has been the most reliable, repeatable and accurate method for me so I use it. If a test cut made with a good tool using the ways/saddle/tool post of the lathe being tested produces a cut on a rod that shows no deviation over a 4" run, and that rod is heavy enough not to deflect from cutting forces, then the headstock pretty much has to be aligned with the ways, don't you think?

While I'm at all of this, my personal approach to set up is to align the headstock, then level the lathe, then align the tailstock - in that order. If the headstock is off axis then everything else you do will also be off. Think about it.
 
Wasn't serious about doing the vertical, as it's 3 tenths over 9 inches. That's in the "leave that one alone" category. Horizontal is 6 tenths, so might try to correct that. First I'll see how hard it is to get access to those bolts.

Ok, will chop off a piece of the 2" aluminum. I have a 1-2" micrometer to measure. Just get it round first then take a fine 0.001 cut, using a nice sharp HSS tool?

@mikey When you say level the lathe, you mean check for twist, correct? You actually mean check that the level of the ways near the headstock is the same as near the tailstock? How good of a level is needed? Could one get away with a $60 evilBay level? On a limited budget, so want to minimize expenditures on low usage tools.

As for the tailstock, mine's off in both dimensions by a few thousandths. (What a surprise...) Horizontal is easy to fix. (If I can free up the screw - it doesn't want to move) Don't recall if the TS is high or low. Measured it once, but have forgotten what it was. Fixing the vertical offset seems to be a bit of work.
 
Ok, will chop off a piece of the 2" aluminum. I have a 1-2" micrometer to measure. Just get it round first then take a fine 0.001 cut, using a nice sharp HSS tool?

Yes, get it round and smooth, then take a very light cut to minimize deflection and measure the rod. If the headstock is aligned correctly it will read the same all the way down the rod. If it does not, move the heastock until you get a cut that does read the same all the way down the rod.

@mikey When you say level the lathe, you mean check for twist, correct? You actually mean check that the level of the ways near the headstock is the same as near the tailstock? How good of a level is needed? Could one get away with a $60 evilBay level? On a limited budget, so want to minimize expenditures on low usage tools.

Yes, when I say to level the lathe I mean to remove all twist from the bed. As for how sensitive a level is required, a simple Starrett 98 will do it but a more sensitive level in the 0.0002"/foot range will be faster. Both will work and you will still have to do a 2-collar test after using either one. The difference is that it will take a lot fewer trial cuts with the more sensitive level to finalize your settings so in terms of time and frustration, the more sensitive level is worth its cost. As for "low usage", your lathe will move over time and require you to recheck level periodically. By that, I mean annually at least and bi-annually if possible. You also need to check it after turning heavy or off-balance work pieces because vibration can loosen settings. I pull my precision level out at least 3-4 times per year and considering how much time it has saved over the years it is certainly worth what I paid for it.
 
Yes, get it round and smooth, then take a very light cut to minimize deflection and measure the rod. If the headstock is aligned correctly it will read the same all the way down the rod. If it does not, move the heastock until you get a cut that does read the same all the way down the rod.

Yes, when I say to level the lathe I mean to remove all twist from the bed. As for how sensitive a level is required, a simple Starrett 98 will do it but a more sensitive level in the 0.0002"/foot range will be faster. Both will work and you will still have to do a 2-collar test after using either one. The difference is that it will take a lot fewer trial cuts with the more sensitive level to finalize your settings so in terms of time and frustration, the more sensitive level is worth its cost. As for "low usage", your lathe will move over time and require you to recheck level periodically. By that, I mean annually at least and bi-annually if possible. You also need to check it after turning heavy or off-balance work pieces because vibration can loosen settings. I pull my precision level out at least 3-4 times per year and considering how much time it has saved over the years it is certainly worth what I paid for it.
Took 0.030 off the diameter of the 2" OD 6061 rod to get to bare metal. Then a 0.001" deep pass. My 1"-2" Micrometer seems to be 0.0003" off from the 1" and 2" standards. At least it is consistent. Since its not clear to me the standards really are any good, won't adjust anything just yet. The average near headstock reading was 1.970233" (6 readings). The average near tailstock reading was 1.969250" (four tight readings). So the tailstock reading is 0.000983" smaller than the headstock. This taper is over 4". I need to do better than this.

The above measurements match my recent boring experience. There was a taper in the bore. Hence this thread.

Thanks for clarifying the usage. It wasn't clear to me that I'd have opportunity to use the level again. If there's some re-use, I can justify getting one of these levels. Are the $60 0.0002"/10" levels any good? Or are they just heartbreak :bawling:in a wooden box?

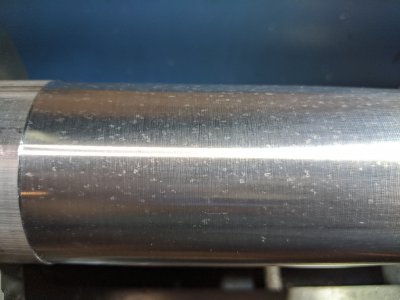
One last question, kind of off-topic. When the 6061 was turned, the finish had little white discolorations on it on a bare metal background. Is this because of the material itself, or due to there being a tiny defect on the lathe tool bit, or something else? I used WD40 as a lubricant and tried Aluminum Tap Magic, both seemed to give the same finish. Kind of speckles.IMG_20200901_145454.jpg
 
Last edited:
Little fine point "freckles" are less common when you use a tool with a large and generous radius. I use one of those circular carbide elements when I am trying to get a very smooth surface.
 
What kind of tool did you use for your cuts? Was it HSS? The finish suggests you used something sharpish but used the nose radius to cut. You will find that the nose radius deflects the most and a large radius will deflect much more than a small one so larger nose radii are less accurate than small ones. You will get a much finer finish by using the end cutting edge adjacent to and just behind the nose radius to make your passes. This will also deflect less, giving you better accuracy; since accuracy is the point here, you may wish to review your technique. This is NOT a criticism of you because you're relatively new and may not be aware of this stuff. I'm trying to tell you those things you need to know to work accurately so you can rely on your results.

If you used a carbide insert then I hope it was at least a CCGT-AK insert with a sharp ground edge. Here, too, you can use the end edge just behind the nose radius to improve accuracy and finish. Just keep in mind that when doing test cuts of any kind during lathe set up (headstock and tailstock alignment and leveling), you should avoid carbide inserts and use a sharp HSS tool that is capable of taking accurate micro-cuts.

Your results suggest the tail end of the rod is closer to your cutting tool than is the chuck end so you would need to nudge the front end of the headstock away from you and re-tighten the bolts. Repeat your cutting tests and adjust again as necessary until you get zero deviation down the bar. Do not rely on a dial indicator run across the front of the rod to tell you if the rod is off; measure the diameters.

If you care about your lathe and its accuracy, you will use that level often. I know we're just hobbyists and all but some of us work to rather tight tolerances and having the machine set up well is important. As to the quality of those import levels, I don't own one so I cannot comment. Others who do own them seem to think well of them for the most part but if I were you I would start a thread and ask. I own a Kinex level; that one is very good.

As to the tiny flecks, I don't know if there are inclusions in the material or not. I don't see them when I turn aluminum.
 
What kind of tool did you use for your cuts? Was it HSS? The finish suggests you used something sharpish but used the nose radius to cut. You will find that the nose radius deflects the most and a large radius will deflect much more than a small one so larger nose radii are less accurate than small ones. You will get a much finer finish by using the end cutting edge adjacent to and just behind the nose radius to make your passes. This will also deflect less, giving you better accuracy; since accuracy is the point here, you may wish to review your technique.
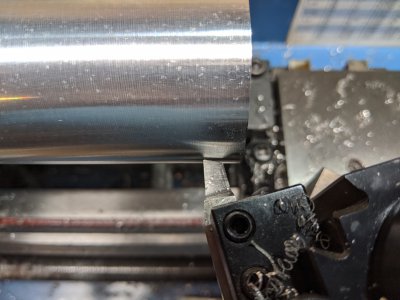
It was HSS. A general purpose square tool, similar to post #21 of the models-for-grinding-hss-tools thread. It is quite possible that I'm using it incorrectly. I find the tips of my HSS tools are prone to breakage. Sometimes the tips break below the point. Can you show me a picture of the correct angle of the tool relative to the work piece? This is how it was set up for all the cuts. (Except it was actually cutting!) You can see the chips of the last cut sitting on the tool holder.
IMG_20200901_163014.jpg
I do have some TCTGT carbide inserts, which do leave a nice finish, especially when new. If I recall correctly they have a 0.007" nose radius. But, I was following your guidance to use HSS.

I don't see the flecks when cutting with new sharp carbide. My guess is there is a defect on the cutting tip or edge of this HSS tool bit. All the tools I've ground seem to develop this problem after a while. They are sharp, and then an edge cracks or something. They never have dulled from use. And no, I don't bang them around or into anything.
 
Last edited:
Okay, try turning the tip of the tool a few more degrees to the left. You are going to use the end edge just behind the nose radius. Just touch the work and make a pass, then come back and feed in a thou and make another pass. Increase your speed and slow your feed. It should make a clean cut with no ridges. Try that and report back.
 
Okay, try turning the tip of the tool a few more degrees to the left. You are going to use the end edge just behind the nose radius. Just touch the work and make a pass, then come back and feed in a thou and make another pass. Increase your speed and slow your feed. It should make a clean cut with no ridges. Try that and report back.
So the tip goes towards the headstock, and the tail goes towards the tailstock? I'll loosen the tool post and rotate CCW a few more degrees.

As for changing the feed rate relative to the speed, alas, this lathe cannot independently control this. The feed rate is proportional to the spindle RPM. I could change gears and change the ratio. The gears are set to 20/80/20/80 right now. I think that is the slowest feed rate relative to spindle RPM, correct me if I am not understanding this correctly.
 
Yes, turn CCW a bit and see what happens. As to feed, just do it manually. It will work better for you.
 
Back
Top