Hi all, I think this is my first post here - been lurking around for the last year or so.
I have an Enco 360 bandsaw I picked up earlier this year. Two things quickly became evident:
- It would benefit from a fence, which was a nice little project to make
- The gap in the table for the blade is far too large for detail work or small parts.
This saw seems to be designed for grunt work light commercial use, maybe on larger sheet metal or other parts where "whoops it got sucked into the table" isn't a concern.
However in the home shop, once I cleaned up and started using this saw ... it was unsettling to work on any small parts, or parts with small off-cuts. Especially if small parts got sucked into the table, it was terrifying to picture a finger going down with it.
So I have been thinking for a while about how to add a pocket for a zero-clearance insert, and in the last few days spent some shop time implementing it.
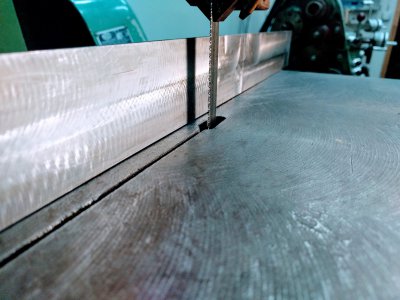
Here are a couple "before" pictures showing the size of the hole in the table for the blade. I believe the blade is 1/2" wide, for scale. The "blade passage" hole is a roughly .380" wide and 1.280" long oval.
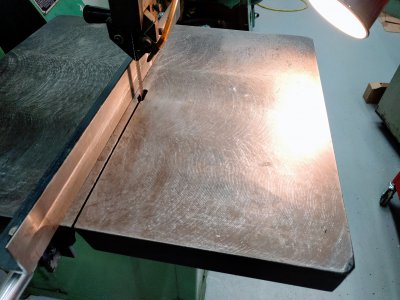
This table measures approximately 20x22". My mill is a Rockwell 21-100 with a 24" table. This *barely* fit the bandsaw table on it, with 1" to spare on either side for clamping. The ends of the table beyond the t-slots are not part of the table casting and are only held on with fasteners to collect coolant and hold the bearings for the Y axis screw, etc... so I avoided clamping against this with the step block. I had to use the smallest step blocks with 1-2-3 blocks to stay within the 1" clamping area past the bandsaw table.
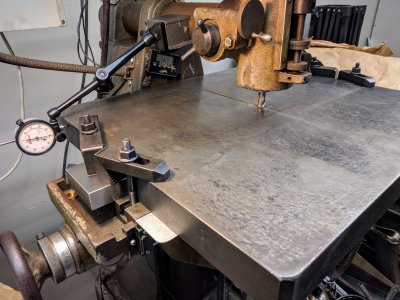
I had under an inch to spare on reach with my dial indicator stand when sweeping to square the table up to the mill, and that still required getting creative with where the base was attached.
A lot of luck was involved in this setup. The table appears to have been machined on all sides, with the X and Y sides of it actually being square to one-another; and the top was surprisingly flat: zero runout across the 3-4" that I swept, just surface deviation. That is, the top was coplanar with the bottom surface, so it could sit straight on the mill table.
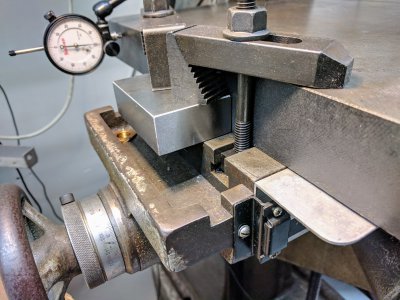
Close-up above, of the clamping setup used on both sides.
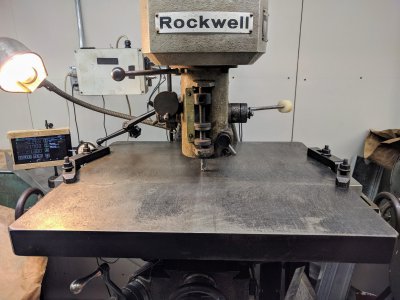
From the front you almost can't tell there's a mill table underneath this, looking like some crazy person bolted a plain machine table onto a mill.
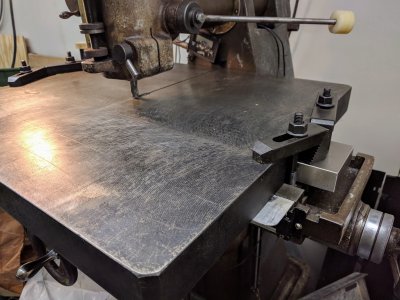
My luck continued from here. The blade passage is not exactly centered on the table, it is an inch closer to the operator side of the bandsaw (facing the column of the mill here). If I run the mill X axis all the way towards the column, the bandsaw table hit the column just at the point where the pocket could end.
I wanted to use a 1" end mill with slow feeds and speeds to make a proper oval. However my 1" end mill is long... which would force me far enough down in the Z axis that the bandsaw table would hit the ways for the Z axis, losing roughly an inch of travel that was required. I ended up having to use a 1/2" end mill, and had just enough travel to come .300 past the blade passage in the table.
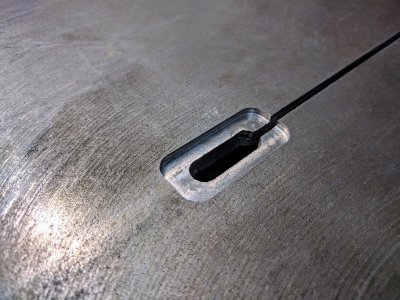
The resulting pocket is .875" wide, .125" deep, and 1.934" long - the latter dimension was a result of the limited travel, the length of the blade passage, and maintaining symmetry on both sides of the passage.
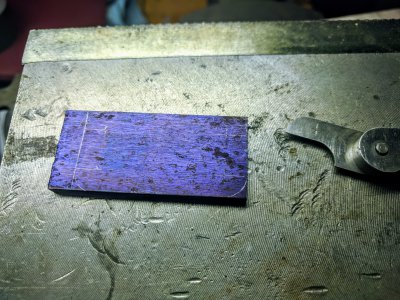
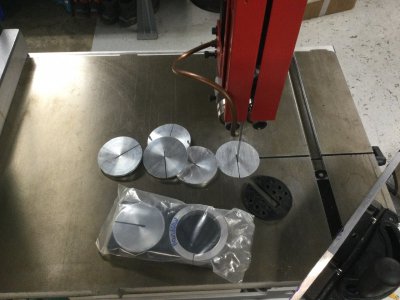
Laid out the insert on a 1" piece of bar stock. I ended up making two - the second one was much faster since I could now use the bandsaw to nip the corners off without having the off-cuts get drawn into the table (or the part getting unstable near the edge of the passage)
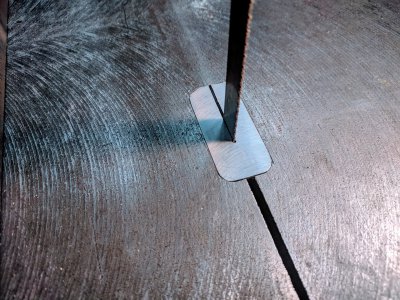
The stock was a bit over .125" thick, and I don't think it sat 100% flat in the pocket - so I took a quick pass with a shell mill to knock .010" off and add a nice surface finish. Then put the fence against the pocket and pushed it into place (with pushsticks) while the saw was running.
Thanks for reading. This upgrade should make the saw much more comfortable and safe to use for our intended purposes for years to come. I hope this helps anyone trying to envision a similar change in their shop, it was worth the couple hours of thought and execution! I cannot tell you how much luck was involved in being able to do this on my mill, with this particular bandsaw table. My dreams of using the mill to refinish this table's rough machining marks are pretty much dashed, and that's ok
I have an Enco 360 bandsaw I picked up earlier this year. Two things quickly became evident:
- It would benefit from a fence, which was a nice little project to make
- The gap in the table for the blade is far too large for detail work or small parts.
This saw seems to be designed for grunt work light commercial use, maybe on larger sheet metal or other parts where "whoops it got sucked into the table" isn't a concern.
However in the home shop, once I cleaned up and started using this saw ... it was unsettling to work on any small parts, or parts with small off-cuts. Especially if small parts got sucked into the table, it was terrifying to picture a finger going down with it.
So I have been thinking for a while about how to add a pocket for a zero-clearance insert, and in the last few days spent some shop time implementing it.
Here are a couple "before" pictures showing the size of the hole in the table for the blade. I believe the blade is 1/2" wide, for scale. The "blade passage" hole is a roughly .380" wide and 1.280" long oval.


This table measures approximately 20x22". My mill is a Rockwell 21-100 with a 24" table. This *barely* fit the bandsaw table on it, with 1" to spare on either side for clamping. The ends of the table beyond the t-slots are not part of the table casting and are only held on with fasteners to collect coolant and hold the bearings for the Y axis screw, etc... so I avoided clamping against this with the step block. I had to use the smallest step blocks with 1-2-3 blocks to stay within the 1" clamping area past the bandsaw table.

I had under an inch to spare on reach with my dial indicator stand when sweeping to square the table up to the mill, and that still required getting creative with where the base was attached.
A lot of luck was involved in this setup. The table appears to have been machined on all sides, with the X and Y sides of it actually being square to one-another; and the top was surprisingly flat: zero runout across the 3-4" that I swept, just surface deviation. That is, the top was coplanar with the bottom surface, so it could sit straight on the mill table.

Close-up above, of the clamping setup used on both sides.

From the front you almost can't tell there's a mill table underneath this, looking like some crazy person bolted a plain machine table onto a mill.

My luck continued from here. The blade passage is not exactly centered on the table, it is an inch closer to the operator side of the bandsaw (facing the column of the mill here). If I run the mill X axis all the way towards the column, the bandsaw table hit the column just at the point where the pocket could end.
I wanted to use a 1" end mill with slow feeds and speeds to make a proper oval. However my 1" end mill is long... which would force me far enough down in the Z axis that the bandsaw table would hit the ways for the Z axis, losing roughly an inch of travel that was required. I ended up having to use a 1/2" end mill, and had just enough travel to come .300 past the blade passage in the table.

The resulting pocket is .875" wide, .125" deep, and 1.934" long - the latter dimension was a result of the limited travel, the length of the blade passage, and maintaining symmetry on both sides of the passage.

Laid out the insert on a 1" piece of bar stock. I ended up making two - the second one was much faster since I could now use the bandsaw to nip the corners off without having the off-cuts get drawn into the table (or the part getting unstable near the edge of the passage)

The stock was a bit over .125" thick, and I don't think it sat 100% flat in the pocket - so I took a quick pass with a shell mill to knock .010" off and add a nice surface finish. Then put the fence against the pocket and pushed it into place (with pushsticks) while the saw was running.
Thanks for reading. This upgrade should make the saw much more comfortable and safe to use for our intended purposes for years to come. I hope this helps anyone trying to envision a similar change in their shop, it was worth the couple hours of thought and execution! I cannot tell you how much luck was involved in being able to do this on my mill, with this particular bandsaw table. My dreams of using the mill to refinish this table's rough machining marks are pretty much dashed, and that's ok

