2020 POTD Thread Archive

made some new jaws for my HF 4x6 bandsaw
IMG_9361.JPG
IMG_9365.JPG

more details here
 
I find it hard to understand why on most of these machines, the jaws never come up to the blade in any position. Always having to cobble together a sub jaw etc etc to make safer cuts. Pierre
 
I don't know either. The original moving jaw could be shifted closer to the blade, but then the guide rollers would hit it. There was lots of frustration that went into the design of these :)

Also made a cute little gear puller to get a gear off my circular saw motor (doesn't work anymore)
IMG_9367.JPG
IMG_9368.JPG
IMG_9369.JPG

motor still doesn't work after taking it apart further, but at least I have the gear off now!
 
I finally had the chance to cut my first gear. I'm trying to install a heavy 10 hand lever collet closer, and I wanted to use an original-style gear (one of those long ones). I cut one blank already, but realized I forgot to add the gear width itself, so I had to re-cut it (it was a half inch too short - I might thread the end of the bad blank and add a chunk of metal just to finish this one). Anyway, setup was a bear. I should use a self-centering chuck on the indexing head, but I only had a 4 jaw independent. I finally got it centered, then I got the axis centered for the mill and proceeded to cut :

20200404_105630.jpg


20200404_112553.jpg


20200404_113603.jpg


20200404_113609.jpg


Now, I had added a boss in there because I wanted to be able to bolt on a plate I can use for a lathe brake (I really don't like putting it in back gears to remove stuck chucks). Because Harbor Freight mini mills don't have room, I had to move everything to the drill press (and change the direction the chuck was holding it to get the boss to the outside). Again, setup was the pain. Once done, three holes that I can tap.

20200404_131611.jpg


20200404_134901.jpg


I'm pretty stoked! I only need to cut the keyway now.
 
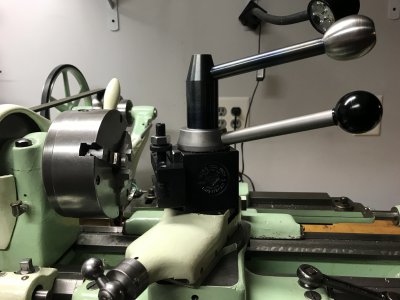
I finished my Aloris tool post nut-handle. I made the ball on the handle from 304 stainless today. I plan to “blue” the nut and handle (which are hot rolled steel). Looking forward to not having to look for the wrench every time I want to adjust the tool position.

I did an “oil blueing” treatment to the nut and handle this morning. The part should not see much abrasion/wear and I just wanted a color change and a little rust resistance. I think it came out pretty good for my first time. It was pretty easy too - just heat up gradually until it reached a nice blue/grey and then dunk it in oil to cool down. I used some black epoxy to permanently affix the handle and knob.
 

Attachments

  • 1CFA54B5-18B7-4E8A-8A20-D7C9DE5635D8.jpeg
    1CFA54B5-18B7-4E8A-8A20-D7C9DE5635D8.jpeg
    2.1 MB · Views: 53
I did an “oil blueing” treatment to the nut and handle this morning. The part should not see much abrasion/wear and I just wanted a color change and a little rust resistance. I think it came out pretty good for my first time. It was pretty easy too - just heat up gradually until it reached a nice blue/grey and then dunk it in oil to cool down. I used some black epoxy to permanently affix the handle and knob.

That looks pretty good!
 
Had to take a break from the barrel work.

Nothing high tech, just a simple 2 collar test bar. 1-1/8 drill rod, 3-1/2 inch aluminum discs from eBay. Bored them to slide through the rod and stop at the knurled section. Pressed the discs to position with the 20 ton shop press. Just for added insurance I spread some retaining compound on the knurling before I pressed the discs into the rod.

The rod ends were drilled and single point cut the centers.

Had a test bar before made from 2 inch bar stock, but a pressing project forced me to sacrifice it.

This new one should last a long time.

20200404_215348.jpg
 
In the shop, I finally got round to mounting my York vise / Power arm combo that I restored and had been sitting on my bench for god knows how long. I've made some plates that are mounted under the bench with threaded holes for the power arm and the original fixed vise that I had mounted there - that way I can swap them out whenever I want to. The plates are held in place with some counter sunk screws.

IMG_0890.jpeg
IMG_0891.jpeg
IMG_0892.jpeg

Whilst I was doing that, the 3D printer was going in the study - and the first lot of parts for my larger shop vac hose have been sorted out. The parts are held together with the snap ring in the front of the pic, and it allows the two other parts to rotate. It took a while to figure out the correct thread to connect to the barrel of the vac (it's M68x5, but I eventually made it M65.5x5 for a smoother fit - this meant editing the Fusion 360 thread files to create the profile). The 'thread' for the corrugated hose that will go in there is a 2mm triangle section spiral with a pitch of 6mm.

IMG_0896.jpegIMG_0899.jpeg

I'm now busy printing out the hose cuff that goes on the other end of the hose, along with some tools to connect to it.
 
I like those 3D-printed vacuum adapters. The guy who first taught me to machine in the college shop, Fred, said when he retired that his greatest advancement was splitting the vacuum hoses in the middle so clogs could be cleared. He was a huge champion of the vacuum and hated air nozzles, which push chips and grit in deeper.

I made a printed nozzle to clean out my T-slots:
8cd4e2bcefcd836c376c286535a91328.jpg
 
Back
Top