2020 POTD Thread Archive

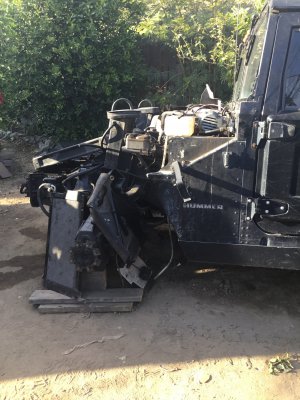
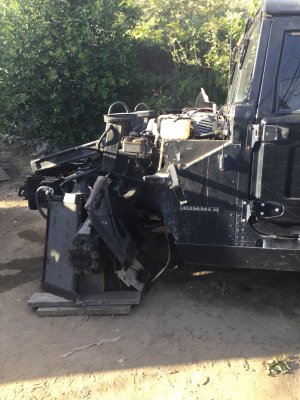
Last summer I put my H1 on its roof
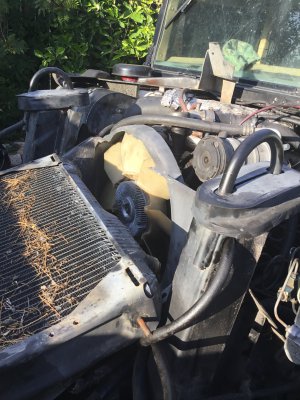
today I started the repairs
i took the tires and rims in for repairs and balancing.
the radiator is ready to be taken in for acid cleansing and repairs.
I have replacement mirrors and what install them after the roof is fixed and repainted
 

Attachments

  • 356E2AEC-F7BD-4F88-90CA-9D20D041693E.jpeg
    356E2AEC-F7BD-4F88-90CA-9D20D041693E.jpeg
    1.3 MB · Views: 84
  • 5D8E59E5-5EBD-41B0-A23A-00AC8DB94295.jpeg
    5D8E59E5-5EBD-41B0-A23A-00AC8DB94295.jpeg
    1.1 MB · Views: 86
  • 8B06F938-12B0-4659-BD35-38E8352EC0F6.jpeg
    8B06F938-12B0-4659-BD35-38E8352EC0F6.jpeg
    1.5 MB · Views: 86
3/32" steel! WOW overkill, no wonder you are changing to something more manageable.
Well, it worked for him at the time, but. . . He made a frame from 1" square tubing and tack TIG'd 0.090" steel panels in place. He cut a couple of access holes in the back to access the ATC. He is 30 and had no problem hopping up into the enclosure to clean out chips, etc. I'm 60 and didn't need to get steps on my Fitbit by climbing around the machine.

Biggest problem was he didn't manage the coolant back to the chip pan very well. Coolant hit the steel panels and ran down and out the gaps in the panels/tubing. He caulked up everything, but the enclosure had to be cut apart to get it off the mill.

I figure everything needs to be managed like a roof. Shingle everything back to the chip pan. I won't be 100% successful, but should be close. I tend to go heavy on the flood coolant and it sprays everywhere. Figure there aren't too many downsides to too much coolant as compared to not enough. I was cutting some stainless on my Bridgeport CNC mill once and the mist coolant ran dry. I was working ten feet away, cutting sounded "funny". The carbide end mill was glowing orange, flutes totally filled with welded in chips.

Bruce
 
Yeah, machine containment has to be properly designed. We have one Haas that is nice and tight but another has a small irritating drip that hits the floor in the foot traffic area. Had to put rubber pref mat there.
Flood coolant works but not the end all. We were cutting a CU/MO matrix material and the parts were potato curls when done. Took a long time to figure it out. Between tools and coolant, it was the amount of coolant that was too much. It was counter to what we all knew.
 
Been working on some AXA tool holders. I decided to cut the dovetail first, so roughed out the slot and used a dovetail cutter from there. I went about 0.100 from each side and wound up slightly over the size I was aiming for, measure earlier next time. Doesn't matter for this though, I have a couple that are a little bigger than this and they work fine. Pulled the post from the lathe and it fits up nicely and locks securely.

View attachment 318521

I just used a ruler on the bandsaw, then milled them square again. Wound up with a 0.020 max height variation. Other than two intentionally short ones. The short ones were the last bit of the bar. Could have made one full height and scrap or two little ones. Figure I can cut them for 1/4" or maybe make a couple of boring bar holders for micro100 and similar size tools.

View attachment 318524

Leaning towards not leveling the others out. I have close to that much difference in the Chinesium holders I have from various sources.

Still need to cut the tool slots and drill/tap the hold down screws. Thinking about ordering a bag of cap screws from McMaster for them and the other ones to replace the grub screws.
I'd really like to make some tool holders, but I've never used a dovetail cutter. What is the procedure? I mean, do you use a end mill to cut out the bulk then come back in with the dove tail tool?I assume the you must take very small DOC? I understand that is different depending on the power of your machine, but dovetail tools seem so delicate. Would just love a little advice before trying...
 
Yes hog out the material with a straight mill. Then follow up with many passes only feeding in side ways (this is the way I do) to form the dovetail. Be sure that the holder for the tool has no oils etc, as the tool tends to be drawn down into the work.

See post #11 It may help

 
I'd really like to make some tool holders, but I've never used a dovetail cutter. What is the procedure? I mean, do you use a end mill to cut out the bulk then come back in with the dove tail tool?I assume the you must take very small DOC? I understand that is different depending on the power of your machine, but dovetail tools seem so delicate. Would just love a little advice before trying...

I used a 3/4" rougher to remove the bulk of the material. I just matched the size of the slot on the existing holders. Well, I averaged the size anyway. They don't need to be precise, and the import ones take full advantage of that. The domestic might too, I don't own any to compare.

I then ran a normal 3/4 end mill to smooth everything out and take the last 0.020 or so. Probably not necessary as I got a good finish with the rougher.

Then used the dovetail cutter. DOC maxed at 0.040, but only for one pass. I went lower after that as things got hotter than I liked. As you go further into the cut, you use more of the cutter. It's a form tool. I found 0.020 to work great even with most of the cutter engaged.

There are tons of videos on YouTube showing the process, tricks for measuring and such. The actual cut isn't hard though.

The tool I used is from Randy Richards. He has a YouTube channel and makes them for sale. A bit more expensive than the cheap HSS cutters, but uses a carbide insert and is very durable and well made. I found a few reviews saying that the import (cheap) HSS cutters don't hold up. Comparing pricing for name brand tools this one was very reasonable. He has videos that show making tool holders and the dovetail cutter. I could have probably made my own, but figured I already had enough projects for the moment.
 
I made some spinning tops for my nephews at Christmas time and decided to build another for myself today. I made the outer ring from brass and the center from 6061 aluminum. Bearing is 4mm press fit. Maiden spin was just over 12 minutes.
I found out it's pretty hard to get a good photo of shiny things.

ZhfRl9Q.jpg


DcN5xS9.jpg


9YTvvIL.jpg
I like shiny things.
 
Got tired of fumbling for the allen key for my micrometer stop, I use it routinely because I use an integrated proximity stop system on my ERL-1340. I made new micrometer lock bolts/levers out of O1 steel, the bolts are a M10 1.5 thread on the bottom. The locking bars slide through holes at the top of the bolts, the levers have a pressed in cap on one end and a threaded cap on the other end. I use a spring with a brass pin that fits into the center of the top of each bolt and applies pressure to the sliding bars to keep them in place. Works well, and one less allen key that I do not need to keep track of. Fun project for the day given that I am house bound these days. Stay well, be safe.

20200329_171721.jpg

Unlocked
20200329_174501.jpg

Locked
20200329_174535.jpg
 
Got tired of fumbling for the allen key for my micrometer stop (snip)

Nice work on the lock bolts.
I see something (looks like an aluminum bracket w/ a (possibly) brass round headed something) attached to the saddle, between the ways.
What is that? If there's a write-up about it, some search terms or a link would be great. Thanks.
 
Back
Top