Workstations stand for PM-1236T stand (HF tool chest mod)

skcncx

H-M Supporter - Gold Member
H-M Supporter Gold Member
Joined
May 2, 2022
Messages
356
While I wait for my PM-1236T, I've been planning my workstation/stand.... all this is inspired (copied) by designs previously shown on HM (primarily @davidpbest design) ... thought I'd share my take. Tell me where I'm going wrong or missing something!

Objectives

  • Strong and sturdy
  • Ample storage underneath for accessories
  • Targeting 48" to 50" lathe spindle center line height, that should put cross slide handle (center) around 42-44" from
  • Moveable as needed
    • Plan to use heavy duty levelling casters (when levelled, casters are off the floor)
    • 2nd thought was to just have fixed levelling legs and build separate dolly w/casters for each end... jack up, slide underneath, move and remove when done.
My plans are to
  • Buy the U.S. General 72" top tool chest from Harbor Freight and build the stand around it.. like others,
    • It seems most others have used the shorter 56" version and just place on the bottom shelf of their stand... I'm going for a more integral setup, neither better or worse (well, worse is up in the air :).
    • The BIG question is what color box... red or black?
  • Frame around tool chest will be 2" square aluminum tubing all welded together (it's what I have plenty of).
    • Tool chest won't really carry any weight, all that is transferred through the main frame.
  • Tool chest flip up top lid comes off and area for pull out chip pan. There's about 3" height, so more than needed but also lots of easy access to.
  • Do not plan to use the included chip pan
  • Not sure about the splash guard, though, likely will be installed and used for swarf containment as well use accessorized with holders for common/quick access tooling
  • *IF* I ever convert to 3 phase and need a VFD or oiler system, the left bank of drawers can come out and that opens up a cavity for electronics... or all that stuff goes over head.
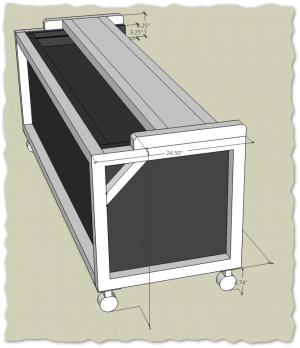
I'll turn this...into this... (excuse my beginner 3d skills in Sketchup)
1660660290048.png
1660661322055.png

1660661379914-png.417376

Caster/Levelling feet choice at the moment

The levelling threaded rod is 16mm.. but I've seen you can get these with a 24mm levelling threaded rod. Their just very expensive, $110/caster. Once the caster if off the floor, it's just like a threaded leveling foot, but you are 5" off the floor so the larger rod the better.

1660660402343.png
I figured these weights
Lathe: 850 lbs.
Tool Chest (empty): 350lbs
Frame: 200 lbs.
Tool Chest (loaded stuff): 500 lbs. (pure guess)
Total Static Load is: 1,900 lbs.
Casters rated at 2200 lb. / caster. Theoretically, 8,800 lb for 4.


Attachments

  • 1660661379914.png
    1660661379914.png
    67.8 KB · Views: 526
The Carrymaster leveling castors would be the best casters for the job, there is a quality difference in casters, Carrymaster is at the top.
 
The Carrymaster leveling castors would be the best casters for the job, there is a quality difference in casters, Carrymaster is at the top.
Thanks for the link, the are even a bit cheaper. One main feature I was looking and both of the following have it is the ability to level with a wrench... not the finger/hand wheel type, seems like that would be tough with a lot of weight on them.

I was looking at these Foot Master $78

Carry master equivalent $62
 
Make sure your drawer faces are at least 3" recessed from the front edge of whatever is the top surface of the drawer area. By this, I mean the front edge of the chip pan if it is full-length, or some sort of "table top" for the drawer area. Otherwise, chips will lodge in the drawer handles, and some will work their way into the drawers themselves. Chips can even bounce off the operator!

I put an old Atlas QC42 (10x24) lathe on a Craftsman workbench/drawer unit (Waterloo-sourced) 40 years ago. I had the local heating contractor make a chip pan that covers two layers of 1-1/8" glued-together plywood subfloor and overhangs the 3" with a 30-degree up-angle lip and doubled-over edge. It has worked great!
Make sense... on my current setup, an Atlas 618 on a rolling tool chest I'm using the top drawer to store all my tool holders... I thought that was a good idea until I used it. Annoying to constantly open/close the drawer to grab another tool holder and nearly impossible to keep chips out of there. I'm planning on storing all my tooling, drill chucks and items you access frequently above the back splash guard like I see many do. I think the top section of that HF tool chest when I remove the lid will become my entire chip pan area and deeper than most. I like your idea of extending it out a bit at an angle.
 
If any one of the colors were in stock or arrived earlier, I would have just gone with what I could get... I actually like the orange, blue, black and red ones from HF. At one time I had a great idea to color code all my tool stands... woodworking = blue and metal = red... then I realized I buy cabinets, stands based on what's available and features, size, functionality first. trying to be OCD about color coding is a losing battle. I think I'll just get black, the non color one.
 
I have done a version of David's stand with an HF too box (top). I choose a 56" tool box and took the lid off. That worked very well and left me enough space on the left for an electrical box and one-shot oiler. If I had to do it again, I would use the same toolbox but build the stand a bit shorter (about 70" total) and eliminate the space to the right of the toolbox. I got a center height of about 49" and would not like it much taller (I am 5'9). So you definetly want to stick to the top tool box.

IMG_0657.JPG


Regarding construction, I really like the angle irons David used at the end of the big channel for the lathe. I don't think the leveling screws at that connection are really necessary but it made it very easy to screw down on top of the stand. Not sure how you intend to do that. I think you should add additional bracing in the corners. I used triangles cut from 6" wide 3/16 flat bar and that worked quite nicely (if you make them from tubing you loose a bit more usable depth).

I am not convinced that putting the whole contraption on casters works well. I really needed the additional middle support especially after I loaded up the toolbox. And you need to level the lathe in place to avoid twisting the bed. I have carrymaster casters under my bandsaw (where they work okay) but would not like to have to use them under my lathe. I much prefer moving my machines around with a pallet jack when needed (I made sure the height under the toolbox allowed for that). And once you look at more than one machine, a pallet jack quickly becomes cheaper than quality casters.
 
I got a center height of about 49" and would not like it much taller (I am 5'9). So you definetly want to stick to the top tool box.
Great, I'm 6', so 48-50" should be good.

Your setup looks nice.

I don't think the leveling screws at that connection are really necessary but it made it very easy to screw down on top of the stand. Not sure how you intend to do that
Not decided on angle, tube or solid bar on the ends of the channel holding the lathe but it will be bolted down... or welded (if I don't add the levelling screws).

A lot of my frame decisions are based on where I end up at my target height, so I may bring the main tubing frame around the tool chest above it.

I was getting the impression that the levelling screws on that end were/could be the primary lathe levelling (aligning) vs shims under the feet of the lathe itself... if not, then I don't see a need either.

I think you should add additional bracing in the corners.
For sure, I'll add gussets and support so it won't rack and be plenty rigid. In addition to the front and back runs to support the tool chest, I'll run additional angle down the middle.

I am not convinced that putting the whole contraption on casters works well. I really needed the additional middle support especially after I loaded up the toolbox.
I'm on the fence, though leaning toward levelling casters... but yes, a set of high quality levelling casters is $300-$400. Once the levelling feet are down, you are effectively not on casters. Though, now I'm thinking I just spent a lot of high quality casters I'm hardly using them. I've had the same thought of investing in a small/narrow pallet jack... I see them around $700... two sets plus of casters does start to lose the value. I'll definitely mull this over.

And you need to level the lathe in place to avoid twisting the bed.
Well, to the point above regarding the levelling screws on the beam ends of the lathe support structure, if I end up just using shims under the lathe's mounting feet for final alignment I won't put them on the beam ends. I do like that idea, but sounds like in practice it's not as beneficial as they seem.
 
$700 should buy you a nice Crown including delivery (and I was surprised by how much the price went up, it was $400 a few years ago before tariffs and supply chaos). I just bought a mini pallet jack from Northern Tool. They are about $300 now and perfectly fine for everything I have to move around the shop (and easier to find a place to store than a full sized pallet jack). Depending on your area, you may be able to find used ones for cheap as well.
 
Back
Top