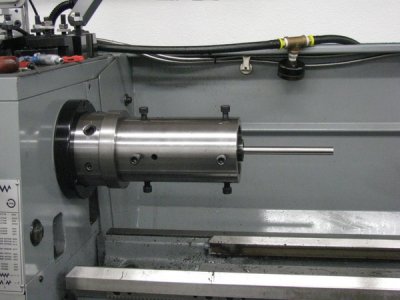
-
Welcome back Guest! Did you know you can mentor other members here at H-M? If not, please check out our Relaunch of Hobby Machinist Mentoring Program!
You are using an out of date browser. It may not display this or other websites correctly.
You should upgrade or use an alternative browser.
You should upgrade or use an alternative browser.
What size D1-4 Backing Plate to make a chamber jig out of 4" DOM?
- Thread starter ridgeway
- Start date
Any pictures you can share ??I bolted mine, I believe 5 inch is standard.
- Joined
- Jan 24, 2013
- Messages
- 105
For me the outboard spider is the way to go. I have an HF 8x12 and made an outboard spider for mine. The reason I like the outboard spider is you don't have a long length of spider sticking out of your chuck. Maybe a heavy lathe can handle that, but the smaller lathes I wouldn't want to risk it on.
Bob
Bob
- Joined
- Aug 18, 2013
- Messages
- 31
For me the outboard spider is the way to go. I have an HF 8x12 and made an outboard spider for mine. The reason I like the outboard spider is you don't have a long length of spider sticking out of your chuck. Maybe a heavy lathe can handle that, but the smaller lathes I wouldn't want to risk it on.
Bob
^^^This is the way to go. What you are referring to as a "Chambering Jig" is what appears to be better known as an action truing jig for bolt actions.
The closer you can work to the headstock, the better. You want rigidity in your setup.
Also with the setup shown, your points of adjustment are very close together, making zeroing the chamber a PITA. The further apart your points of adjustment the easier it is to make more precise changes.
I drilled and tapped the outboard end of my spindle 90 degrees apart for 1/4 x 28 setscrews. Turn the screws to get rid of the conical end that bites into the material. Don't waste your money on brass tipped screws, polish the end that you turned on the screw and use a bit of copper sheeting and wrap the barrel, this makes clean up of any marks on the barrel a lot easier. Those brass tipped screws will really leave some tough to remove smears, especially on a sandblasted barrel.
On the inboard side depending on the barrel length I will use either the four jaw or I use a D1-4 adapter plate that I turned to the same diameter of my spindle and drilled and tapped for setscrews. Makes a great spider and it gains me about 4".
When I use the four jaw I make a ring of #6 copper ground wire that is annealed and put it around the barrel. This acts as a pivot point so adjustments made at the outboard spider do not put the barrel in a bind.
BP, would it be possible to get a picture of what you did with a back plate? I have an outboard spider almost complete. I was thinking about getting a Bald Eagle spider to bolt to a face plate...just curious how you have yours set up.
http://www.grizzly.com/products/Aluminum-Spider-Plate-5-Diameter/BE1125
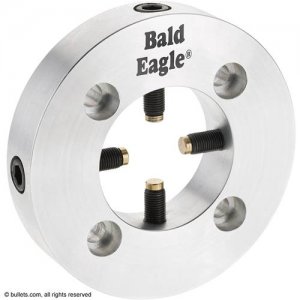
http://www.grizzly.com/products/Aluminum-Spider-Plate-5-Diameter/BE1125

- Joined
- Aug 18, 2013
- Messages
- 31
Finally made a little time to take a couple of pics:
Basic D1-4 adapter plate, turned to spindle nose diameter and drilled/tapped @90 degrees of the circumference for setscrews.
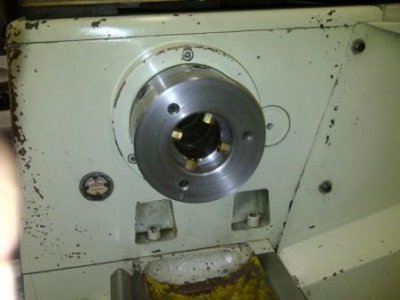
In place on the spindle, this nets me about a 4" gain over a 4 jaw chuck.
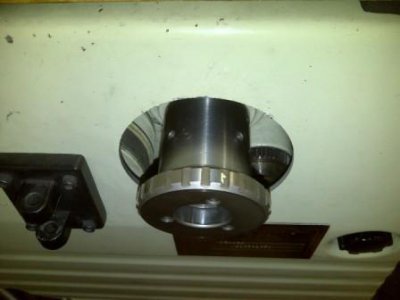
Kind of tough to see with the gear cover on but on the outboard end I drilled/tapped the extension for my collet closer to match the inboard "Spider". This netted me about a 3'" gain on the outboard end over an add on spider and is one less thing to have spinning in the breeze and secure to the spindle.
Saves set up time too!
With this set up in place I can work a barrel as short as 18" through the headstock, keeping my work nice and close to the spindle nose for accuracy and rigidity.
Shorter barrels I work with the 4 jaw alone for relatively general work but when I am threading for a suppressor or other work that needs to be dead nuts accurate I use this:
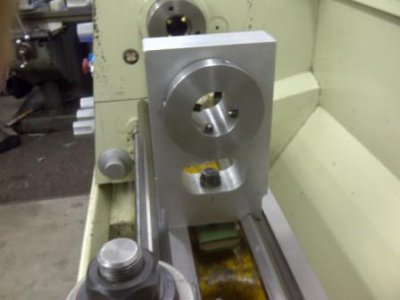
It is a double row precision bearing cathead that I carved out of a 2" slab of aluminum. The nice thing about this set up is it works just like an inboard and outboard spider setup. I can adjust the barrel for concentricity and axial alignment.
When you are working barrels for suppressor use and precision distance rifles you have no room for errors.
When I am setting up a barrel I use a "range rod" from PT&G of the appropriate bore size and indicate it in two places, one as close to the muzzle as possible and the other as far out from the muzzle as possible. both indicators are Interapid's .0005's (can't remember the model #). With both indicators working at the same time you can adjust and compensate for any axial yaw of the bore as well as concentricity. I shoot for zero needle movement on both indicators, some times it only takes 10 minutes other times I have "chased the needle around" for an hour before I was happy, just depends on the individual barrel.
Has worked damn well so far....


Basic D1-4 adapter plate, turned to spindle nose diameter and drilled/tapped @90 degrees of the circumference for setscrews.

In place on the spindle, this nets me about a 4" gain over a 4 jaw chuck.

Kind of tough to see with the gear cover on but on the outboard end I drilled/tapped the extension for my collet closer to match the inboard "Spider". This netted me about a 3'" gain on the outboard end over an add on spider and is one less thing to have spinning in the breeze and secure to the spindle.
Saves set up time too!
With this set up in place I can work a barrel as short as 18" through the headstock, keeping my work nice and close to the spindle nose for accuracy and rigidity.
Shorter barrels I work with the 4 jaw alone for relatively general work but when I am threading for a suppressor or other work that needs to be dead nuts accurate I use this:

It is a double row precision bearing cathead that I carved out of a 2" slab of aluminum. The nice thing about this set up is it works just like an inboard and outboard spider setup. I can adjust the barrel for concentricity and axial alignment.
When you are working barrels for suppressor use and precision distance rifles you have no room for errors.
When I am setting up a barrel I use a "range rod" from PT&G of the appropriate bore size and indicate it in two places, one as close to the muzzle as possible and the other as far out from the muzzle as possible. both indicators are Interapid's .0005's (can't remember the model #). With both indicators working at the same time you can adjust and compensate for any axial yaw of the bore as well as concentricity. I shoot for zero needle movement on both indicators, some times it only takes 10 minutes other times I have "chased the needle around" for an hour before I was happy, just depends on the individual barrel.
Has worked damn well so far....


