What have you done in your shop lately?

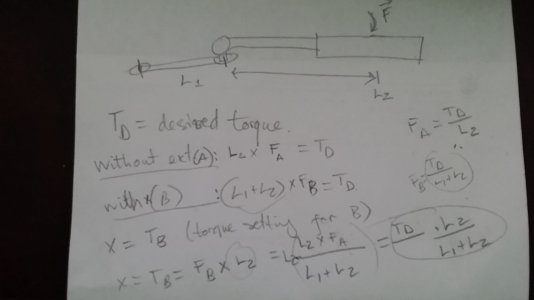
I saw someone on you tube used that method before. I posted it here because partly seeing that and now here. Maybe someone need to verify with weight (I may do it later ). One way to check the formula is setting A at 0, meaning no extension, then your force must be equaled to the torque number using the formula. However, the longer the bar, we know the less you need to press, not equalled.

Edit: read again my logic above and it doesn't make sense, and formula seems correct. I will update later after doing some math

I will have to double check this since I used my method for torquing my diesel engine head bolt using an extension adapter.
 
Last edited:
The click in a torque wrench is a response to force. Torque is force times moment arm. Change the moment arm length, and you change the torque. @royesses is doing the right thing by recalculating the effective setting against the nominal setting when using an extension or offset.
 
Thanks all for sharing your knowledge.

I can confirm that I was wrong. My initial thought was that the torque wrench only knows its "head", not where you hold it, but that's not how it works. Further thinking, the number "12" I used above for the inches in a foot was completely off. The ft.lb was just a unit of measurement. So if it's inch pound, the multiplication factor would be different if using my formula. It's just wrong.

But ...

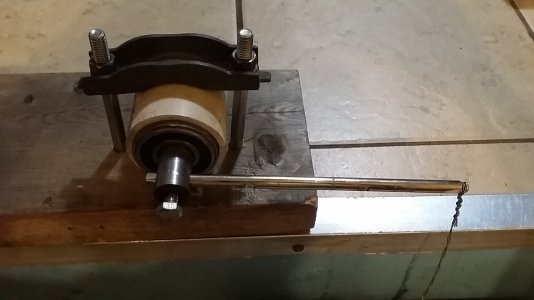
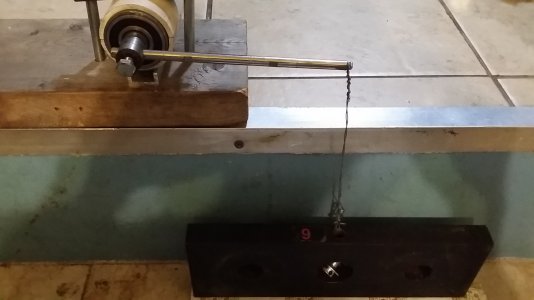
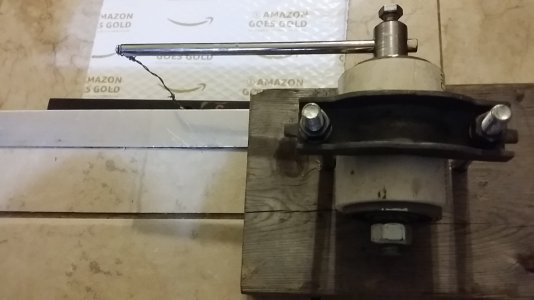
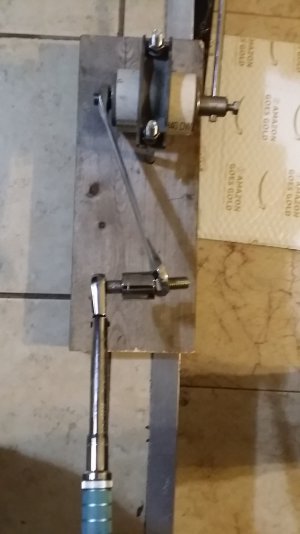
I always wanted to build a torque wrench tester, since I didn't trust my low cost torque wrenches (since I have acquired a few better made).

So today, I made just that. I will need to have a "calibrated" weight, but it should not be a big problem. I heard postal office can weight a package for you.

Here's a picture of the setup:
20191029_214244.jpg

20191029_214301.jpg

20191029_214327.jpg
20191029_214456.jpg

Without the extension, it shows 79 in.lb. With the wrench extension, rough measurement (not the diagonal like in picture, but along the board), it's about 7.5 in. The wrench is 8" center to center of holding handle. With the extension, I measured 38 in.lb. But the extension now has the box end wrench, a nut and a short bolt (1/2").
 
What I found a bit interesting is that these torque wrenches appear to need a warm up.
An Armstrong wrench initially measured it (without extension) as 76 ft.lb. The Harbor Freight didn't click until 77 ft.lb, then after that, it settles down at 76 ft.lb. That's impressive for the low price Harbor Freight. After that, I set both back at minimum settings. Awhile later, maybe 20 minutes, I measured and it was 79 ft.lb for both torque wrenches. That's what I meant they may need a warm up.
 
In the past, I took a calibrated snap-on dial torque wrench and put it in a vise. Then I took each of my other torque wrenches and, using a socket to couple the two wrenches together by the square drive, tested them against the control. Three HF wrenches, a Park, a Craftsman beam-type, and my favorite S-K wrench all popped within a couple of lb-ft of the calibrated wrench. So I guess it's not too hard to make a spring or a beam accurate. What I really learned was that I don't like using $h!t tools, and I feel so much more confident using my nicer torque wrench to do my thing, but I don't get too upset if I have to throw a HF wrench in the pickup and do field work with it. I know I'll get good enough results, and if there's gonna be wear-and-tear it may as well be on the cheapie and not on the one that costs 8-10 times as much. So maybe hand tools are like handguns- they all go boom when you pull the trigger, but what makes or breaks then is how confident and comfortable you feel with the one you like in your hands.
 
Today I tried to continue cutting an existing thread. Basically, the rod was broken near the end of the threading area. After I welded it back up, I tried to line the cutting bit into one of the existing thread, move the part in a way that the dial falls into a number. This can be seen rather easy since it's a large 3/4" coarse thread. I then started to cut, but somehow the existing thread just got messed up. That didn't make any sense to me. It's easier for me to just weld all over the whole threading area and re-cut it. But just wanted to find out what I did wrong, or it's any advise on this?

I am thinking of just cutting out that weld part without thread may work too, but having a lathe, I like to play with it a bit and maybe learn something.
 
If you had the tool bit at 90 degrees to the work and aligned with the existing thread I would suspect backlash in the feed screw wasnt taken up.
Or the wrong thread count was used.
I have to keep my half nuts fully engaged when reversing back to the start of the thread and go a bit further before going forwards again to take up the backlash in the system.
It is possible to pick up the thread but does take a bit of fiddling to get it accurate.
Set the tool bit aligned up with the thread as best as you think but dont let it actually touch.
Run the lathe and watch to see if the point of the tool accurately follows the thread or what it will probably do is lag a little.
Adjust accordingly.
 
It's probably backlash then. I didn't account for that at all. I could put a nut on the new thread area. It didn't continue onto the old thread.
It was getting late in the day and I decided instead of beating myself up, I just cut out the new thread area and put it back in.
 
I scrapped a 500 pound washing machine, but stole the feet off it first. Okay it didn’t weigh 500 pounds, but between me, my son, my wife, and a dolly we never got past the second step out of the basement. I put those feet on a bench I’ve had that has always been wobbly. No more wobble!

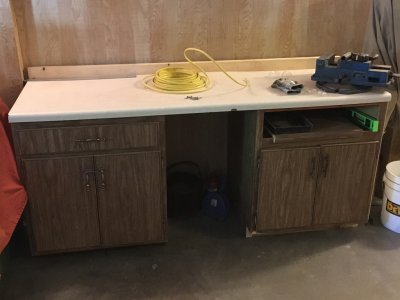
Then I cut a cabinet that used to hold an oven right in the middle in half. Slapped an old warped countertop on it, and viola! A nice garage addition.

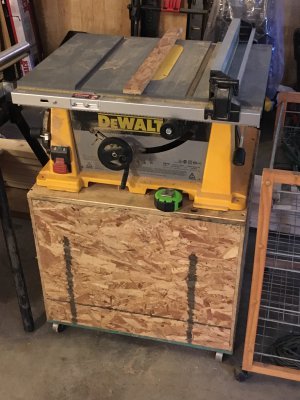
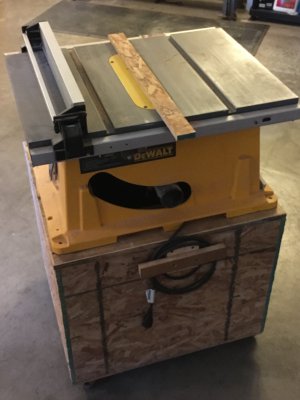
Finally, I’ve always hated lifting this portable tablesaw, and setting up something to set it on when I needed to use it. So I drug out a leftover sheet of plywood and knocked up this rolling base to leave it permanently mounted. I’d pulled the cast iron wheels off something in a dumpster a few years back. I’ll be adding several creature features to this as time permits. But at least I don’t have to pick the tablesaw off the floor in the meantime.

What’s all this have to do with hobby machining? Well as you can see, there’s a milling vise on the new garage countertop. So there.

And this was three separate days of doing. I’m not really good enough to manage it all in an afternoon. 795E7272-94DF-47FA-94A4-B694E171D16D.jpegC48E422A-380C-42E4-9EF4-C90AC93347D6.jpeg61A69ACC-FA6B-415D-9F88-B347B81DC570.jpeg1FBDC756-0132-4BBB-930E-22203D0AA557.jpeg795E7272-94DF-47FA-94A4-B694E171D16D.jpegC48E422A-380C-42E4-9EF4-C90AC93347D6.jpeg61A69ACC-FA6B-415D-9F88-B347B81DC570.jpeg1FBDC756-0132-4BBB-930E-22203D0AA557.jpeg795E7272-94DF-47FA-94A4-B694E171D16D.jpegC48E422A-380C-42E4-9EF4-C90AC93347D6.jpeg61A69ACC-FA6B-415D-9F88-B347B81DC570.jpeg1FBDC756-0132-4BBB-930E-22203D0AA557.jpeg
 
Back
Top