[Newbie] Trying to understand how to fix this issue.

turningwheels

Registered
Registered
Joined
May 9, 2020
Messages
42
I have a new Grizzly G0619. I have been having fun with it and now that the fun is turning into an obsession, I am trying to figure out what I am doing wrong. So here's the story. I bought an Accusize 2" Facing tool with 3 cutters. When putting a block of aluminum in the vise, tapping it down on top of the parallels to make sure its sitting tight, I then run the facing tool down the X-Axis of the table. Doing essentially a half overlap I notice distinct lines running along the surface of the block. They have a discernable ridge about .0055 to .001. Also, after facing both sides of the block, I then measure it and it's out up to .002 longitudinally and about .0015 on the Y-Axis.
A little history on my obsession with this issue, I have put a dial indicator in the chuck and checked the table on both x and y axis. X is out less than .0005 across the length of the table. Y is almost perfect, less than .0005. The vise is out about .001 on the X- Axis and less than that on the y-axis. Its a big ole 6 inch vise that weighs about 40 lbs I would guess.
So, the photo is using a 3/4 HSS TIN end mill, NOT the facing tool. I faced the other side to get it as flat as possible on the Y-axis to see if the ridges went away and they did. The side you are looking at is the orientation that is was in in the mill. I forgot to lock the Z-Axis down until I got just past the .6150 mark. You can see the swirls where is changed the depth a little.

I am wondering how I can rectify these weird differences in the facing. Any help is much appreciated.IMG_20200616_222552.jpg
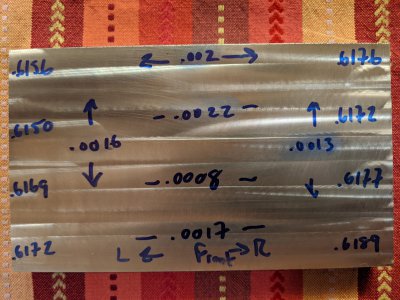
 
I'm not sure if it's any help but what tolerances are you needing for the work you're doing? People have trouble holding tenths with big industrial machines.

If the ridge is bothering you a light sanding will take care of that.

When you put the machine to work you're dealing with dynamic loads as opposed to the static state when you're measuring something without the force of a cutting tool against metal. If you get rid of the last digit on the piece in your picture you're doing pretty good for most hobby shops....

BTW, we have that same tablecloth:grin:

Cheers,

John
 
Have you proven that the spindle is at right angles to the table travel?
What brand (quality) of vise are you holding the workpiece?
Are the table gibs properly adjusted?
 
At first glance, I'm not sure if the problem you think you have is actually the problem you have. You faced one side of that work piece and then made cuts on the other side but did you square the edges that are what is contacting the vise jaws?

To sort out if you actually have a problem and to more accurately see how serious it is, you have to square the work piece on at least three sides.
  • You have two sides, two edges and two ends. We'll ignore the ends for now.
  • First, flatten one side as best you can. You can use your end mill, face mill or a fly cutter if you have one. Just get it as flat as possible. Once it is flat, this will be your master reference face.
  • Position the reference face against the fixed jaw of the vise and put a round rod between the dynamic jaw and the work piece. Place the round rod about half way up the dynamic jaw and lock the work piece down. Now flatten the edge that is sticking up. Once you do this, that edge and the reference face are 90 degrees to each other.
  • Next, flip the work piece 180 degrees so that the edge you just cut is touching the bed of the vise and the reference face is still touching the fixed vise jaw. Again, use the round rod to lock the work in the vise and cut the edge that is now facing up. Once done, you have two edges that are 90 degrees to the reference face.
  • Now put the reference face down on two parallels and lock the work piece in the vise. You don't need the round rod any more. Now cut the last side with your end mill, face mill or whatever.
NOW if you have a problem you will know that you actually have a problem. It may be that you don't actually have a problem other than not squaring the work first.
 
TW, what Mikey said is spot on, as always, but I would add one additional step, just because I'm a nitpicker and I'm not sure how much experience you have. After you have faced a side and removed the work piece from the vise to reposition it to face the next side, file down the burrs left by the milling process before putting it back in the vise.

Tom
 
I am beginning to think that your idea may be the best one. Sounds like a fun project to make one. Still, the 002 difference in height is a bummer along the axis. I'm going to do another pass with the lock engaged on the z axis again.
As far as tolerances go, I am looking for .001 or less across the length of the piece. Is that too much to ask from a hobby machine?
 
Have you proven that the spindle is at right angles to the table travel?
What brand (quality) of vise are you holding the workpiece?
Are the table gibs properly adjusted?

Whats the best way to qualify the spindle?
Grizzly G7154

I just adjusted the x and y gibs. X was way out. I'll adjust Z tonight.
 
At first glance, I'm not sure if the problem you think you have is actually the problem you have. You faced one side of that work piece and then made cuts on the other side but did you square the edges that are what is contacting the vise jaws?

To sort out if you actually have a problem and to more accurately see how serious it is, you have to square the work piece on at least three sides.
  • You have two sides, two edges and two ends. We'll ignore the ends for now.
  • First, flatten one side as best you can. You can use your end mill, face mill or a fly cutter if you have one. Just get it as flat as possible. Once it is flat, this will be your master reference face.
  • Position the reference face against the fixed jaw of the vise and put a round rod between the dynamic jaw and the work piece. Place the round rod about half way up the dynamic jaw and lock the work piece down. Now flatten the edge that is sticking up. Once you do this, that edge and the reference face are 90 degrees to each other.
  • Next, flip the work piece 180 degrees so that the edge you just cut is touching the bed of the vise and the reference face is still touching the fixed vise jaw. Again, use the round rod to lock the work in the vise and cut the edge that is now facing up. Once done, you have two edges that are 90 degrees to the reference face.
  • Now put the reference face down on two parallels and lock the work piece in the vise. You don't need the round rod any more. Now cut the last side with your end mill, face mill or whatever.
NOW if you have a problem you will know that you actually have a problem. It may be that you don't actually have a problem other than not squaring the work first.
That's the best reply yet. I'll get to it and report back.
Thank you!
 
Just for kicks,
The mill has a rated tolerance. There is going to be so much spindle error, table error in everything that is involved.
Do you know what the rated accuracy of the mill is?
On my mill, I have to lock down the 10 X 50" table and knee to get the best results.
I can then go to the surface grinder and gain the accuracy required.
A milling machine is a roughing machine tool.
In my humble opinion.
 
Back
Top