"Tramming" or squaring a drill press?

ScrapMetal

Active User
Registered
Joined
Apr 6, 2011
Messages
2,082
I'm looking for a little advice on the best way to proceed. I am about ready to use a new HF drill press but I need to make sure that the "table" is square to the bit. I don't have a mill as of yet so I don't have any "tramming" type indicators/tools or such. I could just put a long bit in the chuck and eye it up with a small square but that strikes me as being somewhat less than reliable.

Any suggestions as to the proper technique?

Thanks,

-Ron
 
Ron,
If your quill is level vertically measured in 2 positions at 90 deg and bolted down then all you have to do is ensure the table is level. Left to right and front to back. Have you got a good quality level?
IMG_9861.JPG
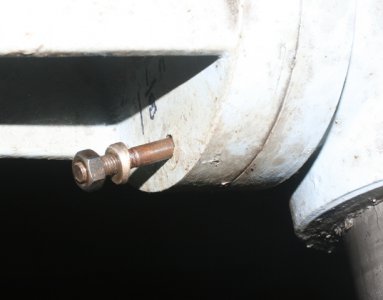
My press allows the table to rotate on its centre axis and to rotate around the column. It can also be tilted. I dont use that function very often so I set it up spot on and drilled and reamed a hole to suit the shank of a small bolt.
IMG_9860.JPG
I cut the head off and slip it in so the table cant move accidently.
IMG_9859.JPG
I made a small tapered washer to suit the angle it was drilled at and use the threaded portion to jack it out when I do need to tilt the table.

Cheers Phil

IMG_9861.JPG IMG_9860.JPG IMG_9859.JPG
 
Instead of a drill use a piece of round stock that is known to be straight, can be determined by the roll test, and as large as the chuck will accommodate. If the square is accurate you should be able to "tram" the DP table to be as square as the square is.

Joe
 
Instead of a drill use a piece of round stock that is known to be straight, can be determined by the roll test, and as large as the chuck will accommodate. If the square is accurate you should be able to "tram" the DP table to be as square as the square is.

Joe

Good advise Joe
 
Ron,
If your quill is level vertically measured in 2 positions at 90 deg and bolted down then all you have to do is ensure the table is level. Left to right and front to back. Have you got a good quality level?
View attachment 34545
My press allows the table to rotate on its centre axis and to rotate around the column. It can also be tilted. I dont use that function very often so I set it up spot on and drilled and reamed a hole to suit the shank of a small bolt.
View attachment 34546
I cut the head off and slip it in so the table cant move accidently.
View attachment 34547
I made a small tapered washer to suit the angle it was drilled at and use the threaded portion to jack it out when I do need to tilt the table.

Cheers Phil

Good advice but I'm afraid the "leveling" part can't really be applied as this HF drill press is technically a "benchtop" and it won't have the advantage of being on a consistently level surface. This press has a tilt-able table that can be positioned around it's column as well as raised and lowered. That's one of the reasons I am asking about this. It's hardly what could be considered a quality press and once the table is moved (even up and down) I'm concerned as to if, or at least, how well, it returns or hold it's "zero". Here's a link to the model of press that I'm working with: http://www.harborfreight.com/garage...vy-duty-16-speed-bench-drill-press-38142.html

Instead of a drill use a piece of round stock that is known to be straight, can be determined by the roll test, and as large as the chuck will accommodate. If the square is accurate you should be able to "tram" the DP table to be as square as the square is.

Joe

Good thought. Do you think it would work if I took a 1/2" or 5/8" (the chuck's capacity) piece of steel, face it on the lathe, then use my Mighty Mag and indicator on the end?
I could then spin the chuck around and check against the surface of the table.

-Ron
 
Put an indicator on an articulated arm and chuck it in the drill press.

Lower the quill, lock it and check the table left / right and front / back.

Not sure how you would adjust it, but at least you will know.

Never thought about it with my DP, but I am going to check tomorrow!!
 
Just keep this in mind when lowering the quill on a drill press. The farther out the quill is, more play in the quill. You can check your self. Quill up, grab the drill chuck, and check for play. Quill down, and repeat. You will find the quill has play in the down position. Most DP Ive seen dont have provision to lock it. If your DP has a round table, you could sweep it with a indicater, but the sqaure ones make that a bit tough.

If yours is in need of ajustment, they usually have the ability to tilt the table , left and right. Front to back is another issue, if you need to correct that, you will need to shim the base flange. A old set of feeler gauges would help with that ;)
 
I made a new post in this thread a couple of hours ago, still hasn't been passed by the moderators (Yes, I saw the message when I posted but figured someone would have seen it by now.) Oh, well...


Put an indicator on an articulated arm and chuck it in the drill press.

Lower the quill, lock it and check the table left / right and front / back.

Not sure how you would adjust it, but at least you will know.

Never thought about it with my DP, but I am going to check tomorrow!!

That sure simplified things. I hadn't thought of using the arm off my indicator stand. Just unscrew it from the base and chuck it up, with the dial indicator installed of course. Spin the quill around to different points on the table and viola! :)

Just keep this in mind when lowering the quill on a drill press. The farther out the quill is, more play in the quill. You can check your self. Quill up, grab the drill chuck, and check for play. Quill down, and repeat. You will find the quill has play in the down position. Most DP Ive seen dont have provision to lock it. If your DP has a round table, you could sweep it with a indicater, but the sqaure ones make that a bit tough.

If yours is in need of ajustment, they usually have the ability to tilt the table , left and right. Front to back is another issue, if you need to correct that, you will need to shim the base flange. A old set of feeler gauges would help with that ;)

Using the above setup I can check the quill's relation to the table at different points in the quill's travel. There certainly isn't a provision on this press for locking the quill and I'll be real interested to see just how much play is in it at the "down" position. That would be a real bummer to go to all the trouble to true up the table then have a good chunk of the effort negated by slop in the quill.

I knew the side to side wouldn't be much of a problem but I hadn't considered the forward and back (Well, Duh! I deserve a swat for that one.) Maybe my mind just blocked that out as being too much of a P.I.T.A. as if that's out, every time you reposition the table, up, down, left or right you'd have to recheck and re-shim. An old set of feelers would work very well. Thanks for that tip.

I am certainly going to take some pictures of this operation on the DP. I'll see if I can get to it tomorrow. :cool:

Gaaah! I'm thinking about this too much now. Something else just occurred to me, what if the table isn't flat? How many of you guys have checked your DP's table to see? If mine's out I'll have to wait until I bring my shaper back to life to true it up. It's round but it's also 11 1/2". I don't think it would work on my 11" lathe. :p

More food for thought!

Thanks guys,

-Ron
 
Last edited:
Ron,
Just checked the que for pending approval and it was empty. Someone else already did it or I can't see it. I should be able to see just about everything and I dont see any clue of a reason to moderate you or anyone. I appologize for the inconvenience and will forward this to a higher password and ask them to look too.
Thanks!!!!!!!!!!!!
Bob
 
No problem Bob. Just appears to be an odd glitch with the system. I'd probably have to look at the source code itself to see what it felt was questionable in that post and that's probably not going to happen. :biggrin:


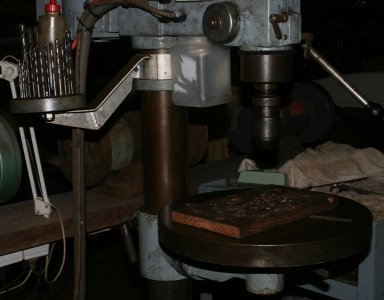
Here's the setup I used today:


I was getting readings that were all over the place. I'm thinking that much of it was due to the roughness of the table so when I have a little more time I'll repeat the procedure using something to smooth out the imperfections. Maybe slide a 1-2-3 block or something else of consistent thickness around underneath the indicator.

I may have been better off not knowing. :p

-Ron
 
Last edited by a moderator:
Back
Top