

I was inspired by @Ecosta777 and Inheritance Machining YouTube channel to try making a Starrett 91 tap handle. I elected to do the smallest one to verify the process of making the parts before starting on a larger one. I made it from 4140 I had on hand. It was a fun project, but working on small parts made this more challenging then the larger one probably will be.
To start, I turned 1/2" bar stock to 12mm (I do everything in metric), then turned the long handle end down to the correct diameter. I chose not to taper the handles so that I could easily hole it in my chucks for multiple operations. I didn't see the need for the taper, but time will tell if that is a mistake. The original has a radius between the center section and the handles, so I ground a radius cutter for this transition. My hand grinding skills leave a lot to be desired, so this tool could use a lot of improvement.


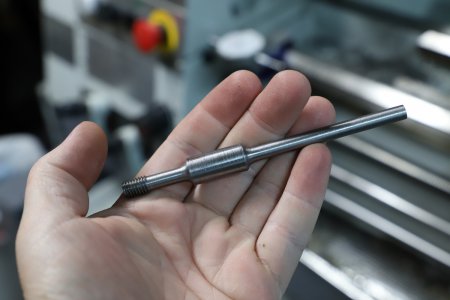
Next, I flipped it and did the threaded end. It was turned to the right size, threaded, and then the hole for the plunger bored into it.


From there, it was brought to the mill where the center section was flattened on both sides making it the thickness of the handles.


Now it was time to start on the hole for the tap. I located the position on where is should be, drilled a starter hole, and then a 7mm hole for the final size.

The next operation was filing the v groove along the axis of the handle where the tap will be locked into position. I didn't have a square file, so I tried using a triangular file, that didn't work so well. I will be cleaning up the profile at some point once I get the correct file.


The next steps will follow in the next post.
To start, I turned 1/2" bar stock to 12mm (I do everything in metric), then turned the long handle end down to the correct diameter. I chose not to taper the handles so that I could easily hole it in my chucks for multiple operations. I didn't see the need for the taper, but time will tell if that is a mistake. The original has a radius between the center section and the handles, so I ground a radius cutter for this transition. My hand grinding skills leave a lot to be desired, so this tool could use a lot of improvement.
Next, I flipped it and did the threaded end. It was turned to the right size, threaded, and then the hole for the plunger bored into it.
From there, it was brought to the mill where the center section was flattened on both sides making it the thickness of the handles.
Now it was time to start on the hole for the tap. I located the position on where is should be, drilled a starter hole, and then a 7mm hole for the final size.
The next operation was filing the v groove along the axis of the handle where the tap will be locked into position. I didn't have a square file, so I tried using a triangular file, that didn't work so well. I will be cleaning up the profile at some point once I get the correct file.
The next steps will follow in the next post.


")