- Joined
- May 27, 2016
- Messages
- 3,469
Well - maybe "restoration" is the wrong word!
I have taken it apart with a couple of things in mind. One is to try and repair the broken-off bit of the T-Nut slot. The other is to perhaps do something about the backlash. As mentioned in another recent thread, simply securing the Acme nut with it's grub screw near halves the backlash from 0.022 to about 0.012, and even just this is enough to get it working again well enough to set doing a bigger graduated dial modification for itself, of which there are several YouTube videos that look interesting.
"Warts & All"
We know you like pictures, and on this, I need advice. This is the very same compound casting that I posted about from last October where I got excellent suggestions from @Nutfarmer , @matthewsx , @Superburban , @tq60 , @SLK001 , @Gaffer , and some amazing pics from @Ulma Doctor. After considering the approach of cutting away the broken lip entirely, and replacing with a with a bolt-on, versus attempting to weld it up, I have decided to attempt the weld, even though my weld experience is limited to welding up a trailer frame with a cheap buzz-box, long ago. This time, I have a better welder.
So here we go with a condition evaluation, with the paint stripped, and a minimal clean-up.
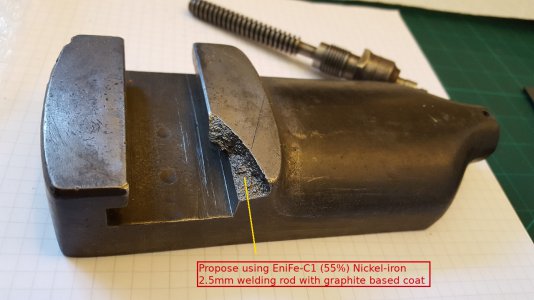
The strange brown color is as it was under the paint. Is that a kind of rust? I wire-brushed the break. Here is where we come to the first question(s).
Please forgive if I hesitate on these details. I have never done this before, and these are the things I think. It goes without sayinig that in the end, it gets a new paint job!
1. Before the weld, should I grind or cut on the break surface before welding? Maybe one of the little tools with my Dremel.
2. I learn that things go much better if the whole casting is pre-heated to about 300C-400C, and care taken to cool slowly. If one is grinding the break clean, is that done while it is hot?
3. I have the choice of two kinds of welding rod that would leave a repair that can be machined, or filed. Both are recommended for repairs to "cast iron", although this metal is maybe cast "semi-steel". One is 99% nickel. The other type is called ENiFe-C 55%Ni, which I understand is used for welding to cast iron, and between dissimilar metals onto cast iron. It seems to have a graphite-based coating on the rod. I will go with whatever you folk recommend.
4. How are the welds laid in? Where does one start? Is there a planned strategy? Are they "peened"? Can you overdo things, and end up work-hardening with the slag hammer?
5. For slow cooling, I am thinking a mineral wool lined box with insulated lid, filled with sandbox sand. Does the sand need to also be hot when the job is put into it?
6. Will the whole thing be "distorted" after all this, and need other treatment to the surfaces?
The Compound Condition
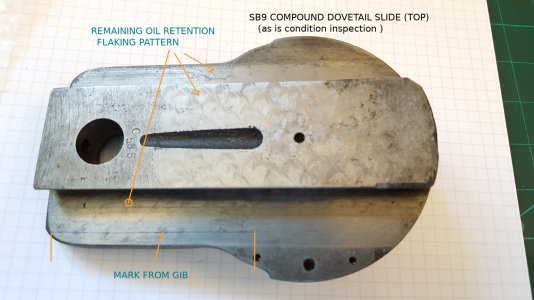
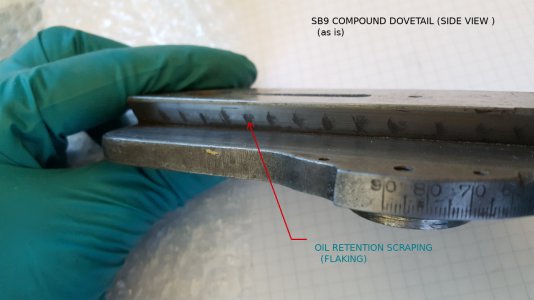
There is some evidence of remaining oil retention flaking scrapes. There are places where parts of it stood exposed, and maybe where chips grime got in. One mark looks like a wear ridge at first, but is in fact a mark from the edge of the gib. The surfaces either side the mark still have some flaking.
 _
_ 
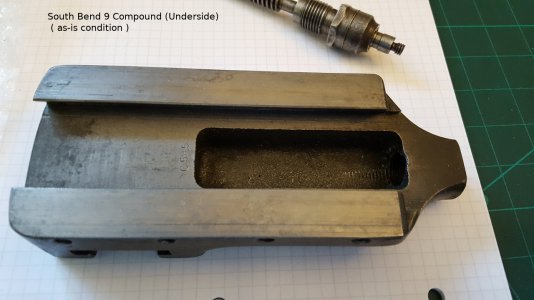
The underside is not pretty, but again, there are suggestions of remaining flaking. That view is being photo-bombed by a good view of the graduated dial. I get along with it OK by using one of those binocular headbands (as us older guys do), but now that I look at the image, it has me decided that it was always just too small, and hard to read.
The Acme Screw Backlash
Even as it is, if I put in the 1/4" UNC 20TPI grub screw, the backlash reduces to a more usable level. Taken apart, I see it clearly needs replacing, maybe with some better made contrivance. I can have it soldier on, while using the lathe to make another, but I have in mind to use a little mold box, and make one out of bronze loaded JB-Weld. I have seen some remarkable videos of things done to squeeze a cut plastic tube onto a Acme thread, all the while blasting away with a butane torch, then turning the remains into a good-looking nut, but here, such a plan runs into the obvious "Catch-22" of needing the lathe to turn it's own nut. I have a little video [Good Lord - the video actually turns out to have sound ] !
View attachment SB9-Compound Acme Nut2.mP4
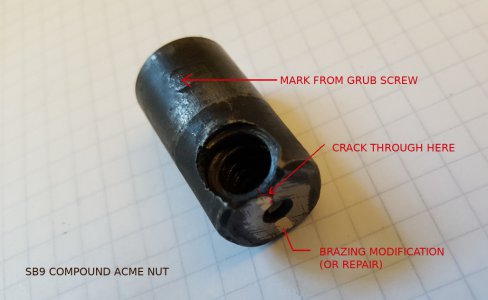
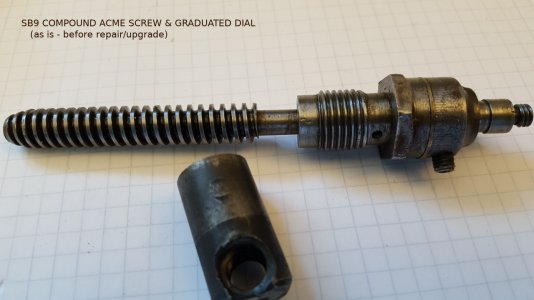
I think the Acme nut is a bit of a disgrace! I am thinking it would not have looked like that originally. It has had a "brazing operation" on it's lower end, possibly split and "squeezed together" a bit, then brazed, as a kind of "reduce the backlash quick 'n dirty fix". In any event, there is a crack in the brazing. Also, it "rocks a bit" in the round hole in the dovetail piece until the grub screw is tightened.
 _
_ 
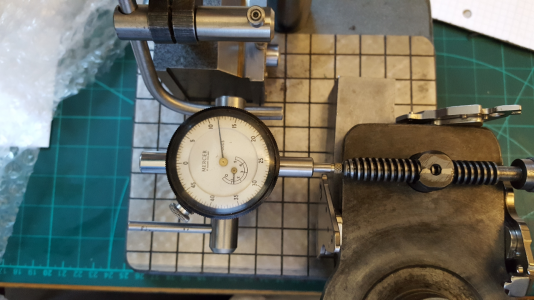
I did attempt to put a number on the actual axial backlash. This picture is just for laughs. By far the better way is to see what it is on the graduated dial when all is assembled. Here it says 0.012".
Pitting!
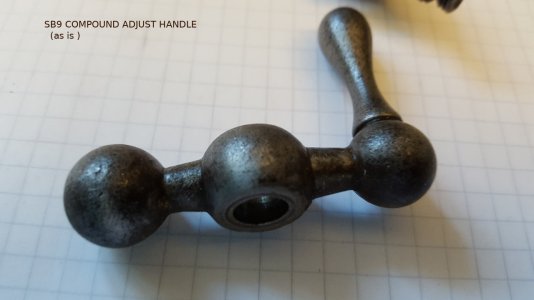
The adjuster handle. It was always like that since I got it, but I was not going to sniff at it, because the whole lathe with drawers, 4-jaw chuck(s), and tooling had only taken $147 bucks. If I don't shine it up a bit, then in the face of a paint job, it will definitely lower the tone of appreciations among compound aficionados. I am just not sure how best to go about it. I don't know how to turn on spheres, it's a distraction, and this whole work was to try and get something going to make the part for XRF sensor anyway!
OK then - warts & all I said, so here it is! It is not going to stay that way! I have to wonder why it looks so much worse than most other bits on the lathe, which seem to be in better condition, and mostly lived drenched in oil.
So there we have it. Somewhat picture-heavy, a bit off-putting - I admit, but hopefully here I reap the benefits of what to do to fix it up. Regarding the compound nut, that must surely only be allowed to live long enough to turn up it's own replacement!
I have taken it apart with a couple of things in mind. One is to try and repair the broken-off bit of the T-Nut slot. The other is to perhaps do something about the backlash. As mentioned in another recent thread, simply securing the Acme nut with it's grub screw near halves the backlash from 0.022 to about 0.012, and even just this is enough to get it working again well enough to set doing a bigger graduated dial modification for itself, of which there are several YouTube videos that look interesting.
"Warts & All"
We know you like pictures, and on this, I need advice. This is the very same compound casting that I posted about from last October where I got excellent suggestions from @Nutfarmer , @matthewsx , @Superburban , @tq60 , @SLK001 , @Gaffer , and some amazing pics from @Ulma Doctor. After considering the approach of cutting away the broken lip entirely, and replacing with a with a bolt-on, versus attempting to weld it up, I have decided to attempt the weld, even though my weld experience is limited to welding up a trailer frame with a cheap buzz-box, long ago. This time, I have a better welder.
So here we go with a condition evaluation, with the paint stripped, and a minimal clean-up.

The strange brown color is as it was under the paint. Is that a kind of rust? I wire-brushed the break. Here is where we come to the first question(s).
Please forgive if I hesitate on these details. I have never done this before, and these are the things I think. It goes without sayinig that in the end, it gets a new paint job!
1. Before the weld, should I grind or cut on the break surface before welding? Maybe one of the little tools with my Dremel.
2. I learn that things go much better if the whole casting is pre-heated to about 300C-400C, and care taken to cool slowly. If one is grinding the break clean, is that done while it is hot?
3. I have the choice of two kinds of welding rod that would leave a repair that can be machined, or filed. Both are recommended for repairs to "cast iron", although this metal is maybe cast "semi-steel". One is 99% nickel. The other type is called ENiFe-C 55%Ni, which I understand is used for welding to cast iron, and between dissimilar metals onto cast iron. It seems to have a graphite-based coating on the rod. I will go with whatever you folk recommend.
4. How are the welds laid in? Where does one start? Is there a planned strategy? Are they "peened"? Can you overdo things, and end up work-hardening with the slag hammer?
5. For slow cooling, I am thinking a mineral wool lined box with insulated lid, filled with sandbox sand. Does the sand need to also be hot when the job is put into it?
6. Will the whole thing be "distorted" after all this, and need other treatment to the surfaces?
The Compound Condition
There is some evidence of remaining oil retention flaking scrapes. There are places where parts of it stood exposed, and maybe where chips grime got in. One mark looks like a wear ridge at first, but is in fact a mark from the edge of the gib. The surfaces either side the mark still have some flaking.
 _
_ 
The underside is not pretty, but again, there are suggestions of remaining flaking. That view is being photo-bombed by a good view of the graduated dial. I get along with it OK by using one of those binocular headbands (as us older guys do), but now that I look at the image, it has me decided that it was always just too small, and hard to read.

The Acme Screw Backlash
Even as it is, if I put in the 1/4" UNC 20TPI grub screw, the backlash reduces to a more usable level. Taken apart, I see it clearly needs replacing, maybe with some better made contrivance. I can have it soldier on, while using the lathe to make another, but I have in mind to use a little mold box, and make one out of bronze loaded JB-Weld. I have seen some remarkable videos of things done to squeeze a cut plastic tube onto a Acme thread, all the while blasting away with a butane torch, then turning the remains into a good-looking nut, but here, such a plan runs into the obvious "Catch-22" of needing the lathe to turn it's own nut. I have a little video
View attachment SB9-Compound Acme Nut2.mP4
I think the Acme nut is a bit of a disgrace! I am thinking it would not have looked like that originally. It has had a "brazing operation" on it's lower end, possibly split and "squeezed together" a bit, then brazed, as a kind of "reduce the backlash quick 'n dirty fix". In any event, there is a crack in the brazing. Also, it "rocks a bit" in the round hole in the dovetail piece until the grub screw is tightened.
 _
_ 
I did attempt to put a number on the actual axial backlash. This picture is just for laughs. By far the better way is to see what it is on the graduated dial when all is assembled. Here it says 0.012".

Pitting!
The adjuster handle. It was always like that since I got it, but I was not going to sniff at it, because the whole lathe with drawers, 4-jaw chuck(s), and tooling had only taken $147 bucks. If I don't shine it up a bit, then in the face of a paint job, it will definitely lower the tone of appreciations among compound aficionados. I am just not sure how best to go about it. I don't know how to turn on spheres, it's a distraction, and this whole work was to try and get something going to make the part for XRF sensor anyway!
OK then - warts & all I said, so here it is! It is not going to stay that way! I have to wonder why it looks so much worse than most other bits on the lathe, which seem to be in better condition, and mostly lived drenched in oil.

So there we have it. Somewhat picture-heavy, a bit off-putting - I admit, but hopefully here I reap the benefits of what to do to fix it up. Regarding the compound nut, that must surely only be allowed to live long enough to turn up it's own replacement!
Last edited:


