Scraping in a straight edge

I admire what you guys are doing here, and I really wish I wanted to do this too…but no.
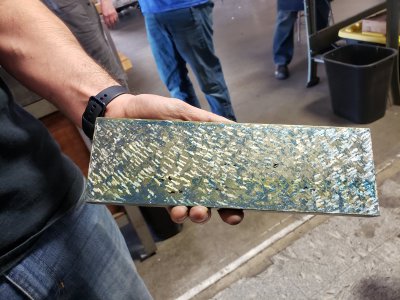
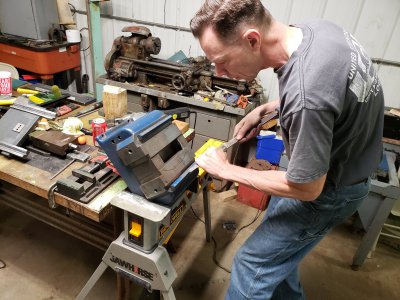
I certainly am not going to make a hobby out of scraping machines, but I have a few a couple that I've rehabbed mechanically (bearings, bushings, oil systems, electrical etc) that I'd like to see the ways cleaned up. We'll see how far I get. This is my getting started effort, get a working 18" straight edge for bluing dovetails. Dabbling to get my feet wet, or my hands blue in this case. ;)

I'm going to focus on this for a few days while the paint on the rotary table rebuild drys, and work on getting my RaspberryPI set up as a PICO development computer.
 
A sharpy is a necessary tool. I like to use green to contrast with the dykem, as it is a bit harder to wipe off then the dykem.

I'm not sure I understand how you're using the Sharpie. Do you 'Sharpie" the entire surface of the workpiece before you attempt a Dykem print?

If that's wrong, please elucidate.
 
I'm not sure I understand how you're using the Sharpie. Do you 'Sharpie" the entire surface of the workpiece before you attempt a Dykem print?

If that's wrong, please elucidate.
The blue hi spot tells a story. Tiny donuts are circles around hard contact (hi) points. The faint points are not quite contacts, etc. You sit and look at the pattern and decipher that story. Pivoting and rapping corners can add more to that story, trying to visualize the surface countour. From there you come up with a scraping strategy. Its easy to smear the blue, but a sharpie better allows a strategy to be mapped onto the surface that can be followed while scraping. Light checkboard, heavy roughing, step scraping, etc. So evaluate the hi spot, make a strategy and record it with the sharpie, then follow the strategy with the scraping.
 
Another part of the story is looking where stoning polishes the surface. Those tend to be more localized hi spots vs the generally global story from the surface plate, although a convex surface can be tricky
 
First off, I consider Dykem as the best ink for scraping, but you wear it for days if it gets into your skin. Rabler, spread the ink on with a soft foam paint roller or a DAPRA soft foam ink roller first to spread it evenly and use that when you rough scrape. Use this foam roller long before using a hard Brayer. You have to run your hand through the ink after applying it to be sure there is no crud in it. You can't feel crud with anything other then your fingers. That's why I prefer water soluble ink like Canode, Stuarts Engineering paste (from UK), or Charbbonnel as you can wash it off your hands. After you apply the Dykem and feel for the crud.. then put your straight edge on the blue and rub it. count to 10 as you rub so you can highlight the high spots. The longer you rub the more the ink rubs off the higher high spots. They average .0002" to a .001" depending on what your scraping.

Once you get 20 PPI and you want more, rub the SE on a dry or no blued area to shine up the high spots. The highest ones will get polished and shine like a mirror, the high spots a tenth lower will look black. I only use a hard brayer roller when I am scraping 30 to 40 PPI. In the old days before I used foam rollers I would take a red rag and fold it into 4ths and then roll it up in a wrap around it with electricians tape. Then dab Dykem on the plate and spread it with the end of the rag. Once the rag is used a while it gets saturated and gets shinny and won't leave lint on the plate. That's why it is imperative you wipe the bluing and un blued area with your hand feeling for crud. I have also used hard 1/2 thick white felt. Where are you ? You can call me as I am sure I can help you as I have helped 40,000 people to learn to scrape over the years. Many of these people answering you on here are my students. Also you should use put on a highlighter to dull the shinny metal. We used to use red lead, now I use red Charbnonel ink diluted with Windex. You need to just leave a thing layer on the bare metal. wiped clean and not sticky.
 
Here is something I wrote today on Practical Machinist. That forum has new ownership so I think it is OK we share posts.
The post starts with this You Tube show. Then I wrote about it.
 
The scraper hand (tech) is not aiming at each high spot, he is randomly scraping the area on the first scrape, this is not the typical Japanese method of scoop scraping. It is similar to a BIAX power scraper way of scraping. He leaves a burr at the front each scrape mark. When you scoop scrape you lift the blade out and you don't leave a burr. He is scraping what I call "crosses" The width of each scrape is good as the width of the scrape mark and the opening of the scrape is about the same, which is perfect. He should also separate the the distance of each line as they are too close together. Look at the scrapes end to end as they are long openings because the ends touch creating a trough or long low spot. Over stoning? That depends what grit the stone is or how dirty the stone is. He might be using a ground stone as they don't take off much as it is rubbed. I don't like diamond ground stones until I am scraping 30 to 40 PPI

I do like the use of the Highlighter or it looks like "red lead" as it dulls the shinny high spots. and it's easier on the eyes when scraping. They don't show everything after the stone or before, or clean the surface after scraping with Windex or mineral spirits so the stone doesn't plug up, or use a clean hand to wipe off the surface or they don't show him doing it before rubbing the blued plate though. His white cotton gloves look dirty. Wearing the gloves helps on the hands from getting sore then not wearing gloves.

It appears he switched hand scrapers on the 2nd scraping as the width of the scrape mark is narrower. Or he ground the radius smaller. Most will have 2 scrapers, so you don't have to replace the carbide as often. I prefer a clamped on carbide insert and not brazed on as brazed you have 2 blade (flipped) and clamped you have 8 sharp sides. I like how his scraper bends too, compared to a stiff handle.

It was edited to that many points as I suspect that was 3 or 4 more scrapes after the first scrape. It doesn't show him cross hatching or changing directions at a 90 degrees to get the checkerboard pattern after each scrape, so its edited. Also he avoids the low areas, goes around the "no blued areas" in the 2nd scrape which is the way it's done.

Again he is not aiming at the blued high spots, he is scraping high and low area's and it will get more points, but takes longer to scrape to get more points. I call what he is doing "Machine gunning" he needs to be a "snipper" and aim at each high spot (kill factor is better then spraying all over the place. . If you aim it takes less time. It takes hand / eye coordination to hit the individual high spot and is more difficult then random machine gunning the area scraping which you do in the beginning. My students can testify this as I have them random scrape in the beginning to get a checkerboard pattern, reversing directions after each pass on the surface as the bearing comes out faster.
 
Here is he complete thread on PM. I write on both forums as they both spread the word.
 
The above youtube video is getting a pretty good chip from scraping. I get some chip but a lot finer. Is that a technique issue, or is the above video not cast iron?
 
If you haven't measured your depth of the scrape marks take a magnetic base and attach it to a1 2 3 block and set it on the bottom of your straight edge with a .0001" indicator. Put the indicator close to the 1 2 3 block and put the stem in a scraped low spot then slowly move the 1 2 3 block enough to move the indicator onto a high spot. Check 3 or 4 low to high spots. The minimum should be .0002" and the maximum is .001" / average the spots and if you have around .0004" your good. I would think the low scrape spots in the Japanese show is about 3 to 4 tenths. It looks like it's more but it isn't. Oh he is scraping IRON... If your not getting a minimum of .0002" you are chicken scratching...lol or that's what we call it when you afraid to push down. I used to say push down until the scraper handle bends.

My good friend Keith Rucker came up with this idea when I was teaching a class inside his shop down in Georgia. He walked up to his house and brought down his bathroom scale and I put the hand scraper on it and pressed down to what I felt was the right pressure. 8 pounds downward pressure is what you need to do. to get the carbide to cut good and to get the right scraping low spot. Always press down the same pressure weather your roughing (paint scraping) or pin pointing going for 40 points. Do not lighten when you get more points. keep the depth the same, just shorten your length and use a rounder radius. 90 or 60 for roughing x 1" long for roughing and a 20 to 40 radius x down to 1/8" long. start long doing the checkerboard pattern and as you get more points shorten you stoke slowly, say 3/4" next time 1/2" next time as you get more points 3/8 - 1/4" then 1/8" all the same depth. Did you notice I tell who taught me something to the public, I don't pretend I figured it out myself as some do. Many Never give me the credit for what I taught them. If you look on you tube famous people who scrape mention me as their teacher. Tom Lipton of Oxtool, Adam Booth or Abom79, Keith Rucker of Vintage Machine, Stefan Gottswinter, John Saunders of NYC CNC, etc. Just type in the search area on you tube "Richard King Scraping" and see many of them. PS: Press down 8 pounds when using a power scraper too.

Diagrams I have inside my school booklet of PPI nd Percentage, and An award BIAX German gave me for teaching in Austria. Measuring the depth of scrape marks with a tester we had in Austria, Also some students inside my class in my shop. Duane Dickey who is a member and The VP of Bushe Precision
 

Attachments

  • 20200128_055558.jpg
    20200128_055558.jpg
    294.6 KB · Views: 21
  • Golden blade award.jpg
    Golden blade award.jpg
    330.1 KB · Views: 16
  • 20191022_112834.jpg
    20191022_112834.jpg
    375 KB · Views: 15
  • 20191022_112958.jpg
    20191022_112958.jpg
    313.6 KB · Views: 15
  • 20201112_145635.jpg
    20201112_145635.jpg
    513.8 KB · Views: 14
  • 20210328_152854.jpg
    20210328_152854.jpg
    426.9 KB · Views: 15
  • 20210619_120131.jpg
    20210619_120131.jpg
    579.7 KB · Views: 14
  • 20210714_172408.jpg
    20210714_172408.jpg
    479.4 KB · Views: 12
  • 20210718_092505.jpg
    20210718_092505.jpg
    544.9 KB · Views: 18
  • 20200128_055814.jpg
    20200128_055814.jpg
    179.6 KB · Views: 16
Last edited:
Back
Top