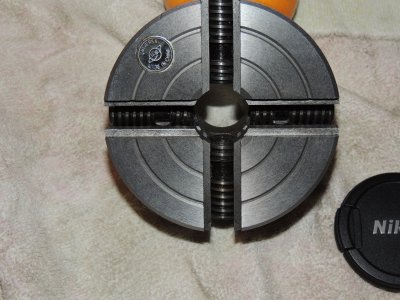
removing jaw screws on independant chuck

LEEQ

Active User
H-M Supporter Gold Member
Joined
Jan 13, 2013
Messages
1,033
I have a Universal 4 jaw independent chuck (Chinese chuck). I intended to tear it down for a cleaning and deburring. I was expecting to see screws in the back to remove the jaw screw retainers. I was met with solid looking plugs instead. Anyone know just how these are put together? I would like to pull the screws that drive the jaws to remove burrs. I believe this will smooth out the roughness felt when jaws are pulled out far enough to put the last of the thread in the jaw. Any insight would be greatly appreciated. If I knew what the hidden portion looked like I could figure a way to proceed without damaging my tool. Anyhow, pics..Caleb Army_081.JPGCaleb Army_080.JPG
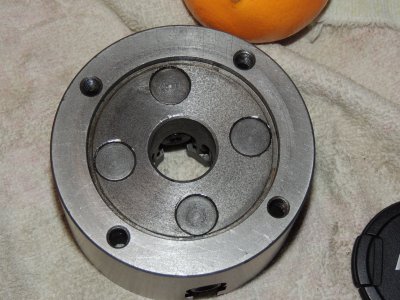
Caleb Army_081.JPG Caleb Army_080.JPG
 
Those plugs should be a very light press fit.
Try tapping them out.
If they don't want to move, you can make a punch that will hit on both sides of the saddle of the retainers.
Just mill the center out of some round stock to make a U shape.
 
If they are solid plugs I was considering drilling and tapping a small hole in the center of each plug to aid in pulling these in the future. I thought of the forked punch. but this is a small chuck. The slots above the forked plug are not any larger than they are, so if you milled a slot wide enough to clear the screw, there would be nothing left of a punch that would fit through the slot.
 
Common enough on chucks. Usually just a easy fit with minimal friction so they dont just fall out on their own. The backing plate keeps them secure.
They should just tap out easily from the front side with a suitable sized pin punch.

Cheers Phil
 
You probably know what a bearing cap looks like on a crank shaft, right? Anyhow, there a small inverted retainer (looks just like an crankshaft bearing cap) holding each of those screws in at the center. You need to remove those round caps to get at it. Maybe, with a small punch, you can punch it out from the front side.

Now one thing I'd like to pass along... Don't go nuts deburring your chuck. They fit nice and tight for a reason.


Ray
 
Thanks guys, I'm not referring to changing machined surfaces, but rather to removing horribly sharp edges where two machined surfaces meet on Chinese cast products. Also to smoothing out the very end of the thread on the screws so that the buggers don't grab at and prematurely wear my jaws when I dial them out far enough to engage this portion of the thread. I'm not much of a motor head, so your reference to cranks or cams is lost on me. I thought I knew how they were retained, but maybe not so much. I picture a solid plug with a round slot cut in the end that cups the unthreaded portion of the screw on this chuck. I know this is what both ends look like, but as to whether or not it is only one piece I cannot see. I will probably take a weency pin punch to it back in the shop to see if I can get one to slide out.
 
I found on my latest 4 jaw chuck that the jaws had some sharp edges and also the tee slots they run in were a bit rough on the machined surfaces. I stoned those parts smooth and broke the edges. Made a huge difference to the smooth turning of the chuck key

Cheers Phil
 
Well the weency pin punch made quick work of it. They are indeed one piece. I can see damaging the bore the screw rides in easily with the pin punch so I may yet drill and tap those plugs. I removed burrs and cleaned up the beginning and ending of the threads. It now works much smoother with the exception of one jaw. While disassembled I noticed the screws appear to be cast and then ground for outside diameter only. I might be wrong about that, but the thread where it has not been ground is rough as an old cob. The ground portion raises a burr at the top of each thread all the way around, Sharp! I think I may tear that screw out and go round those threads removing said sharp edge. I can't see anything else that might drag. More on that when I get done turning between centers.
 
Leeq,
With the screw removed, run each jaw in its slot by hand. Checking for tight/rough spots. Apply a bit of lateral force to them also.

cheers Phil
 
Those plugs will be easyer to remove next time and you won't often have to take it down that far.
If you drill and tap them, you'll need to plug the hole to keep lube in the chuck and chips out.
Make certain the plug doesn't interfere with internal clearance.
 
Back
Top