Pocket Milling

CrossSlide

H-M Supporter - Gold Member
H-M Supporter Gold Member
Joined
May 19, 2014
Messages
70
I need to mill a 4" x 3"x 1" pocket in a piece of aluminum stock. What is the best process and end mill type?
 
With a manual mill? If so depending on the number of parts required, set stops in all three axes and rough it out just shy of finished size then finish, use the largest 2 flute high spiral endmill that the corner radius dimension will allow, use much coolant or air to evacuate the chips. The chips will be your biggest problem as they will fill up the pocket and be recut, this is undesirable at best.

One of the advantages of a horizontal milling center is that gravity does most of the chip removal work.

Good luck
 
The mill is G0704 and is manual. Is there any advantage to using a ballnose vs. square endmill or some type of indexable mill?
 
If the pocket requires a specific radius at the bottom corner then a ball mill is the only way to do it, this will need a very small step over to finish the floor of the cavity with, otherwise leave a step at the bottom corner and finish with the ball mill, this will save a good deal of time. You probably do not have the power to use an inserted mill as intended they are also not the best at evacuating chips (many have through-spindle coolant holes which will blow the chips across the room, you almost certainly do not have through spindle coolant capability), however they have the advantage of simply replacing inserts rather then the entire tool.
 
The mill is G0704 and is manual. Is there any advantage to using a ballnose vs. square endmill or some type of indexable mill?

On a manual mill use the ball nose to create a corner radius in bottom of the pocket. It doesn't work too good for any other milling of the pocket. Use a sharp corner or one with a small radius for the bulk of the mill operation removing aluminum from the pocket. Either run a mister at full blast or compress air to evacuate the chips. You also may want to drill pilot holes at each corner to give you a point to start the end mill so you don't have to plunge the end mill. If you do, use a drill bit about 1/32" under the end mill diameter.
 
I have a G0759, which is just a G704 with readouts. I had a project where I cut a dozen 2X2 X1.5 pockets in cast iron. It really helped to remove most of the surplus metal with a drill. It is a lot easier and cheaper to sharpen a drill than replace that nice end mill.
 
I would first go in with a corn cob roughing end mill and use a vac. Be VERY careful of metal build up on the bit AND chip build up in the pocket. Use a cutting fluid if necessary and the vac. I do not like blowing chips all over the place, I use a vac. A corn cob cutter makes easy chips to suck up. After it’s roughed out, go in with a two flute and size it up…Dave.
 
I have a G0759, which is just a G704 with readouts. I had a project where I cut a dozen 2X2 X1.5 pockets in cast iron. It really helped to remove most of the surplus metal with a drill. It is a lot easier and cheaper to sharpen a drill than replace that nice end mill.

I was thinking about that...
 
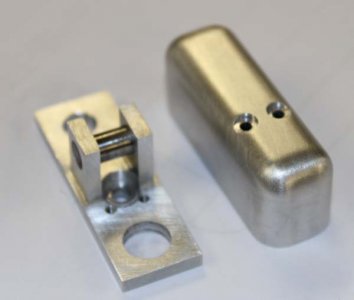
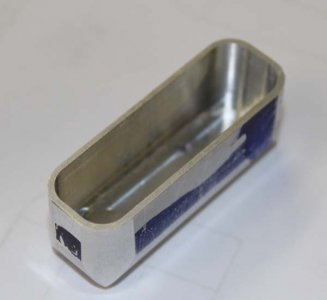
Good topic. I had to mill some cavity pockets in these little aluminum rocker covers (my IC radial engine build). The fine tooth rougher EM & vacuum chips trick worked well. I set up hard stops in the X-direction & just had to monitor the Y-direction. I think I left about 5 thou finishing for final dimension around the inside perimeter. This pic doesn't show the issue but when I got to the corners , the EM got a just a little bit grabby & seemed to cut 'a bit more' even though the DRO said that was the end point. I can see an ever so slight transition line at the end point. I remember locking the table in the first direction before going to the next (90-deg) direction hoping to eliminate any drift. Is there a trick to this finishing stage? Maybe no climb milling allowed? I haven't tried those high helix spiral EM's yet, maybe that will help? I seem to recall I had a similar issue with mild steel.

IMG_0634_edited-1.jpg

IMG_0629_edited-1.jpg
 
Good topic. I had to mill some cavity pockets in these little aluminum rocker covers (my IC radial engine build). The fine tooth rougher EM & vacuum chips trick worked well. I set up hard stops in the X-direction & just had to monitor the Y-direction. I think I left about 5 thou finishing for final dimension around the inside perimeter. This pic doesn't show the issue but when I got to the corners , the EM got a just a little bit grabby & seemed to cut 'a bit more' even though the DRO said that was the end point. I can see an ever so slight transition line at the end point. I remember locking the table in the first direction before going to the next (90-deg) direction hoping to eliminate any drift. Is there a trick to this finishing stage? Maybe no climb milling allowed? I haven't tried those high helix spiral EM's yet, maybe that will help? I seem to recall I had a similar issue with mild steel.

I would second the use of a fine pitch roughing end mill. Drill a starter hole to start the cut. A vac is a very good idea because the rougher will output a lot of fine chips and re-cutting them will reduce the life of the end mill. Leave at least 0.010" along the periphery and at the bottom for finishing. I suggest a high helix 2 or 3 flute end mill for finishing, with WD-40 for coolant.

Petertha, I'm not sure if I understand your situation but an "over-bite" can occur in corners because the end mill is cutting two surfaces at once. End mills don't like to do that. They cut fine on the end or the side but not both at once. They also do not like to cut on two sides at once, which is what happens when you hit the corner. When I have corners to finish that have to be clean I plunge the corner to get the corner radius and then use a smaller end mill to feed into the corner from two directions. Seems to work better for me anyway.
 
Back
Top