New shop build -- photo intensive thread, warning!

mleptuck310

Registered
Registered
Joined
Feb 23, 2022
Messages
26
I'm new to this site, but figured I'd jump in and detail the new shop I designed, engineered and built over the past year and a half. To start, in late March of 2020 we somehow sold our house in 3 days for well over asking price in the initial stages of the lockdowns (the folks who bought it never set foot in the house until settlement day; did everything via facetime on my wife's phone, believe it or not). So, come early July, I needed to move the contents of my wood/machine shop in our daylight basement to the new place. Here's my old space mid-move out:
IMG_20200626_160632.jpg

So after I loaded everything into a 24' rental truck, I got to deliver it all to the new place, and it filled two of the three bays of the attached garage:
PXL_20201112_021004693.jpgPXL_20201112_020950237.jpgIMG_20200801_100909.jpg

THEN, to make matters worse, these two guys just followed me home from some weekend adventures (and got stowed into the garage too):
IMG_20200725_163841.jpgPXL_20210421_213922940.jpg

Our new place is ~6 acres, about 5 of it pretty heavily wooded with mature black oak, poplar and several hickory trees. I started scouting potential building sites in the property, with an eye on how I could minimize the amount of tree work to do, vehicle access, how I could get utilities out there, etc. and we settled on a spot off of the top of our driveway, about 150' from the house. Labor Day weekend of 2020, the Gravely went to work on the brush:
IMG_20200907_140349.jpgIMG_20200907_140347.jpgPANO_20201009_164356.vr.jpg

As winter came in, I got the design and engineering pieces of the building knocked out, and started the civil engineer on the stormwater plan (what a racket that is...). Now that the leaves and foliage were down, I started seeing more and more iffy trees that would be surrounding the building, and as my critical eye looked more and more, what originally was a plan to drop 5-7 trees (keep in mind, most of these trees are in the 100' tall region) grew to about 20. A new bar and chain on the Farmboss, a handful of felling wedges, a sledge hammer and a peavey, and away I went:


PXL_20210117_191211327.jpgPXL_20210124_183453345.jpgPXL_20210112_214042402.jpgPXL_20210311_221039031.jpg
PXL_20210312_205617306._exported_1466_1621348231020.jpgPXL_20210311_221053268.jpg

This was the biggest tree I had to drop -- that is a 20" bar on the saw for scale, and it JUST made it....
PXL_20210303_223241272.jpg

We were left with a nice pile of butt logs that I was able to sell off to a local sawmill (kept a few for myself too):
PXL_20210319_212125462._exported_0_1617325918057.jpgPXL_20210319_212112289.jpg

Then, a few days of chipping (and stump grinding, not pictured) followed:
PXL_20210417_172138563.jpg

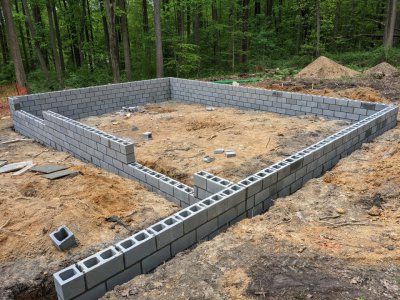
Until FINALLY I could get some footings dug and poured, and my block walls in place:
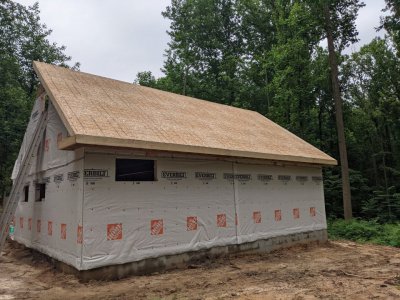
pxl_20210507_203604346-jpg.397942


To be continued!
 

Attachments

  • PXL_20210507_203604346.jpg
    PXL_20210507_203604346.jpg
    273.9 KB · Views: 239
After hemming and hawing about the insane price of lumber in early 2021, my wife got tired of my griping and TOLD me to just order the damn lumber and shut up. Who was I to argue?

So, let the framing begin! 9' pre-cut 2x6 walls in 12' sections, so I was able to stand them all solo (a couple were a tad hairy, but none got dropped, and no injuries reported.

May 13th the first wall section went up:
PXL_20210513_220612305.jpgPXL_20210516_174519803.jpg
PXL_20210516_204637682.jpgPXL_20210518_104931258.jpgPXL_20210518_104957034.jpgPXL_20210526_202608325.jpg

2 lengths of W12x26 steel, and I'm ready for the 2nd floor deck:
PXL_20210528_201807829.jpgPXL_20210530_132827606.jpg

I **HATE** OSB, and really really wanted to sheath and deck in CDX, but geez, the prices... I was convinced to go the OSB route, and I have to say the LP 3/4" T&G subfloor they gave me went together WAY easier than any CDX I'd ever put down. A few light taps with the sledge on a beater board, and the tongue was nicely seated, and away we went.
PXL_20210531_211442602.jpg

Now to frame a 9/12 up and over by myself.... 16' 2x8 rafters maxed out (had nothing by a million little triangles left over once all the rafters were cut. Really wasn't bad at all getting the ridge up. Made some temporary props, slipped one end, then the other end of the ridge between pairs of rafters and, it started to look like something:
PXL_20210606_211942777.jpgPXL_20210606_212023074.jpgPXL_20210607_220648293.jpgPXL_20210609_213837459.jpg

The plan was for an 8' covered slab the entire front length of the building (and the porch columns sat on the slab), so while I waited for the flatwork to get done (other than the spray foam insulation, the concrete flatwork was the only thing I didn't do myself) I got rafter tails and soffit framed, framed my fly rafters and return roofs, and sheathed the back roof:
PXL_20210624_223516996.jpgPXL_20210624_223556854.jpg

Front and interior slabs poured, so now I can start planting columns on there and framing the porch roof:
PXL_20210624_223634628.jpg
PXL_20210627_183507597.jpg
 

Attachments

  • PXL_20210613_210828164.jpg
    PXL_20210613_210828164.jpg
    205.6 KB · Views: 6
Got the roof weathered in over the July 4th holiday. I even had my wife up on the roof feeding me shingles
PXL_20210704_180933160.jpgPXL_20210705_154819415.jpgPXL_20210705_201759080.jpgPXL_20210709_213422464.jpgPXL_20210710_152034052.jpgPXL_20210711_184109379.jpg

Then had to go source some bluestone to cap off the block wall on the uphill side of the porch, and then plant the roof column back on top when it was dry
PXL_20210716_200421740.jpg

Upstairs kneewalls and collar ties in place, ready for my framing inspection. I've got ~15' kneewall to kneewall, and almost 9' wide of 7'+ ceiling. Not totally ideal; I'd have loved to have done a shed dormer the length of the back of the building, but the additional costs for structural ridge beam, the chance I would have had to introduce columns on the 1st floor to transfer roof load down (avoiding columns was a MUST in my design choices), etc. just wasn't worth it in my mind. The 2nd floor is going to be where all the woodworking machines live, and I don't use them nearly as much as the machining tools, so I'm okay up and down as needed when I need to do some carpentry.
PXL_20210829_165526829.jpgPXL_20210829_165539630.jpgPXL_20210829_165600267.jpg

Time to get power out there. NEVER in my life would I have guessed the 1"(Ethernet and coax) 1.5" (3/4" PEX water line) and 2" (3x 1/0 SE cables) conduit runs to the building would cost more than my service entrance cables. Go figure....
PXL_20210903_172931953.jpg

I was fortunate enough to have a separate 100A off-peak meter on the side of the house that was only feeding a few house circuits. I consolidated those into the main house panel, and now had the entire 100A feeder segregated for the garage. Only problem is, the meter bases are on the back of the attached garage, and our outdoor compressor was only about 1 foot away from the building, and I needed to trench 3'+ deep (since I was running water out there). This 10' length of trench got dug by hand with a lot of cursing and sweating (it's July, remember?)
PXL_20210906_183002561.jpg

New 100A disconnect on the bottom of the meter base, and 2" into it for SE cable. 1" stub for low voltage stuff sticking up, and the 1.5" can be seen entering the basement below frost line)
PXL_20210906_201208575.jpg

Then, I needed to burrow UNDER the sidewalk behind the garage (with a 4" trenching shovel and digging bar from both sides, like I was digging the Channel Tunnel)
PXL_20210906_183016513.jpg

And pipes connected and critter/water proofed until next sections went in:
PXL_20210906_201222183.jpg

The backhoe made pretty quick work of the remaining 150' of trench.
PXL_20210911_184149914.jpg

Until I hit some GIANT rocks I decided were easier to bore beneath than attempt to dig out:
PXL_20210913_215400488.jpg

Until I was finally ready to pull my SE cable (custom rack-a-tier by yours truly):
PXL_20210916_205237652.jpg

Finished up with a piece of Azek on the new building and conduit bodies into the building as needed
PXL_20210917_200236703.jpg

Let there be light! I did nine 8,550 lumens LED fixtures for the ~900 sq.ft. of 1st floor space. Each fixture is 3 bulbs, and I split each fixture internally and wired to different switches so I can halve the light output as needed.
PXL_20210903_172937888.jpg
 
Nice.
With all that wood cleared, you could have done like Keith Rutker... He cut down a lot of trees, then sent them over to be milled and dried. The resulting lumber was used for a beautiful post and beam shop. I hope you sold that lumber...

Now, great shop. I hope those steel beams will be strong enough for a chain fall and trolley. How big is the square footage?
 
That looks like a great space!
 
Nice.
With all that wood cleared, you could have done like Keith Rutker... He cut down a lot of trees, then sent them over to be milled and dried. The resulting lumber was used for a beautiful post and beam shop. I hope you sold that lumber...

Now, great shop. I hope those steel beams will be strong enough for a chain fall and trolley. How big is the square footage?
I thought about that, and LOVE post and beam, but it would be uncharted territory for me (framed hundreds of houses, done ONE little post and beam porch project), and also kicked around a steel-clad post frame but really wanted more comprehensive insulation/air stopping, more ability to be flexible in mounting cabinets, fixtures, etc. The butt logs all got sold (I donated a few to a non-profit antique machinery museum I volunteer for), and all the shorts in the pictures were hand split (I LOVE splitting wood by hand), stacked and are used for camping and backyard firewood.

Beams can easily lift 3500# with very allowable deflection at midspan (1/200; not great but for quick lifts and drops, not an issue) and I've got trolleys for both. First floor sq. ft. is ~900 (25 x 36) upstairs about 500 (14x36) with lots of storage behind kneewalls I'll be using liberally.
 
When I saw those oak logs in your pics the post n beam idea occurred to me too. Very cool idea but you have to separate "practical" from "would love to do" to actually make progress some times.

Very nice job so far!

I like that you laid 3 conduits while you have your trench open. Do you have an initial use for all 3? Is it possible to pull a water line while your trench is open?

Edit: I just read that you are putting a water line in. GOOD CALL!
Hi Mike, you got it -- three conduits one for electrical service, one for water and one for low voltage. Next post or two will show more details on the utilities I ran out there!
 
Back
Top