Mini Lathe Mount on Workbench - Heavy Old Wooden Desk

MaverickNH

H-M Supporter - Gold Member
H-M Supporter Gold Member
Joined
Nov 6, 2012
Messages
128
I have a heavy old wooden desk I’ve put my LMS 7x12 mini lathe on, with a sheet of 1/8” oil-resistant rubber under, with the supplied rubber feet. As I’ll be converting that lathe to a 7x16 shortly, I’m reconsidering the workbench mounting.

I could rough-level that desk with shims under the legs, replace the rubber sheet with a steel plate, remove the rubber feet and bolt the bed down metal-to-metal, using shims to level.

Is that overdoing it?

BRET
 
Yes. IMHO. :)
You will get different opinions, no doubt about that. Ted Hansen and others have shown that bed twist isn't an important issue with 7x lathes, as most of them have other sources of inaccuracy that are more important.
You could always just put the new lathe where the 7x12 sits now, and upgrade the base later if necessary.
Congrats on the new purchase - that extra distance between centers will be nice.
 
get the drip pan/tray if you don't have one already,, depending on the desk top sturdyness a metal plate might be helpful,, adding some screw levelers to the desk legs...
 
get the drip pan/tray if you don't have one already,, depending on the desk top sturdyness a metal plate might be helpful,, adding some screw levelers to the desk legs...
LMS has a larger/thicker tray I ordered - it’s much nicer than the stock unit that comes with the extended ways kit.

A local metal shop is making me a 1/4” x 24” x 36” steel plate, which I’ll bolt to the wooden desktop. As a 7x16 lathe is pretty small, it will be nice to have a larger surface on which to mount a magnetic indicator holder when mounting to the lathe isn’t possible.
 
Almost there on my bed extension/DRO install!

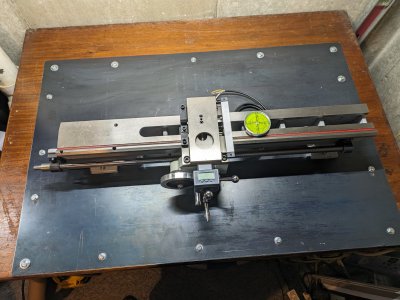
I’ve mounted that 1/4” x 24” x36” A36 steel plate to the top of my wooden desk with 1/4” lag screws/washers around the perimeter. The lathe bed has M6 threaded mounting holes. Rather than mounting through both the steel plate and desktop (combined ~2” thickness) I’m considering simply bolting the bed down to the 1/4” steel plate by drilling/tapping four holes in the plate.

While the manual has measurements for mounting holes, I’ve learned that these bed castings are not quite precise. I can set the bed on the plate to mark and drill the holes, but find the overhanging ways and components make getting a transfer punch aligned vertically not possible. How best to mark holes for drilling/tapping?

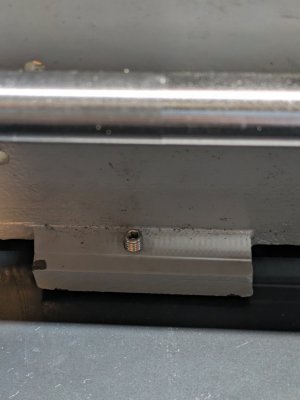
I see there are M6 cone-point set screws - might I twist in 20mm screws to extend a bit from the ~12mm thick bed base and bang on them to mark for drilling/tapping?

BRET
 
I did a similar thing to you (my steel plate is 6mm, so a little thinner than yours) but my plate is on top of a steel lathe stand designed for a 10x22 lathe (Amadeal didn't have any lathe stands for a 7x14).

To work out the holes, I ended up measuring the holes' relative positions, creating a sketch in Fusion 360 with dimensions, printed it out (via the arse about face you have to if you have a free license) and then marked out the plate using the drawing as reference. Lots of measuring twice there.

I also made the holes, clearance holes (8mm IIRC) so if my drilling was off by a mm or so (I was using M6 bolts), it wouldn't be an issue.
 
LMS has a larger/thicker tray I ordered - it’s much nicer than the stock unit that comes with the extended ways kit.

A local metal shop is making me a 1/4” x 24” x 36” steel plate, which I’ll bolt to the wooden desktop. As a 7x16 lathe is pretty small, it will be nice to have a larger surface on which to mount a magnetic indicator holder when mounting to the lathe isn’t possible.


Link? Pics?
 
Link? Pics?

I’m glad you asked! I’ll see if the holes in the chip tray match the bed casting.

[EDIT] - yep the holes are about 1/2” for M6 bolts, only good for rough positioning.
 
Last edited:
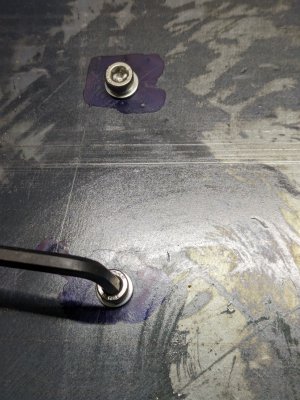
It worked! The Cone-Point Set Screws, when threaded into the bed mount and extended a little bit, worked like four spaced center punches to mark the steel plate for drill and tap locations. I decided to leave out the chip tray, as it would just impede brush & vac cleanup. It’s <1/2 degree off from level in the long direction of the ways and barely off perpendicular to the ways, so I didn’t shim before bolting the bed down.
 

Attachments

  • PXL_20231206_170139564_Original.jpeg
    PXL_20231206_170139564_Original.jpeg
    147.2 KB · Views: 3
  • PXL_20231206_172138425_Original.jpeg
    PXL_20231206_172138425_Original.jpeg
    413.8 KB · Views: 3
  • PXL_20231206_212519971_Original.jpeg
    PXL_20231206_212519971_Original.jpeg
    502.4 KB · Views: 3
Back
Top