Making the lead screw last

Shotgun

Registered
Registered
The lead screw on my 12"x52 Craftsman is so worn that the half nut won't even stay engaged. The thread faces have been worn down to knife edges. I fixed it initially by filing out a small amount of material from the end of elliptical slots on the half nut carrier. This allowed the nut to clamp tighter, and worked for a while. But, it only takes it to jump a thread on the leadscrew once while trying to single point a 20tpi thread as the last operation of a part to send you looking for solutions.

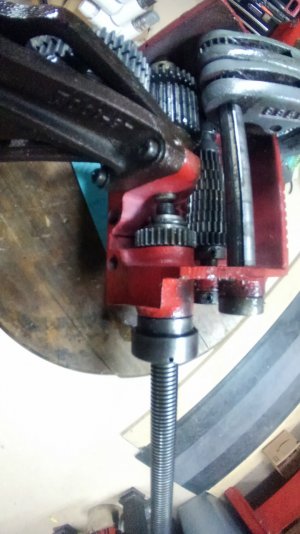
My solution was to flip the lead screw around, since the tailstock end looked practically brand new. The threaded end, down at the tailstsock, slid into the headstock side receptacle far enough to leave .850" between the leadscrew and bearing on the tailstock end. I chucked the leadscrew, and drilled a 1/4" into the headstock end. Then I took a 1/2"x20 bolt, and turned it so that it had a 1/2" long pin where the head used to be, and drove it into the hole in the leadscrew. That extended the leadscrew, and provided for something to ride in the bearing. I then cut down a piston wrist pin from a Corvair engine I blew up to take up the slack area between the end of the lead screw and the bearing.

I don't rightly know what the threaded end of the leadscrew is riding against down inside that receptacle. Maybe I should stick a brass washer in there?
 
First, your lathe is either a 12x24 or a 12x36, not a 12x52. I would tentatively assume that it is a 12x36.

I would also assume, as you didn't give the model number or serial number and you said the the cutoff right end fit into the gearbox and not into the slip clutch, that your lathe is one of the early 1/2" bed machines that did not have the slip clutch.

In any case, what you should have done before cutting off the original 1/2" diameter right end was to scribe the left end flush with the gear box and then measure the length of the lead screw that fit into the gearbox. But as it is too late to do that, I would recommend that you pull the lead screw back out of the gear box about 1/16" and then shim the new right end so that the screw is locked in that position. All thrust on the lead screw is or should be taken by the bearing at the right end, not by the gear box. But in any case, do not put a brass or any other material washer into the right end of the gear box and then shim the right end of the lead screw so that the left end bears against the washer. You should also ASAP replace the half nuts if you haven't already done so.
It's a 101.28990. My tape measure says that the bed is 47" from the face of the head stock to the end of the table. I got the 52 from the length of the leadscrew.

I didn't cut off the original threaded end. Don't think I said that. The only mod I made to the leadscrew, was to drill (gundrill?) a 1/4" hole into the headstock end about 1/2" to 3/4". The bolt I mated to it is stuck in there pretty good, but I could just saw it off and return it to the original configuration in a few minutes.

What is the issue with the leadscrew bearing on the gearbox end? There was a lot of red lettering in that post, but no explanation of what the problem would be. Would there be something grinding in the leadscrew drive? It appears to be bearing on a surface, that is securely held against the headstock's cast iron through bearings of it's own, and is spinning at the same rate. But, I could be wrong. I didn't review the Tubalcain video on how to pull the gearbox until late last night (missed the screw behind the threading chart on my first attempt), so I couldn't conclusively verify that this was the case.

Why would I be in any hurry to replace a half nut that is working just fine? I don't see where it would cause a problem other than maybe screwing up the threads in a piece of scrap I'd be turning at some point in the future. This IS hobby-machinist.com, after all? Right? Emphasis on hobby? And, I have a lot of other accessories to buy before replacing a working part.

By just flipping the leadscrew around, I improved the machines performance at any task I'm likely to undertake. Just took a few minutes and a bolt. And unless you know something I don't, I believe it will be working long after I'm not. I'd much appreciate knowing of any info I don't have on this point. But, I'm not interested in maintaining a museum piece. Just want to make small pieces of metal out of big pieces of metal with tools that I can afford, and that may include half-*** rigging an old machine to keep its old parts working, because all I needed was one cheek to begin with. :)
 
Wa5cab was certainly right about not letting the gearbox absorb the force of pushing the carriage down the lathe bed. The lead screw will go right through the drive receptacle, and rest against a different shaft.

KIMG0520.JPGKIMG0520.JPG
 
OK. Your machine is a 101.28990 (same except for badges as the Atlas 3996 that I have) which is a 12x36 machine. Bed length means the length overall of the ways. Which is 54" more or less. The 101.28990 has a slip clutch on the output of the QCGB. The lead screw slides into the slip clutch and through a keyed friction washer and stops a little short of the end of the 3/4" diameter gearbox output shaft. It should not touch the output shaft as in the event of a crash or an overload on the lead screw, the lead screw should be able to stop even if the spindle and gearbox are turning.

Near the left end of the lead screw is a 1/4" nominal diameter hole drilled through the unthreaded part of the screw, This hole is used for calibrating the slip clutch. Instructions for doing that are in the 3996 and 101.28990 manuals in Downloads as well as some of the others, and in the standalone manual on the 101.201451 QCGB. If you didn't already do that, you should download a manual, drill the hole, and perform the calibration.

The majority of the lead screw is 3/4" diameter, most of which is threaded 3/4"-8 Acme. Two inches of the right end is 1/2" diameter, the end of which is threaded 1/2"-20.

I said to remove and replace the half nuts because of the amount of wear on the lead screw threads. In retrospect, I should perhaps have said to remove and inspect the half nuts. And replace if necessary. However, unless they have been replaced already, and fairly recently, given the amount of wear near the left end of the lead screw, they will be worn out. Normally one would expect the lead screw to outlast the half nuts 2 or 3 to 1. The original half nuts are cast of Zamak. Most after-market ones will be of brass or bronze. Within the past 6 months, Clausing still stocked originals. And at comparable prices to the after-market ones. The originals will generally outlast the after market ones. Especially if the latter are brass. Checking them is fairly simple. The lands and grooves were originally the same width. If the lands are noticeably narrower than the grooves, replace them. Hobby machine or not.
 
Back
Top