Making springs?

homebrewed

H-M Supporter - Gold Member
H-M Supporter Gold Member
Joined
Jul 28, 2017
Messages
2,384
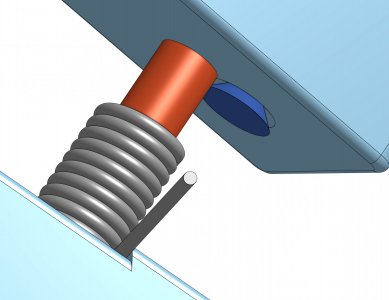
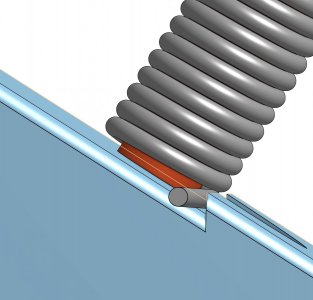
For various reasons I may find it necessary to make a small spring to repair the latch mechanism in our sliding patio door. The spring is a little unusual, with one end having an extended hook but not the other. I haven't found an off-the-shelf replacement, and the replacement latch I bought turned out not to be compatible. There's some angst there that I won't fully go into here (yet), but it appears that the manufacturer wanted to capture more income by making their latch SLIGHTLY incompatible with generics, and that there latch is no longer available. Kicked to the curb by their nonexistent customer service. Anyway, I discovered the problem was due to that there spring. I tried using a standard spring, but that didn't work -- the extended hook is vital. Springs with that kind of end are not as common, and so far I haven't found one small enough.

I tried removing the strike portion of the latch, thinking that I could put something in there that _is_ compatible with a generic -- but who-ever installed the strike must have used screws that are about a foot long (ok, I exaggerate some) because it's impossible to back them out. Heads stripped in the attempt. Replacing the whole slider because of this F-ed up situation will cost big bucks. OK, cool down...time to make a spring that does the job.

I found this site about making springs. Anyone taken this route? Any words of wisdom? The spring I'm talking about is about .2 inches in diameter so the hazards of making big springs aren't an issue, it's the other things I don't know yet.
 
Yep, springs are pretty easy to make. Controlling the tension on the feed in may take a little thought, and be careful as the wire diameter gets bigger, there can be some slightly hazardous spinning around when you cut off tHe feed wire when finished.
 
Any comments on annealing the springs so made? The link I mentioned indicates that they need to be heated to ~500F to relieve the stress from forming them. How do they hold up if they're not heat treated? I'm not crazy about using our kitchen oven to do this, although I could wrap a spring in some metal foil to keep fumes under control if need be. How about a pass or two with a propane torch, above a candle flame, etc? Nope, not a make-a-million solution: I just want one. But a reasonably reliable one.
 
Match the diameter with music wire. Using an arbor in your lathe, with tension on the wire, manually turn the arbor so the wire is wrapped around the arbor. (experiment, the arbor must be smaller than athe desired diameter.) Once you get onto it, it's easy, not before you get it, though, you'll have a few failures. Expect them. Tension saves the day. I use a piece of soft steel to press against the wire at contact with the arbor, as it turns to generate pull on the straight wire. Leave some unbent, With pliers, bend it 90º to be the straight section.
 
A few things you can do since you have one to copy.
1. Measure the wire dia and use that same diameter of music wire. Most hardware stores and even the big box stores have music wire in 3 foot lengths.
2. Measure the pitch of the spring. you will want to get close to that.
3. If the pitch of the original spring is other than tight together, it helps to use a threaded mandrel to wind it on so that you end up with the correct pitch.
4. When you are making the final bends for the ends and for the transition from the spring to the end, use a round nose pliers, a sharp bend will create a stress point that will likely break fairly soon.

5. It will take a bunch of experimentation with different size mandrels because the spring will expand a bunch once you let off the tension.

Be CAREFUL when letting off the tension right after winding, it can whip around a bunch of turns really fast and the tag end of the wire is sharp.

Do NOT use your nice wire cutters to cut the music wire, it is very hard and will damage the cutting edges of your wire cutter.
 
I manufacturer for a customer spring winders, hand held for .009 music wire, mandrills in three sizes, .047, .061 and. 2mm. the mandrills are about 2" long, which limits the length of the springs, but longer pieces could be used. They are hand held and operated. Not counting the wire, the winder will fit in a shirt pocket. (I don't see them on his website right now, maybe their out of stock...hmmm, I haven't heard. ) He sells products for rubber powered model airplanes.
 
I have to make some small torsion springs for a project which will need four - same diameter, but left hand and right hand, different number of turns depending on how much torque is needed, two must deflect 180 degrees, other two about 30 degrees. And NO, none of the suppliers offer what I need, some close, but no cigar.

This is a sketch of what I plan to make.

Mandrel is 3mm drill rod, the dark blue is a hardened M2 flathead screw in a threaded hole. I adjust the screw extension to turn the .025 music wire and then hold it in place with a grub screw tightened from the top of the handle.

I know the scheme shown here will only work in one direction. When I've used it a bit, I may open the depression on the body to let me turn in eiother direction. Or just make another body.

Anyone see anything goofy here?
 

Attachments

  • spring-winder3.jpg
    spring-winder3.jpg
    153.8 KB · Views: 5
  • spring-winder-2.jpg
    spring-winder-2.jpg
    154.5 KB · Views: 5
  • spring-winder-1.jpg
    spring-winder-1.jpg
    93 KB · Views: 5
Back
Top