Leveling and getting my lathe setup for better preciesion

The Headstock was removed from this machine when I got it.
How would I go about confirming it is full aligned with the ways?

My Taig lathe has a headstock that can be adjusted to a minor degree. However, if I recall correctly the most taper I have experienced on the Taig was measured in tenths over a 3" length. The way I got it to minimal taper (around .0001" or less over 3") was to slightly turn the headstock and tighten.

Based on my experience with my Taig, I would try to move and tighten your headstock until you get the taper out, assuming it can be moved to some degree. If your taper is such that the tailstock end of your taper is smaller than the chuck end of the taper, then turn the front of the headstock (spindle end) slightly away from you and tighten, and try that until you get the taper out. By the way, if I recall correctly, you stated in your original post that the lathe is leveled.

Caveat: I am a beginner so what works for me on an entirely different lathe may not work on your lathe. Hopefully, those with experience with your lathe will have some comment as to whether this will work on your lathe.
 
I believe Jim F called it. The headstock was removed when he got the lathe. Sounds like he bought a basket case. To make matters worse he has it on castors. Additionally he allows his 1inch diameter work piece to protrude 4.5 inches from the chuck unsupported. The rule of thumb is about 2 times the diameter at most. Headstock misalignment, lathe not properly mounted, and deflection are all likely contributing causes of his taper.
I was given some advice earlier and it seems to apply here as well. 1) These are things to consider before buying. 2) There’s many jobs you can still do. It doesn’t have to be perfect if it’s only a few % off you can still do certain jobs. And my favorite. 3)This gives you a chance to get to know your lathe and do some head scratching and figure out a few things. All sound advice too. It doesn’t help with his current problem but solid advice just the same.
My advice is to clean it up really good throw in a few cheap tools and sell it for a reasonable price.
When you are checking for twist, you use as large of a round as you get, usually 2", and hang out as much as possible, without chatter.
Usually .001-.003 cuts.
 
Thank you Jim, - I'' try some larger diameter stock.

I will ask that anyone whose suggestions are to scrap it and/or sell it ** PLEASE ** not bother to reply as it provides me with ZERO assistance/guidance or direction - which is why I am posting here. Please help me learn that is my goal.
Unless of course your are willing to finance a new purchase then by all means jump in.

With that said:
LATHE MODEL:
To be specific this is an Atlas QCGB-42 (10")
It was not a basket case - the ways have no measurable wear as opposed the other Atlas TH-36 I have which is dialed in nicely, but has some other issues, and will be for sale when I get this one dialed in.
The QCGB-42 machine is an upgrade for me.

HEADSTOCK:
The headstock was removed for moving purposes to make it lighter, and clean up.
I'm not finding a way to adjust the alignment of the headstock as it is in fact a near interference fit to the bed between the ways.
This was tested by loosening the bolts and placing a mag base indicator on the ways and physically trying to move (wiggle) the headstock.
I was able to see about .0005 that was it.

LEVELING TOOLS: This is what I am using:
Starrette #98-8 - Accuracy per Starrette site:
*** Main level vials have graduations that are approximately 80-90 seconds or .005" per foot (0.42mm per meter)
The graduations on the Vial are approx. 1/8" (3mm) apart accuracy can be extrapolated to 1/2 that or .0025/ft or better.
No different than reading between the lines of a .001 Dial Indicator.
I understand there are levels with finer graduations but I'm pretty sure this is more that sufficient.

TOOLING:
I did take the suggestion to not use a carbide tool and switch to a HSS cutting tool.
(I'm getting better at grinding but still probably only so-so.)
That made an improvement in both surface finish and the measured taper went down to .0015 over the 4" of unsupported stock.
I suspect some of the measured .003 taper may have been the result of the surface finish.
I could see and feel where chips had broken off while cutting.
Clearly we are moving in the right direction.

It is my understanding that it is correct to try and get as much of the potential taper as possible out of the lathe by leveling/shimming and NOT using the tailstock before moving on to adjusting the talistock by measuring turned collars at the ends of a test bar.
If this is incorrect then please let me know.

I do plan to remove the the Legs from the Angle Iron and Castors but for now need it to be somewhat mobile as I rearrange the shop.
I accept this may add to the difficulty in getting the best accuracy this machine is capable of in the "Short Term" - but it's a start.
Life is a journey to be enjoyed over time .
 
If you can live with it, that much is not bad for your situation.
I would live with it until I got the lathe bolted down, then finish dialing it in.
 
If a Starrett 98 level is not sensitive enough for this task, what does everyone recommend?
 
Starrett Model 199Z Master Precision Level
 
If a Starrett 98 level is not sensitive enough for this task, what does everyone recommend?
Levels just gets you close, you have to turn a test bar to get it dialed in.
You also have to calibrate the level before each use.
 
An Update on my journey to better precision:

I spent the better part of 3-4 hours today making a New Tool bit, and rechecking the bed for twist.

The Tools Bit came out quite well but I'm sure many of you guys are laughing at the 3 hours to make (1) tool bit, but as I noted before I'm slowly getting better at this, and I felt it was necessary to really work at it.
I am hoping that at some point I can do this task in much less time but I think it was worth time on this occasion.

I started from scratch using a new 5/16th" HSS Blank. Started on my belt sander with a Miter Gauge to assist in getting the angles started. Then moved to my grinder for the majority of the shaping. and back to the Belt Sander and miter gauge to insure I hadn't messed up the angles too badly while free handing.

I finished it up by honing it on a 4x10" Diamond plate 600 then 1200.
The place I had the most trouble was rounding over the nose. I had to re-do it a couple of times to get that to where I was happy.

First I setup the Tool Bit on Center line using the trap a ruler method.
IMG_3941.jpg

Then I ran another (2) test cuts taking approx .003 per pass with significantly better results now have the taper down to .0003 in 4"
Here are some pic's with some of the details.

I conclusion I think the Carbide tool and the dept of cut was causing significant deflection.
The rest was HSS Tool Bit, Super Careful grinding of the geometry some additional shimming and luck.
IMG_3945.jpg


IMG_3946 (1).jpg

IMG_3947.jpg

IMG_3948.jpg


Have a Merry Christmas all - I will be playing around more over the holidays.
 

Attachments

  • IMG_3941.jpg
    IMG_3941.jpg
    1.8 MB · Views: 6
  • IMG_3945.jpg
    IMG_3945.jpg
    1.5 MB · Views: 6
  • IMG_3946 (1).jpg
    IMG_3946 (1).jpg
    1.3 MB · Views: 8
  • IMG_3947.jpg
    IMG_3947.jpg
    992.4 KB · Views: 8
  • IMG_3948.jpg
    IMG_3948.jpg
    1.5 MB · Views: 8
I do plan to remove the the Legs from the Angle Iron and Castors but for now need it to be somewhat mobile as I rearrange the shop.

Until you have the lathe sited and stable, leveling it is a waste of time. Just use it as is until you can get it in a place where you won't need to move it for a while. You should know that leveling casters, chosen properly to support the weight of your machine, will allow for mobility when you need it and solidity when you don't. I recommend Carrymaster casters if you go this route, and go one weight class higher than your machine actually weighs. With the levelers down, it will be as solid as typical machine mounts would be.

I'll try to give you some tips on leveling.

Whenever you do test cuts, always try to use HSS and make sure it is honed sharp. Keep any nose radius on the tool small, in the 1/32" range, to keep deflection minimized. A good tool with adequate relief and rake angles will cut a softish test bar (12L14, 6061-T6 aluminum) without deflecting much at all when taking small depths of cut. It should also provide a decent finish so that your mic reads accurately.

It is my opinion that doing test cuts is the most accurate way to set up a lathe because it self proves your changes. If you cut and change something, subsequent cuts will show the impact of those changes. I don't like calculations and I won't rely on a MT test bar because of stacking tolerances. This is just my opinion and may not jive with what others prefer.

I further believe that the proper way to set up a lathe is to evaluate the alignment of the headstock with the ways first. If the headstock is off then anything else that relies on that alignment will also be off, including a 2-collar test or tailstock alignment. Some headstocks do not allow for adjustment and may be indexed on the ways. Typically, these will be fairly accurately situated because they are ground to fit. High end lathes will typically allow for some form of precision alignment so you have to check how yours is set up. The best way to assess how accurately the headstock is aligned is with a test cut.
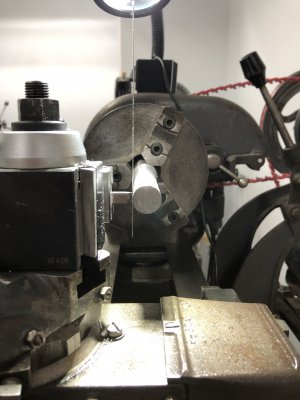
  • Lock a 6" long piece of 1-2" OD 12L14 or 6061 in a 3 jaw chuck, leaving about 4" sticking out. Since this is a first operation, any cuts you take will produce a diameter that is dead on the spindle centerline. The reason for the largish diameter stock is reduce deflection from the cutting forces the tool generates. No tailstock support is used for this kind of testing.
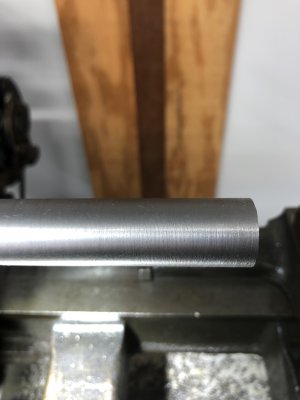
  • Use a sharp HSS tool and take a 0.010" deep cut to remove the skin and make the piece roundish; cut from the end towards the chuck and stop about 1/2" from the chuck. Then take a 0.003" deep cut to refine the diameter and strive for a good finish. Finally, take a 0.001-0.002" deep cut at a slower feed and go for a good finish. Use cutting oil for all these cuts. The last cut should give you a finish that will be good enough to read with a micrometer.
  • Clean the work piece well - wipe it dry, wipe again with alcohol, wipe to dry. Mic the diameter at the end and up close to the chuck. If they are different then the headstock is off relative to the ways. If the end is bigger, the headstock has to be adjusted towards you, and vice versa. Adjust if possible and make test cuts until you nail the alignment. NOW you can level the lathe.
As you know, leveling a lathe is simply assuring the ways of the lathe are coplanar to one another. It has nothing to do with the machine itself being level with the surface on which it sits. A lathe left to sit on a surface will not move much with gravity; we usually have to apply some force to it to get it to move into alignment. To do that, you have to have some way to apply force to the structure of the lathe so that any misalignment of the ways can be corrected. Some lathes have leveling adjusters under the feet of the lathe to allow for precision alignment; my Super 11 is like this. Others must be shimmed, and some lathes bolt to a solid cabinet and adjusting levelers on the bottom of the cabinet are used to twist the lathe that sits on it. I'm not sure how yours is set up but if you do not already have leveling adjusters underneath the feet of your lathe, I recommend you consider fabricating some. It will save you gobs of time and frustration over the years and make leveling your lathe simple.

Okay, you need a spirit level to level your lathe. To be clear, the level is just to get you close and you will finalize your leveling with test cuts done in a 2-collar test (you can look this up) regardless of which level you use. The more sensitive the level is, the fewer test cuts you will need to make to dial in your lathe. A Starrett 98 is good to 0.005"/foot. Most precision machinist levels are good to about 0.0002"/10", so quite a bit more sensitive. You can buy a precision level like this on ebay for under $100.00 nowadays. Again, the more sensitive levels will save you TIME. Imagine if you have to shim your lathe to level it. You shim, test cut, shim, test cut, etc. The more sensitive levels will reduce the number of times you have to do this significantly. If you have to adjust levelers under the cabinet, a better level will save your knees and back. What the Starrett 98 is good for is to get you close. The bubble on a precision level is extremely sensitive and you will spend a lot of time chasing it before it settles down. I use a 98-6 and get the lathe level at both ends of the lathe with that, then switch to my Kinex precision level to finalize adjustments.

Leveling is pretty simple for me. First, I level my cabinet so it is level with the ground; this just simplifies what follows. The ways on my lathe are not at the same level; the rear is lower than the front, so I position my level on the cross slide bed. I remove the compound, clean the cross slide thoroughly, then put the level so that the long axis of the level runs along the long axis of the cross slide. I use a square to align it square to the cross slide and it sits there without me touching it, ever. I run the saddle towards the headstock end and adjust the level on that end with the adjusters under the headstock, then run the saddle to the tailstock end and do the same thing. My lathe allows me to adjust support bolts underneath the feet and then lock it down so it cannot move, and I can do this at either end of the lathe so leveling is quick and easy. Yours may not be so easy.

In any case, once I get the lathe leveled with the 98-6, I repeat this with the Kinex and make whatever fine adjustments are required to get the lathe as dead on as I can. Quite often, I will be a fraction of a unit off on one or both ends. At that point, I stop using the adjusters underneath the lathe and do test cuts on a 2-collar bar. In most cases, I will be off a few tenths between the diameters and I adjust the levelers underneath the cabinet to dial the cuts in. Typically, I can dial out any difference between the collars within a few cuts and I'm done.

All that remains is to align the tailstock and I use a test bar cut on my lathe to do that.

Done.

You said you're trying to learn to level your lathe. I hope this helps. I level my lathe if I move it or at my 6 month maintenance interval or if I turn a big piece that imparted any imbalance to the lathe. This only takes me a few minutes with a 2-collar bar and keeps my lathe cutting well.

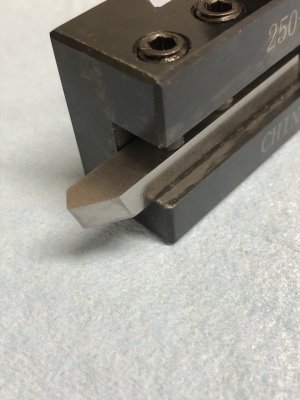
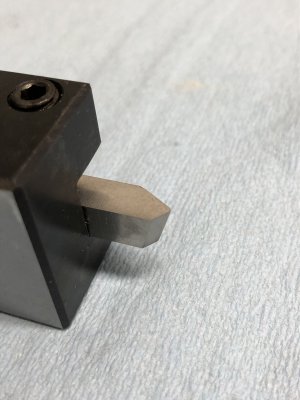
I just looked at your tool and I suggest you grind some rake angles on your tool; it will reduce cutting forces significantly and make the tool more accurate. A really good tool can take a 0.0005" cut (or less) and actually cut it. Carbide cannot do this.

Finally, remember that all lathes move. You can nail the level on your lathe and feel like a manly-man, only to come back in a few days and find that it is a little bit off. This is just the nature of the beast. I suggest you level the lathe, wait 1-2 weeks and level it again, then check it in a month. By then, it will have settled down.
 
Last edited:
Back
Top