Lathe tool brass forming tool grind

I have turned a number of decorative finials from 1/2" C360 on my Sherline lathe. I have zero top rake on the tools, and use multiple tools with different profiles and small contact areas. The larger round portion in the picture below does tend to chatter as the tool is advanced into the work. I think it's because of the larger contact area between the work and the tool, and different cutting speeds along that contact area. Keeping the speed up seems to reduce the chatter. That and a bit of sand paper.

turning_finials.jpg
making finials.jpg
 
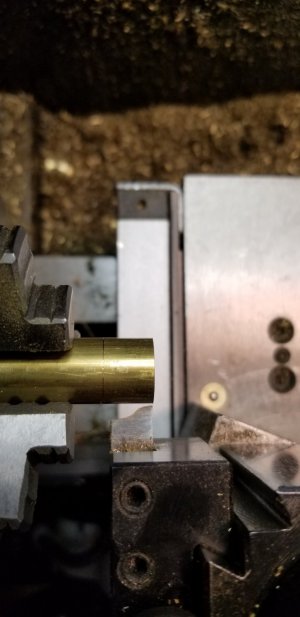
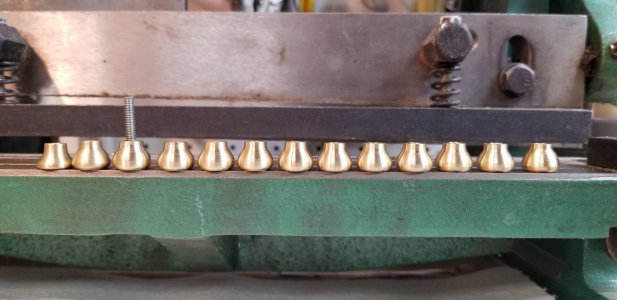
99% of my pipes have a brass bowls in the beginning I used brass hydraulic line fittings now solid brass round/bar stock.
All my bowls were made on a rubber band drive pool cue tip repair lathe. LOL I dont know if i really consider it, even a lathe.
If you think brass is grabby try stack leather tips!
No power. no torque, stick your hand in between the chuck and the bed and stall the spindle .... belt slips,,, it hurts and night even break fingernail.
I cannot think of a worst lathe to do anything on. But at the time it was all I had .
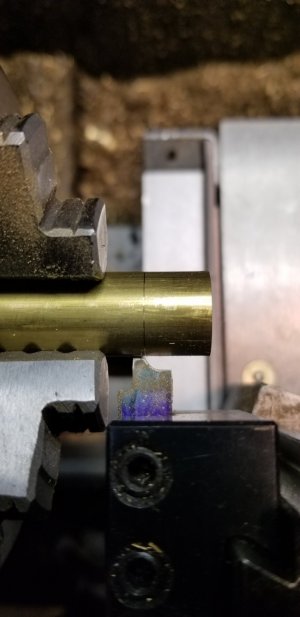
all cuts had to be fine or be like the finishing pass.
Also all cuts/passes was done by hand not on auto feed. There is no auto feed one these lathes
You can see the boring bar in the back ground,


1681002724304.png
Bottom bowl is made from 2 different fittings
I have to agree with the members who are saying brass is grabby and try to make your cuts a close as possible to the head stock/chuck.
Again make as fine as cuts possible...

If you lived closer you could use one of my rubber band drive lathe's
I understand these cue lathe are pretty much a joke.
 
There are also different grades of brass, some of which cut much better than others. Finding leaded brass may be difficult now, since it was outlawed for plumbing fixtures.
Yes, I did some research and found that 360 was noted as easy to machine so that's why I went with it
 
I have turned a number of decorative finials from 1/2" C360 on my Sherline lathe. I have zero top rake on the tools, and use multiple tools with different profiles and small contact areas. The larger round portion in the picture below does tend to chatter as the tool is advanced into the work. I think it's because of the larger contact area between the work and the tool, and different cutting speeds along that contact area. Keeping the speed up seems to reduce the chatter. That and a bit of sand paper.

View attachment 443929
View attachment 443936
This is right in my wheel house, so to speak. You do some really fine work. You have a new follower.
I too am using more than one tool bit.
I initially looked at the width of my tool blank which was 3/8 and I wanted my knob to be 3/8 so I tried doing the entire knob with just one and that was a disaster, to say the least. No matter what I did to improve the cut and eliminate issues, nothing helped. So, changed my thinking to use two, one for the front and another for the back. The back TB cuts a slight shoulder and the back end of the teardrop. The second does the rounding of the front and defines the cutoff point. (you'll see from my photo's when I post them)
I notice that you have quite a bit of tool and stock stick-out. Many have suggested minimal stick-out for both. Doesn't that alone cause you issues?
I'm not familiar with a Sherline lathe and it's rigidity. My mini lathe needed quite a bit of work to eliminate the majority of the slop in the carriage, cross-slide and compound-slide. When I first acquired it, the first time I experienced a dig-in, I thought the entire carriage was going to come apart - everything suffered, even bent the compound slide shaft.
I cannot attach photos at this time but will attach photos of my tooling and setup as soon as I can.
Thank you very much - this was an inspiration to not give up and simply expand the tooling used to make each TB do less work.
 
For rigidity, the best position for the tool is directly over the center of the cross slide. Most modern tool posts place the tool well left of that centerline. For a centered tool, the force from cutting does not tend to tilt the compound or cross slide. When the tool is positioned left (or right) of center, the cutting forces add tilting to the other deflections. That applies to all lathes, large or small.
 
EricB,
The first photo is of the tb that would cut the shoulder and back end.
The second photo is the tb that finished the front and defines the cut off point.
In the third photo are the results. The first three from the left are initial attempts. The left most is what I actually wanted but what a mess doing it with one tb. The second from the left is first attempt with two tbs and the one with the threaded rod in it is the final profile. Very simple I know. Some are just a tiny bit different because I had to do my best to eliminate the dig-in scars before sanding. Nothing comparable to what you have shown but definately a learning experience for me.
 

Attachments

  • 20230409_102926.jpg
    20230409_102926.jpg
    120.2 KB · Views: 26
  • 20230409_103048.jpg
    20230409_103048.jpg
    111.2 KB · Views: 26
  • 20230409_102546.jpg
    20230409_102546.jpg
    384.4 KB · Views: 27
Back
Top