Lathe Threading Auto Stop

Jamespvill

Active User
Registered
Joined
Feb 4, 2014
Messages
185
Hello Gentlemen!

I've got a project coming up soon that is going to require a few hundred internal threads done that are fairly long. I'm not the biggest fan of rushing to disengage the halfnut milliseconds before it goes crashing into a shoulder at high speeds. And this is even worse with internal threads as and lathe owner knows. So here is my solution! A simple automated carriage stop.

[video=youtube;-Riiep0c64o]https://www.youtube.com/watch?v=-Riiep0c64o[/video]

If there is any interest I can post a full write up on the "build". It's essentially just a simply trigger, Luckily I know my guns! :))

Anywho...Enjoy!
 
If there is any interest I can post a full write up on the "build". It's essentially just a simply trigger, Luckily I know my guns! :))


You betcha!

And thanks for what you've already demonstrated in the video!
 
Great idea!
Very nicely built.
Enjoyed the video. Even watched it twice.
Thanks for sharing.

Now some one will want to know if it's negative, positive, or neutral.
 
Yeah, no holding back now. We need all the details.
 
That's great. The other day I was doing some internal boring and thought about setting up a shut down switch like on my power table feed on the mill.
 
Nice Idea! Let's see/hear some more details.
 
Nice work and nice and simple to boot!
Do you have the free end of the fixed pushrod supported at all, its a bit difficult to tell behind the crossfeed handle?

cheers Phil
 
Nice work and nice and simple to boot!
Do you have the free end of the fixed pushrod supported at all, its a bit difficult to tell behind the crossfeed handle?

cheers Phil

Hey Phil,

There is no additional support for the pushrod besides where it it attached to the ways. I would imagine that adding some more support for it would increase the accuracy of where it stops. The pushrod itself it 3/8" so it's fairly rigid.
 
Hello Gentlemen!

After punching out a few dozen threads today, I'm happily surprised at how well this carriage stop works. I'll gladly post a few more details and information about the mechanism.

First a more close-up video of the mechanism (is that the right term?) itself:

[video=youtube;rY6YHA4upRU]https://www.youtube.com/watch?v=rY6YHA4upRU[/video]

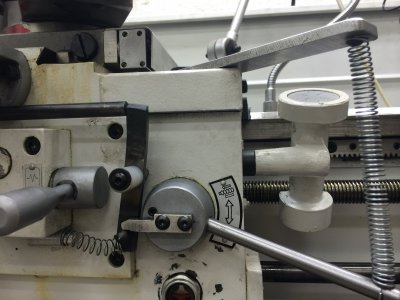
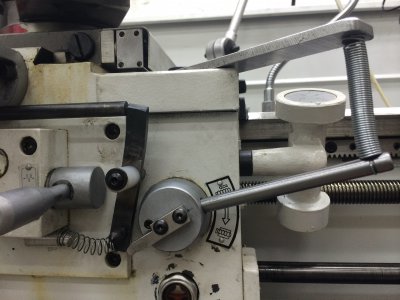
Here are a few stills of it engaged and disengaged.

IMG_6718.JPGIMG_6717.JPG

The toughest part of making this is retrofitting it to your lathe and finding clearance for it, but after you lay everything out, it smooth sailing.

First and most importantly is to find where your pivot pin will go, this should be a place where the pushrod can get the most leverage. So halfway is just about perfect, but your lathe will determine this more.

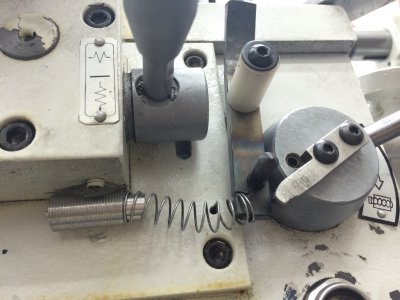
Next you need to build a "trigger" this is the item that pivots on the pivot pin and is pushed by the pushrod (finger). After that is on then it's time to find the best location and orientation for the "sear" or the piece that it attached to the half nut lever. From there is simply fitting and filing to see where everything latches together properly but also disengages smoothly.

I used drill rod for the pin on the "trigger" and O1 tool steel for the "sear" both of which were heat treated and polished on the contacting surfaces.

After that then it's time for springs! One on the rear of the "trigger" to keep it always trying to engage and one on the half nut lever to keep it always wanting to disengage. I'm not too fond of the current spring setup for the lever, it looks a little goofy for my liking.
IMG_6721.JPG

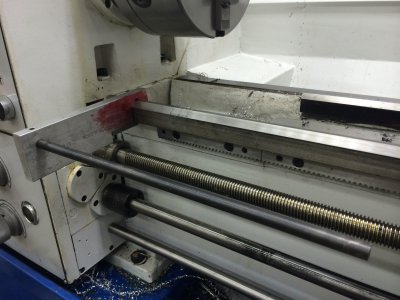
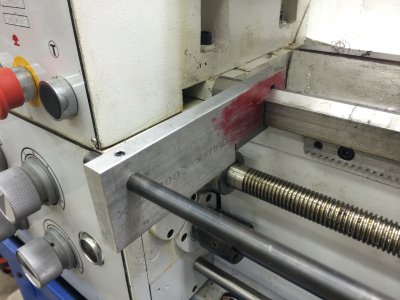
Finally it's time to build your pushrod or "finger" and means of attaching it to your lathe. I chose to attach it to my ways. If I would have had wider aluminum bar then I would have opted for that, but I only had 1/2" so I went with that.

IMG_6719.JPGIMG_6720.JPG

I'm probably going to add a threaded rod through the aluminum block so I can stabilize it against the gearbox behind it in an attempt to diminish all of the flex. The rod is a 3/8" piece that I'm probably also going to add some sort of stabilizing function to towards the end of it.

Besides that, It should be apparent in the original video that it stops in just about the same place each time, which is really all I can ask for!

Thanks for your interest gentlemen, I would like to hear what you would have done differently!

IMG_6717.JPG IMG_6718.JPG IMG_6719.JPG IMG_6720.JPG IMG_6721.JPG
 
Last edited:
Back
Top