- Joined
- Jun 12, 2014
- Messages
- 4,826
I had been considering a Kurt 4 spoke speed handle for quite awhile, but just couldn't justify the close to $200 cost when you include shipping and tax. I decided to build my own, given I had a break from other work. I had purchased some threaded (1/2-13) red 1" ball ends from McMaster-Carr a while ago, I had some 2" 1144 Stressproof for the hub and picked up two 12" pieces of 5/8" 316 stainless rod for the spokes. I did not want to have to deal with broaching or boring a 7/8" hex so I purchased an unchromed deep impact socket that I would press into the hub. Probably about $40 in materials.
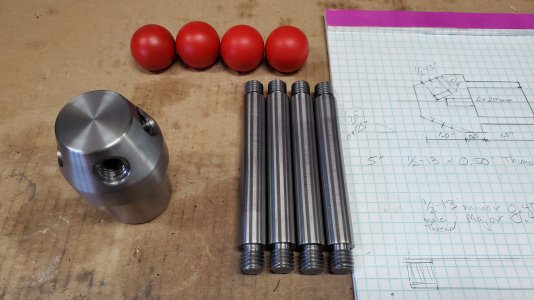
I took a light surface cut on the OD of the socket to make it concentric and ended up with a 1.1" OD, I then cut the hex from the base of the socket on my band saw which left me with a 1.5" full hex section. On the Hub I drilled and then bored an ID to 1.1" so the hex section would be a tight press fit into it with some red Loctite. I center drilled into the hub to accept a 8 x 20 mm neodymium magnet to hold the handle onto the vice hex shaft. I decided to cant the the spokes 20 degrees forward, the arms have an overall length of 5" with a 1/2" threaded portion at each end. Turning the hub was pretty straight forward on the lathe, the 1144 needed a bit deeper cut to get a decent finish with carbide, speeds were in the 800 -900 RPM range using Iscar CCMT inserts. It was also interesting to play with different feed rates until I was getting nice C chips.
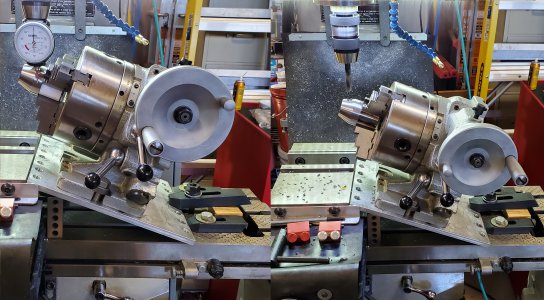
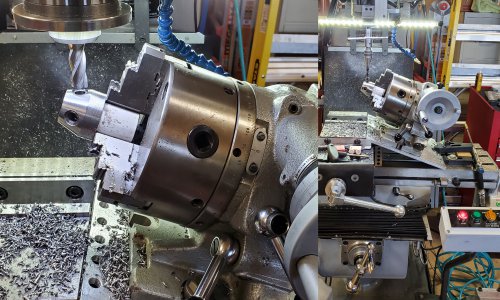
The next step was to accurately drill and tap the four spoke holes at a 20 degree cant and at 90 degree intervals. I do not have a sine vise or angle plate to mount my 130lb rotary table too so I improvised. I mount my rotary table to a 1/2" aluminum plate which affords be more positioning options, I wedged the plate against vise at a 20 degree angle and then secured it down to the table. It was very firmly wedged and all the forces would be down drilling and tapping. The rotary table has index plates so the indexing was very accurate. I used a 27/64" drill for the tap holes and then relieved the top portion with a 5/8" end mill so the arms would be flush when inserted. I used a spiral fluted tap to thread the holes, I find they require much less force then standard hand taps. I maxed out the table to head distance on my full size knee mill and had about 1/16" space between the tap and the hub. There have been quite a few times where I wished I had another 1-2" in head to table height. Bigger is better...
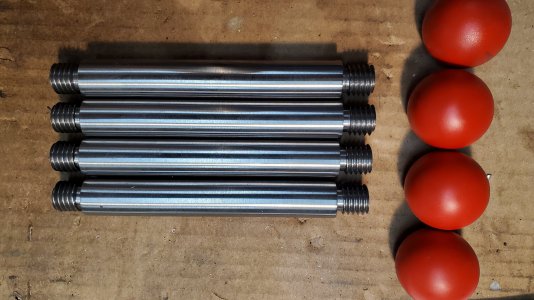
Turning the 316 stainless arms was very uneventful and actually machined a lot easier than the O1 rod I often use. I used my 5C collet chuck as there were multiple op's to turn down the ends of the rod, cut the relief, chamfer the end, thread and polish. I threaded the 1/2-13 thread at 300 RPM with a Carmex lay down insert (same one I have been using for years). Threading passes were with the cross slide to depth's of 0.02, 0.04, 0.06, 0.07, 0.08, 0.09, 0.095 an 0.10" depths with one final spring pass. A complete set of threading passes took about a minute with the proximity stop system, and the threads come out very clean with no tearing. I lightly touch the thread peaks with a fine file and clean the threads with a wire brush. The reliefs groves were a bit wider than I typically do, to accommodate the wider insert cutting tip when threading to a shoulder.
Ready for assembly
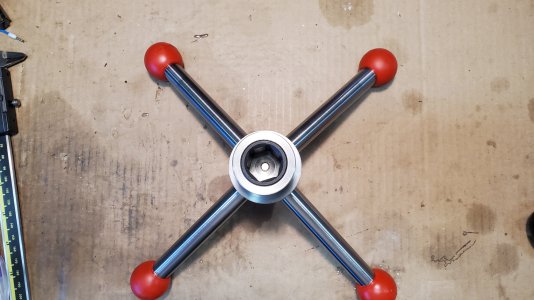
Assembled. the threads were intentionally made to be a a very close fit and the arms lock into the 5/8" hub relief flats.
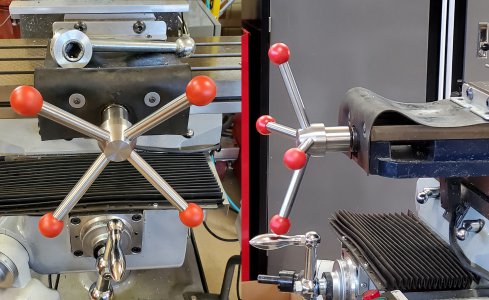
Overall it is much more comfortable to use then the longer single arm style, clamping force is about the same using two hands on opposing handle arms. It is also much quicker to open/close the vice. This was a 2 day project for me, typically I take much more time figuring out setup and how to do things vs. actual machining. Also seems to take longer as I get older, so it goes.
I took a light surface cut on the OD of the socket to make it concentric and ended up with a 1.1" OD, I then cut the hex from the base of the socket on my band saw which left me with a 1.5" full hex section. On the Hub I drilled and then bored an ID to 1.1" so the hex section would be a tight press fit into it with some red Loctite. I center drilled into the hub to accept a 8 x 20 mm neodymium magnet to hold the handle onto the vice hex shaft. I decided to cant the the spokes 20 degrees forward, the arms have an overall length of 5" with a 1/2" threaded portion at each end. Turning the hub was pretty straight forward on the lathe, the 1144 needed a bit deeper cut to get a decent finish with carbide, speeds were in the 800 -900 RPM range using Iscar CCMT inserts. It was also interesting to play with different feed rates until I was getting nice C chips.
The next step was to accurately drill and tap the four spoke holes at a 20 degree cant and at 90 degree intervals. I do not have a sine vise or angle plate to mount my 130lb rotary table too so I improvised. I mount my rotary table to a 1/2" aluminum plate which affords be more positioning options, I wedged the plate against vise at a 20 degree angle and then secured it down to the table. It was very firmly wedged and all the forces would be down drilling and tapping. The rotary table has index plates so the indexing was very accurate. I used a 27/64" drill for the tap holes and then relieved the top portion with a 5/8" end mill so the arms would be flush when inserted. I used a spiral fluted tap to thread the holes, I find they require much less force then standard hand taps. I maxed out the table to head distance on my full size knee mill and had about 1/16" space between the tap and the hub. There have been quite a few times where I wished I had another 1-2" in head to table height. Bigger is better...


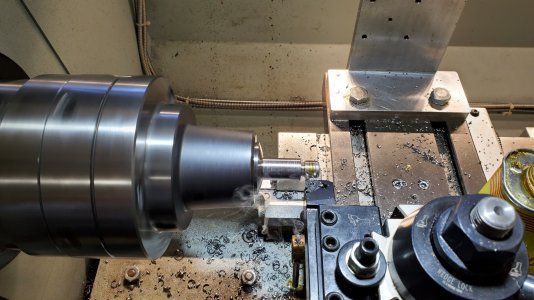
Turning the 316 stainless arms was very uneventful and actually machined a lot easier than the O1 rod I often use. I used my 5C collet chuck as there were multiple op's to turn down the ends of the rod, cut the relief, chamfer the end, thread and polish. I threaded the 1/2-13 thread at 300 RPM with a Carmex lay down insert (same one I have been using for years). Threading passes were with the cross slide to depth's of 0.02, 0.04, 0.06, 0.07, 0.08, 0.09, 0.095 an 0.10" depths with one final spring pass. A complete set of threading passes took about a minute with the proximity stop system, and the threads come out very clean with no tearing. I lightly touch the thread peaks with a fine file and clean the threads with a wire brush. The reliefs groves were a bit wider than I typically do, to accommodate the wider insert cutting tip when threading to a shoulder.


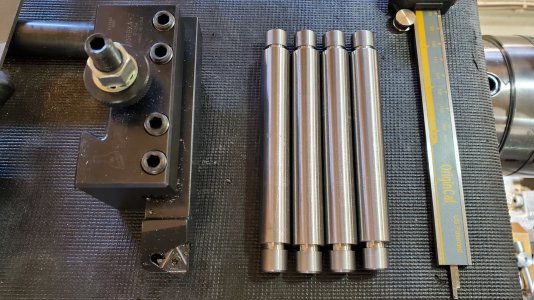
Ready for assembly


Assembled. the threads were intentionally made to be a a very close fit and the arms lock into the 5/8" hub relief flats.


Overall it is much more comfortable to use then the longer single arm style, clamping force is about the same using two hands on opposing handle arms. It is also much quicker to open/close the vice. This was a 2 day project for me, typically I take much more time figuring out setup and how to do things vs. actual machining. Also seems to take longer as I get older, so it goes.


