Jacobs 14N Super Chuck repair

jmhoying

Active User
H-M Supporter Gold Member
Joined
Apr 21, 2013
Messages
208
I disassembled my Jacobs 14N chuck yesterday and thought I'd share some photos. I imagine this chuck is similar to most of Jacobs ball bearing chucks.

Mine worked great from 1/4" to 1/2", but was binding below 1/4" and wouldn't even tighten up past 1/8".

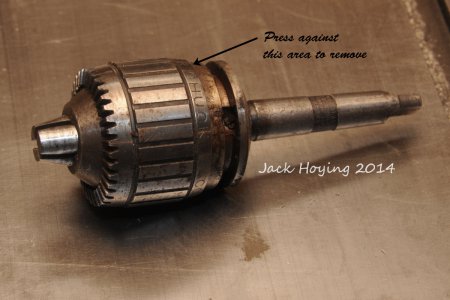
I started by pressing the outer ring off of the chuck. You'll need a ring to fit this position of the chuck (photo 1)
chuck1.jpg

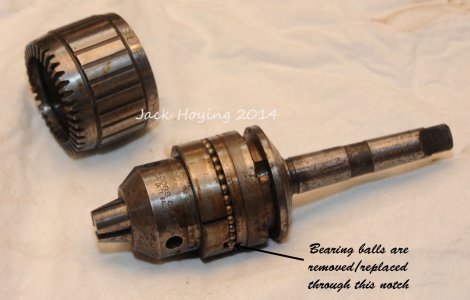
Once the outer ring is removed, you can remove the bearing balls through the small notch, at which point the split race will come off.
chuck2.jpg

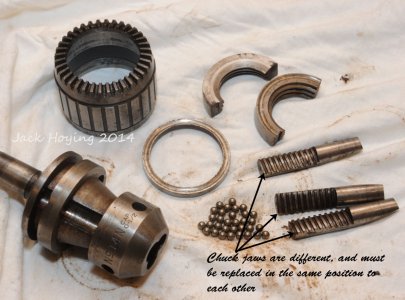
Here are all the parts of the chuck. Since each jaw is different, when I removed each jaw, I made a note as to which one was in which position of the chuck (actually, I took a photo that showed the teeth of the jaw and the lettering on the chuck so I'd know what position to put them back in later)
chuck3.jpg

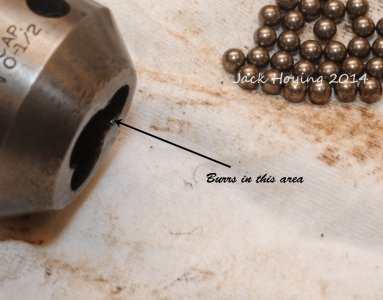
After a through cleaning, the jaws still wouldn't operate smoothly in the farthest out position. It turns out that there were a few small burrs at the mouth of the chuck. I used a fine stone in a Dremel tool to clean them up and that took care of the problem completely.
chuck4.jpg

To reassemble, reverse the process and press the outer ring back on, using the key teeth as the position to press against.

Jack
Fort Loramie, Ohio

chuck1.jpg chuck2.jpg chuck3.jpg chuck4.jpg
 
Very well done and informative post.
Haven't had to dissasemble a chuck for years but information like this would have been nice back then.
 
Thanks Jack!

I hadn't had mine apart yet, and I have a few in varying degrees of wear. Great pics and I really understand the process. Also just cool to know what's in there!


Bernie
 
This thread bring up a question that I have been wanting to ask for awhile.

Jacobs recommends that you extent the jaws about half way out and press on them to remove the sleeve. I don't understand why you would press on the jaws. That would put a force on the jaw teeth and nut threads. Why not press on the body to remove the sleeve? I mean, after all, you are trying to remove the sleeve from the body. I tried to disassemble a chuck similar in construction to a Jacobs but the teeth (threads) on the jaws sheared off. I don't want the same results when servicing my good Jacobs chuck.

Thanks
Chris
 
I don't think you have to press on the jaws to remove the sleeve, but you do need to disassemble with the jaws at least 1/2 out of the body (if not fully extended) - vague memories of bad things that are supposed to happen otherwise.
 
This thread bring up a question that I have been wanting to ask for awhile.

Jacobs recommends that you extent the jaws about half way out and press on them to remove the sleeve. I don't understand why you would press on the jaws. That would put a force on the jaw teeth and nut threads. Why not press on the body to remove the sleeve? I mean, after all, you are trying to remove the sleeve from the body. I tried to disassemble a chuck similar in construction to a Jacobs but the teeth (threads) on the jaws sheared off. I don't want the same results when servicing my good Jacobs chuck.

Thanks
Chris

I also saw on the Jacobs website that you should push on the half-extended jaws, which is what I did for this repair. I'm not sure what hardness the jaws are hardened to, but they are about as hard as anything you'll deal with. Not sure is the teeth are all that susceptible to shear, but I didn't have any problems.

Jack
 
I disassembled my Jacobs 14N chuck yesterday and thought I'd share some photos.
Jack
Fort Loramie, Ohio

Nice post, and well done, this should be quit useful for a lot of people.:))
 
I've done several of the ball bearing chucks, I made tooling to fit the chucks. The outside ring is a press fit body.
The jaws have to be in time and Jacobs web site will tell you the order. Also made tooling to press the shafts out of the body, if anyone is interested. I've done less than 10.
 
I went to the jacobs web site and downloaded the service/repair manual and it does indeed advise to extend the jaws half.
The manual also depicts the jaws with the proper timing and a warning
" CAUTION: Each of the three Jaws differ slightly from the other by the location of the threaded portion (illus. G). In order to ensure proper operation, they must be re-installed in the proper sequence. "
here is a link to the service manual it can be posted here for every ones info http://www.jacobschuck.com/drill-chuck-repair.asp
Regards

dgehricke


Attachments

  • Jacobs chuck service:repair PDF.pdf
    268.3 KB · Views: 39
I don't think you have to press on the jaws to remove the sleeve, but you do need to disassemble with the jaws at least 1/2 out of the body (if not fully extended) - .....

You don't want to open up the jaws all the way, doing so you'll damage the ends of the jaws when pressing the outer sleeve off the chuck body. I learned the hard way 35 years ago. Good thing I was replacing the jaws.

On getting the jaws in the right sequence, you find out real quick when you place the nut halves over the jaws and run them down closed by hand before placing all those little steel balls in the races. Once you have checked and all looks good, back the jaw out about halfway and start filling the ball track with the little steel balls. If you loose one or two in the process, its not the end of the world, it'll still work fine.
 
Back
Top