Indicator On Lathe Work Piece While Turning?

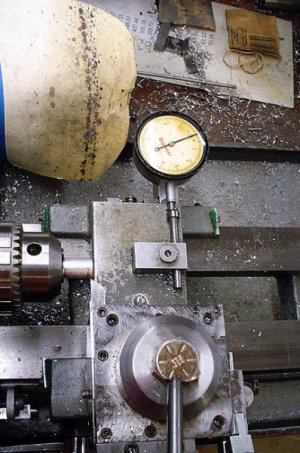
I mounted an indicator on the back of my saddle, to measure the movement of the cross-feed. About the same as mounting a digital caliper there. But I can only measure .125 in .0005. Once the tool is cutting, I adjust the adjustable stop so that the movement of the tool will not over-travel the indicator. I also use it as a stop for the cross-feed when threading, stop at zero, advance the compound, cut, ad tedium. But it makes good threads.
 
Post a picture of your set up.

Understand, this is a posed picture, not a picture of work in progress.

tool work indicator set up.jpg

I'm contemplating 1) replacing the bottom of the 4 way to include a rear mounted tool post, or 2) putting an adjustable positive stop on the left side fo the compound. or both.
 
Actually,I don't even understand the need to have an indicator against the work. I have never done it,and I know it would be VERY,VERY hard on the delicate mechanizmo,and would wear the tip,too.

I just measure the diameter with a dial caliper,or with a mike if it is more critical,like everyone usually does.

How many thousands of times does the internal mechanism move on just one smallish job when the indicator is in contact with rotating work? A sure way to quickly ruin it. Maybe I am misunderstanding what you are using the indicator for.

If the tool shown in the picture is being used to turn a cylinder,it has much too acute a tip. The tip needs to have a SMALL,rounded end on it that more than spans the width of the feed of the cut,if it is to produce a smooth finish. A tip that acute can make a fuzzy surface,from which you will never get an accurate diameter reading.

The only time I use a tip that acute is when I need it to make a sharp corner on the work. For fine detailing,in other words.

I see the bed of your lathe has flat ways. If that is an Atlas or Sears lathe,they are so flexible that they will lie to you all the time!! SHARP TOOLS ARE ESSENTIAL ON FLEXIBLE,LIGHTLY BUILT LATHES. I KNOW,having suffered for a year with a 12" brand NEW Sears Atlas for a year. Then,I discovered the new Taiwan imports (and had more money to spend!) and got a 10" Jet. What a huge difference it made. I wish I still had it,as it would cut many more thread sizes than my Hardinge HLVH,which cuts 27. I can fall back on my 16" lathe if need be,but the HLVH is so pleasant to use,I just wish it had a greater thread range. I must confess,however, that thus far,over 2 decades with it,I haven't actually needed a thread outside its range. I'm just a nut who wants to be ready for ANY eventually! Sometimes they never materialize.
 
Thanks Phil for the helpful hints. Definitely some nuggets I will take away!!

Am I missing something? You cant use your indicator to measure the diameter. And it would be a bad idea anyway. A piece of swarf is sure to hook it up and rip it into the chuck or similar.
#1 Check your gibs
#2 Check your compound for tightness.
#3 Check your toolpost is locked solid. And that the tool is secured. (QCTP?)
#4 Is your tool on centre, (height)?
#5 Do you back the tool out? If so, do you come out a good number of divisions and then wind back in to the same dial graduation that you finished the cut on, before adding on your .010"
And .375 minus .020 is not going to give you .3125. Unless you mean you are just trying take this down to dia with .010 cuts. Thats a pretty light cut for ally. If you are looking for a tight tolerance, good (surface) finish, diameter. I would take a .025 cut, (.050) off the diameter, measure, take your next cut (depending on your measurement), about .005, leaving you with 001-002 thou to clean up at high RPM with cutting fluid for a mirror finish
What lathe are you using?

Cheers Phil
 
The only time I use a tip that acute is when I need it to make a sharp corner on the work.
George, you may have confused me with Buggy Chief, the OP. I was showing my indicator set up to kd4gij who had asked (hopefully) about my setup. I put a piece of rod in the chuck and grabbed the first tool that fit the slot. 'Twas a posed picture.
 
Sorry,TY Bredehoft. I was in a lot of pain yesterday,and full of neurontin!! I MUST get a new right knee. Been putting it off.
 
Get it done, George! As we age, there is no point in putting up with discomfort!
 
Ok, so really new to the hobby and am having challenges turning pieces down to true diameter I am seeking. For example, I have my indicator on the cross slide and determined I need to take .020 off diameter (.010 each side). So I dial cross slide .010 and complete pass on .375 aluminum stock with about 3 inches stuck out from 5c collet and live center on tailstock engaged. Put Micrometer on piece and it reads virtually the same....very frustrating.

My question is, can I put indicator on workpiece opposite side of cutter and it will tell me when the .010 is truly taken off? Any tips are greatly appreciated at this point!! Thanks!
Do you not touch off the part first?
 
Back
Top