I made an ooops, now how do I fix it??

medic29

H-M Supporter - Gold Member
H-M Supporter Gold Member
Joined
Oct 26, 2018
Messages
25
I guess it is part of the learning process. You screw something up, so then you have to fix it, right??

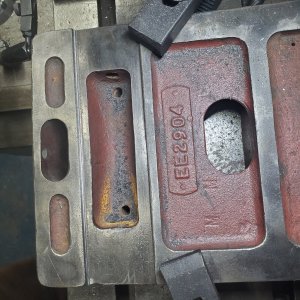
I picked up a different base for my tailstock. One of the grooves didn't match up with the upper of the tailstock, it was around 0.040" too narrow. I had thought about pulling out my file, but wasn't sure I could keep the edge straight, so I thought it would be better to mill that little bit off.

I have an older Bridgeport mill with a M-head, but I figured it should do the job just fine. I spent a lot of time trying to make sure the base was lined up properly and everything was parallel as I was going to be cutting along the x-axis. When I was using the indicator attached to the head of the mill, I was indicating along the original edge and the readings seemed odd compared to how I could see the outside edge was sitting on the edge of the table, but I began thinking it was a cast item and the outside edge wasn't a machined surface so I couldn't go by the outside edge or how it looked. After checking and re-checking and repeat. I made the cut.
edited 20230122_175153.jpg
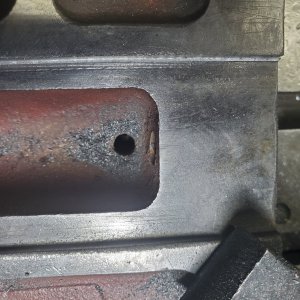
I don't know if you can see it, but the cut started at A and went to B. Unfortunately it went at an angle so I took too much off as I went towards the B end.

It's old cast iron. How do I fix it? I can't "add" cast iron obviously. My first thought was filling the area with some brazing, then machining it back to the correct measurement. Then I also thought about some sort of epoxy I could cut/file/sand to get the correct measurement. This part of the base is the front part of the tailstock, the part facing the headstock of the lathe, so the opposite side would be taking the majority of the horizontal force; trying to push the tailstock backward.

I don't know to be honest. I'm fairly new and have very little experience, thus this mistake. Any help or ideas would be appreciated.

Thanks,
Rick
 

Attachments

  • 20230122_175153.jpg
    20230122_175153.jpg
    633.1 KB · Views: 46
  • 20230122_175243.jpg
    20230122_175243.jpg
    506.8 KB · Views: 44
  • 20230122_175321.jpg
    20230122_175321.jpg
    581.4 KB · Views: 43
It looks from the shape there in the 2nd picture in the 'attachments' list like your Y axis didn't get locked down/moved during the cut. So you perhaps DID have it indicated in correctly.

Your first challenge is probably going to be to figure out where to indicate off of perhaps the other side?

The brazing isn't a bad idea, if I had that ability, thats probably what I'd go with. Epoxying/bolting in a 'filler' piece of Cast Iron and machining that to dimension is the other idea I'd have.
Ya know, I didn't lock the Y axis, I didn't even think about it. I guess I was thinking it wouldn't be an issue; I guess now I know.

Your first challenge is probably going to be to figure out where to indicate off of perhaps the other side?
This is exactly what I was thinking, although I was thinking of using some parallels up against that side to make things a little easier. IDK yet. The first issue is fixing my mistake and filling in where I cut too much out.

The brazing isn't a bad idea, if I had that ability, thats probably what I'd go with. Epoxying/bolting in a 'filler' piece of Cast Iron and machining that to dimension is the other idea I'd have.

This groove is only about 0.125" in depth. The about I cut away was maybe 0.080". I don't think I could epoxy a "filler" piece of Cast Iron, not to mention the piece would be an angled sliver. I have the ability to braze it, but not the experience or confidence. I haven't brazed very much, but I'm willing to give it a shot if that is the best idea. :)
 
Right, any sort of filler would have to be a pretty sizable piece, so you'd need to machine away quite a bit more to make room for it. I don't have the ability to braze, so I'd likely machine off the whole flat(or at least a good chunk of it!), install it with epoxy and screws, then make a new piece.

ONE thought I had though... what about removing ~1/4", and replacing it with a brass 'gib' of some sort? You could screw it in with shims (or that two directional screws trick), and that way you could adjust it to be perfect.
 
Trip to the hobby store...

Some better stores have assortments of small brass shapes, tubes and bars.

You made it too big on one end.

Figure out how to get it fixtured and confirm why it came out as it did.

See if you can find a chunk of the hobby brass solid that has one dimension same as your depth of the cut.

Key stock also can work.

Once you find this material your new total width is whatever the part is plus this material.

Take your time, first get the cut straight.

Now measure your total width and compare to the mating part.

Your spacer needs to fit that space, find something that fits or make it wider to fit or epoxy your spacer in and mill to fit.


Sent from my SM-G781V using Tapatalk
 
The concern that I would have about brazing is warping from the heat.

I would cut additional material so I could insert a piece of brass, say 3/16"x1/8". I would then epoxy the brass to bed it and for good measure, drill holes through the brass and into the casting for some pins , maybe 3/32" diameter. The epoxy and pins should secure the brass in place. If you make the brass slightly over width, you can then machine it to proper fit.
'
 
That is a really big “darn shucks” - I suspect we could all think of a few other remarks.

Almost any repair option is going to have some sort of draw back. Can you just leave it? I can‘t see exactly what the relationship is between the TS upper and lower. Can you get it lined up (reference from the side you did not touch, test cut to confirm TS alignment), assemble it with Loctite ( which on a flat surface is not going to be permanent) - then just use it. When the TS is locked, the clamp will keep the upper & lower sections together. You won’t be able slip sideways for taper turning, but maybe you don’t need to (I have not shifted my TS sideways in several decades).
 
No no, heat is off the table for this repair. The piece is fine, and would take heat well, but you would not be able to clean it up by facing and squaring afterwards, because the height of the tail center cannot be altered. This should be a cold repair. @ErichKeane is right on the money, screw a gib strip into the spacer and re-cut the alignment face square after it's installed. It will be important to get straight, your tailstock should be adjustable for offset but not twists or nods.
 
Trip to the hobby store...

Your spacer needs to fit that space, find something that fits or make it wider to fit or epoxy your spacer in and mill to fit.

Sent from my SM-G781V using Tapatalk
20230123_121346.jpgFound me a piece in my scrap bin that is a bit longer than I need, but a little taller than required, so I have some I can mill off :)
 
I cut a small section, about 0.375" off the long side which gives me plenty of length.
20230123_150750.jpg

So I marked it, then cut it to length.
20230123_155016.jpg

I'm thinking of using this to attach the brass to the tailstock.
0007934068578_1_A1C1_0600.png

I'll have to pick that up on Wednesday, my next day off and hopefully get that set in place, than maybe on Saturday I'll be able to I'll get everything milled to the correct dimensions. :)
 
Back
Top