- Joined
- Feb 7, 2013
- Messages
- 2,487
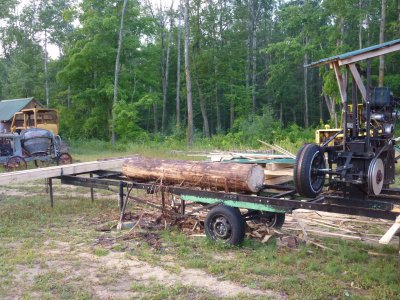
Over the years, I have learned a technique using a band saw for building sheds. I guess it works even if you don't have a band saw.
It starts like this:
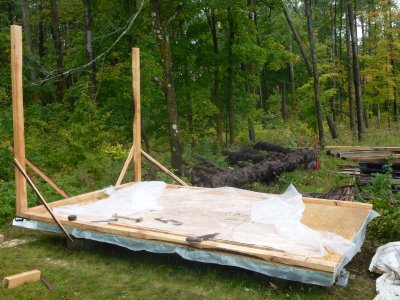
Underneath I level 4 pairs of patio blocks and one layer of concrete constructions blocks. Then I lay down two 8x8 oak beams parallel the
long way and cover that with rough sawn two inch 2x8 or narrower material laid flat. Then I cover that with 3/4 CDX plywood. It's
amazing how sturdy this is. Once the base is level, the rest of the construction can take place. I use basically standard 2x4 construction
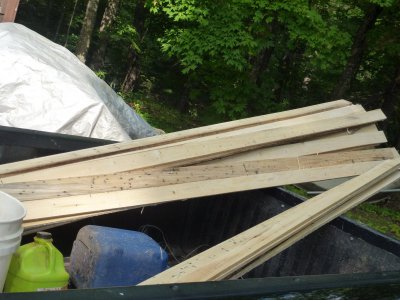
for the framework. The best part I think is one can apply vertical boards of variable widths for the walls and use battens to cover all
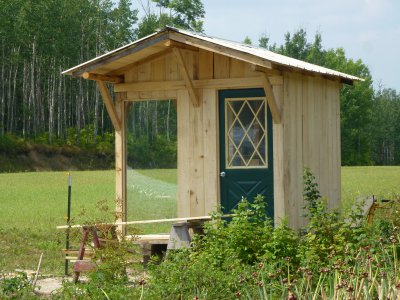
the cracks when finishing up. My latest shed is sort of a combination garden shed/greenhouse project. Poplar trees are plentiful around
here so use that mostly and finish the project with a coat of stain mixed with linseed oil. Since it is not affixed to the ground, the county
assessor really can't tax it since it is movable.
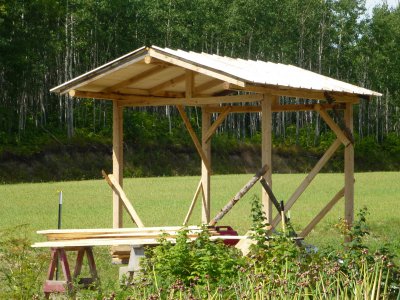
This is a new start in the garden area. It's just 8x8 so enough room for some tools and a solar electric fencer out of the weather.
I used some ash firewood logs to make the verticals and some 12 foot length fir poles for the ridge pole and horizontals. I have some
discarded patio doors that will be south facing and several free used doors with windows to incorporate in the plan. Instead of purlins,
I like to cover the whole roof with one inch boards. That way I can use some free used roofing steel and screw it down anywhere
there are holes in the tin since there is wood beneath. Also it looks nice from the inside looking up at the boards. Today I am working
on the walls and doors and stuff. These buildings can be insulated if desired. I built one in 12x12 several years ago all insulated with
a Norwegian Jotul wood stove making it a cozy hangout. My total building cost will be for the two sheets of 4x8 CDX, some 30 pound felt,
and a few pounds of nails totaling less than $100. I guess that's why I call it a SKOOKUM shed.
I will try to post another photo as I finish up.
It starts like this:

Underneath I level 4 pairs of patio blocks and one layer of concrete constructions blocks. Then I lay down two 8x8 oak beams parallel the
long way and cover that with rough sawn two inch 2x8 or narrower material laid flat. Then I cover that with 3/4 CDX plywood. It's
amazing how sturdy this is. Once the base is level, the rest of the construction can take place. I use basically standard 2x4 construction
for the framework. The best part I think is one can apply vertical boards of variable widths for the walls and use battens to cover all
the cracks when finishing up. My latest shed is sort of a combination garden shed/greenhouse project. Poplar trees are plentiful around
here so use that mostly and finish the project with a coat of stain mixed with linseed oil. Since it is not affixed to the ground, the county
assessor really can't tax it since it is movable.

This is a new start in the garden area. It's just 8x8 so enough room for some tools and a solar electric fencer out of the weather.
I used some ash firewood logs to make the verticals and some 12 foot length fir poles for the ridge pole and horizontals. I have some
discarded patio doors that will be south facing and several free used doors with windows to incorporate in the plan. Instead of purlins,
I like to cover the whole roof with one inch boards. That way I can use some free used roofing steel and screw it down anywhere
there are holes in the tin since there is wood beneath. Also it looks nice from the inside looking up at the boards. Today I am working
on the walls and doors and stuff. These buildings can be insulated if desired. I built one in 12x12 several years ago all insulated with
a Norwegian Jotul wood stove making it a cozy hangout. My total building cost will be for the two sheets of 4x8 CDX, some 30 pound felt,
and a few pounds of nails totaling less than $100. I guess that's why I call it a SKOOKUM shed.

I will try to post another photo as I finish up.
Last edited:


