"How-to" on Electrolysis for cleaning?

Guys, I'm all set to bake up the headstock but quick question first. Is it OK to attach the negative lead to the headstock with bare copper wire? I just read this page stating it's not wise to use copper wire in the water but I've only read it in one place so far. Thanks.
 
Last edited:
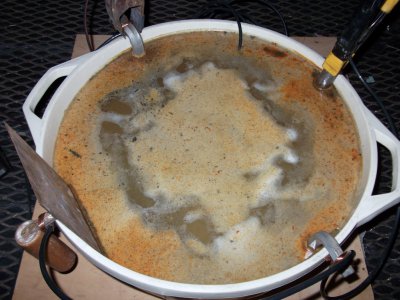
Haven't found any more negatives on using copper in the solution so I checked connections and juiced her up. Ideally I'd like to use a sheet of metal wrapped about the whole tub or find a stainless tub on the cheap but for a first run we'll see how it goes. I have some more big old hex wrenches I may add into the soup. Hmmm.......Splatrolysis. :rofl:

Splatrolysis.JPG
 
Last edited:
I never heard of electrolysis for removing rust until several months ago. Tried it and love how easy and cheap it is!
 
Lets begin with the absolute, electroplating rust off an object, and electrocleaning oil based dirt off an object are different processes.

I'll also point out electrocleaning a greasy machine can and often does leave behind the nongrease portion of the grime as a nasty crust similar in appearance to coral.

Electrocleaning is accomplished with a Sodium Silicate electrolyte NOT the Sodium Carbonate electrolyte normally used in rust removal.
Unlike derusting, the electrolyte in a cleaning tank cn and does contaminate, and will need to be replaced.

The receiving electrode must be equal in size or greater in size than the surface being cleaned.
Current should be limited to no more than 10 amps @ 24 volts DC
Accumulation on the receiving electrode will be less than in rust removal.

Filtration through a sand filter is highly recommended in cleaning

It will be best if the object being cleaned is removed from the tank every few hours and either scrubbed or pressure washed to prevent encrustation development.

As with rust removal process current is best adjusted by increasing or decreasing submerged surface area on the receiving electrode.


This is great information, thanks for explaining the difference in the two processes. Now can the coral like substance be removed by then using electrolplating?
 
On the question of how much current to run: the answer must be in terms of current per area. (That's surface area of part being de-rusted/cleaned.) Each little area is conducting its current in parallel with all the other areas; you add more area and the new area will need its own additional current so as to leave everything else the same.

This: http://myweb.tiscali.co.uk/andyspatch/rust.htm is one of the better references (I.m.h.o.) for electrolytic rust removal that I've found.
It suggests 1mA per square centimeter as a reasonable figure.
 
Using a car battery charger, I have had good results with both the 2 and 6 amp settings. . No need to use the maximum setting; you just need an adequate electrical potential. As discussed, it is important to routinely clean the anodes.

There is a lot of info in this thread which is fantastic...

No disrespect whatsoever to those who have contributed thus far, but for the casual user there is no need to over think things. The process is quite simple, which is why it is so awesome.

BUT, there are a few catch-22's.....DON'T use stainless for an anode...it creates a toxic form of chromium and can easily be avoided. I hear that graphite makes a good anode which will not gunk up; never tried it. Not sure if it has been mentioned, but this process can actually plate certain things on your object. I learned the hard way by placing a headstock with bronze bearings in the dip. The cast iron somehow transfers to the bronze and "iron plated" it. (SPLAT, I hope you didn't suffer this fate) Not sure of the actual scientific process, but it is important to understand that dissimilar metals may get dissimilar results!
 
Last edited:
Using a car battery charger, I have had good results with both the 2 and 6 amp settings. . No need to use the maximum setting; you just need an adequate electrical potential. As discussed, it is important to routinely clean the anodes.

I think that the circuit, which is total thickness and size of the object(s) being cleaned, the amount of water as well as how "charged" the water is with electrolyte (sodium carbonate) will dictate how much amperage will be drawn. So setting your charger to 6A or 10A doesn't mean it'll be outputting 6A or 10A. It'll put out how much is drawn, if you will, by the whole circuit.


No disrespect whatsoever to those who have contributed thus far, but for the casual user there is no need to over think things. The process is quite simple, which is why it is so awesome.

I have to agree.

BUT, there are a few catch-22's.....DON'T use stainless for an anode...it creates a toxic form of chromium and can easily be avoided. I hear that graphite makes a good anode which will not gunk up; never tried it. Not sure if it has been mentioned, but this process can actually plate certain things on your object. I learned the hard way by placing a headstock with bronze bearings in the dip. The cast iron somehow transfers to the bronze and "iron plated" it. (SPLAT, I hope you didn't suffer this fate) Not sure of the actual scientific process, but it is important to understand that dissimilar metals may get dissimilar results!

No, my headstock turned out fine. I ensured to not use stainless for the anodes. FWIW, here's a good source for affordable graphite rods. Get the plain, not the copper coated.
 
This process works great. I used it to help me restore a 1959 Studebaker pickup. I used a plastic 30 gallon tub added about 1/4 of a box of Soda wash and water. for the electrodes I used 4 pieces of rebar down each corner of the tub with bailing wire wrapped around each like in a circuit (all electrodes must be wired together) and then out to the battery charger. I placed a wood dowel straddling the top of the tub to hang my parts form with a wire connected the part from the battery charger. Turned on the charger then let them hang for 6-12 hours. Take the parts out wash with water (high pressure cleaner does even a better job) and use a wire brush then dried them off. Works great, no hazardous waste a little sanding and your ready for paint.
 
Another good source of electrolyte is your local pool supply place. Look for PH Up.

bob
 
Last edited:
I'm in the process of refurbing my Heavy 10. I picked up a bottle of Citristrip yesterday and have been letting the headstock sit overnight with a couple of coats on it. I haven't started to clean it yet but it looks promising ....hopefully not too much work left to do after cleaning the Citristrip off it. Just had lunch and got to thinking about electrolysis. I found two helpful "how to's" here and here and was wondering if anyone had any other links or would care to post their own "how to"?

Electrolysis is easy to do but it's not effective on pitted parts. A physics theory explains that you won't have an electric field within a sphere. A pit is a small sphere.
I've had better luck de-rusting parts using a chemical called "Evaporust". In my area it's only available from Harbor Freight. It works real well and I've used it on everything from Starrett parts to atlas mill parts. Some tips: Don't let the parts sit in the solution too long. They turn black. When you remove the parts, spray them with "simple green" to remove the slime and then spray on some denatured alcohol to wash the simple green off.

If you're trying for a clean surface that you can repaint, consider getting the parts boiled with HOTTTTT water. It removes the accumulation of oils in the pores. Transmission rebuilders have real nice cleaning tanks.
 
Back
Top