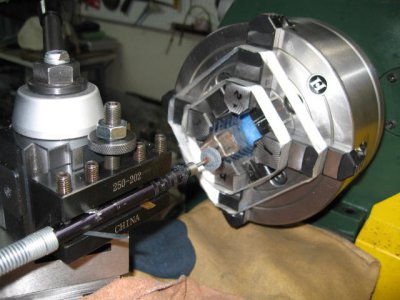
The picture below shows how I did my 4 jaw. The shims that I made were simply cut with a hacksaw from the same piece of 1’’ square tubing, each approximately ¾’’ long. Although the shims were oriented to the same side of the tubing against the chuck body there did not seem to be a need for extreme accuracy here because there was nothing precise about the jaws to start with.
The width of shim (1’’) was based on the radius I wanted the jaw pads to have when finished.
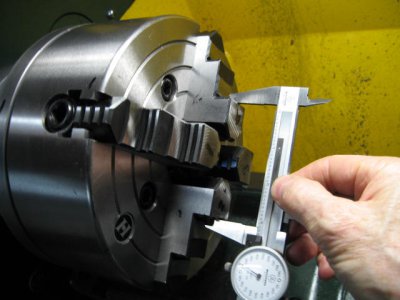
On the question of what surface to use for indexing I chose the outside of the first step in the jaws. My objective was to get both pairs of opposing jaws the same distance to each other. See picture with the caliper showing how this dimension was measured. The indexing circles on the face of the chuck were also used to determine which way to move a jaw to accomplish this.
Using the above approach it was important that the shims have some give. The 1’’ tubing was perfect for this because I could feel them squish as I tightened the jaws into position. Once the jaws were centered according to the surfaces mentioned above, I gave each jaw an additional touch to make sure there was enough tension on the shims for them to stay put during the cut.
Other aspects I like about these shims are that they are relatively light and less likely to ‘take off’ from centrifugal force (even if I planned to run the chuck at low RPM). Also, if the shims got in the way of the grinder, the grinder would only the wall thickness to deal with instead of having to grind the full width of a solid shim.
As a psychological crutch, the outside steps of the jaws were wrapped with glass tape to catch any projectiles that might launch by accident. The tape is not ‘holding’ the jaws in any way. The stone spinning at 30 000 RPM was more of a worry than the possibility of the shims coming out at 200 RPM. It turns out that the sticky side of the tape collected a whole lot of debris from the grinding which was an unforeseen advantage. Note to self for next time: develop this debris collection with tape idea to the maximum.
As a final check that the setup was good to go, some blue was added to the jaw pads and a skim grind was done. This showed that only the ‘problem’ jaws were getting what they deserved so everything looked ready to go.


