- Joined
- Jul 28, 2017
- Messages
- 2,383
I've had a blade alignment problem ever since I bought my 4x6 bandsaw. The only way to get the blade exactly vertical to the bed was to displace it in addition to twisting it. This caused blade tracking problems and also made it difficult to get straight cuts on the long axis of the blade. I evaluated the situation by removing the ball bearing portion of the blade guides, but left the brackets in place. Then I used a small c clamp to clamp an aluminum bar & a machinist's rule to the blade -- see below --- to see where the blade guide needed to be when it was twisting the blade to get vertical alignment.
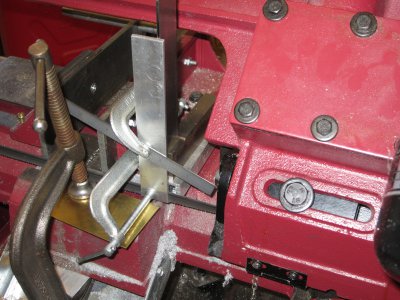
The above image, unfortunately, doesn't show the relationship between the mounting hole for the blade guide and the ruler -- sorry about that. But it does show the setup I used. The shims were used to tilt the bar to the correct angle. What this showed was that the mounting hole was about in the right place, but the "dovetail" boss would prevent the guide from being installed in the desired blade-neutral position (where only twist, no displacement, would be imposed on the saw blade). The upper blade guide bracket was even worse because the required mounting hole position didn't line up with the actual mounting hole.
So I decided to make two replacement mounting brackets. To both simplify the machining and provide some additional adjustment range I decided to make a two-piece replacement for the original cast piece. Part "A" is the portion that is mounted to the saw frame and part "B" is the flat-topped part where the blade guide mounts. The two would be joined by an 8mm flat-top machine screw. So part B can be rotated around the screw in order to achieve a "blade-neutral" twist to the saw blade.
I made the two pieces, shown in the photos below.
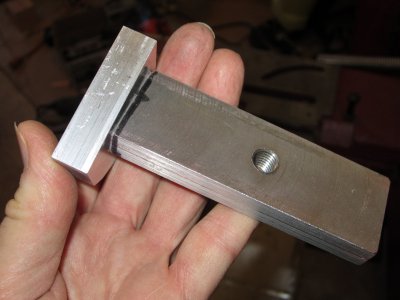
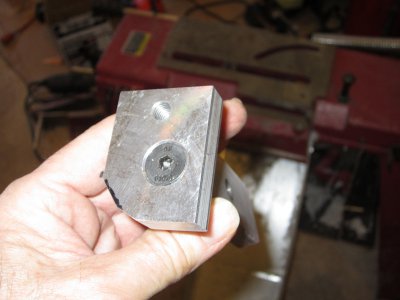
The cut-off corner is to provide clearance between the blade and part B. The rear mounting hole is used to attach the blade guide.
But I still needed to determine the correct location to drill the holes. To do this, I first drilled and tapped the hole in part B where the blade guide is attached. It is centered on the short axis and, by some trial and error, is .375" away from the back edge. The "trial and error" part was the MK1.0 version, which was too far forward.
To make this determination I installed part A on the bandsaw and then marked where the mounting hole would be w/respect to it when the blade was twisted to the desired angle. As shown below:
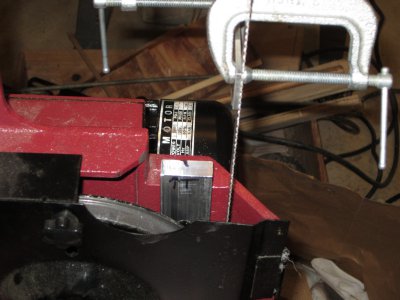
The sharpie mark on the top indicates the required alignment. It was coincident with the edge of the piece, similar to the OEM bracket (at least, for the bottom bracket). From there, I aligned part B so I could see and center the mark through its mounting hole AND where part B was aligned parallel to the test bar, then drew the outline of part A on its underside. This was so I could determine possible location(s) for the screw shown in photo 3 of this sequence. I chose to place the hole close to the end of part A so there would be plenty of clearance between the two screws. This also would produce the largest angular adjustment range of the blade guide mounting hole.
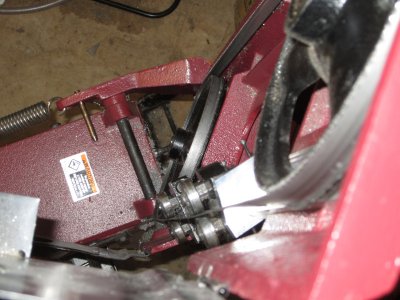
After making and installing the two blade guides the saw blade can be twisted with hardly any displacement, as shown below. With this setup it was pretty easy to get vertical cuts. A minor adjustment of the vice's fixed jaw achieved the same thing on the other axis.

The above image, unfortunately, doesn't show the relationship between the mounting hole for the blade guide and the ruler -- sorry about that. But it does show the setup I used. The shims were used to tilt the bar to the correct angle. What this showed was that the mounting hole was about in the right place, but the "dovetail" boss would prevent the guide from being installed in the desired blade-neutral position (where only twist, no displacement, would be imposed on the saw blade). The upper blade guide bracket was even worse because the required mounting hole position didn't line up with the actual mounting hole.
So I decided to make two replacement mounting brackets. To both simplify the machining and provide some additional adjustment range I decided to make a two-piece replacement for the original cast piece. Part "A" is the portion that is mounted to the saw frame and part "B" is the flat-topped part where the blade guide mounts. The two would be joined by an 8mm flat-top machine screw. So part B can be rotated around the screw in order to achieve a "blade-neutral" twist to the saw blade.
I made the two pieces, shown in the photos below.


The cut-off corner is to provide clearance between the blade and part B. The rear mounting hole is used to attach the blade guide.
But I still needed to determine the correct location to drill the holes. To do this, I first drilled and tapped the hole in part B where the blade guide is attached. It is centered on the short axis and, by some trial and error, is .375" away from the back edge. The "trial and error" part was the MK1.0 version, which was too far forward.
To make this determination I installed part A on the bandsaw and then marked where the mounting hole would be w/respect to it when the blade was twisted to the desired angle. As shown below:

The sharpie mark on the top indicates the required alignment. It was coincident with the edge of the piece, similar to the OEM bracket (at least, for the bottom bracket). From there, I aligned part B so I could see and center the mark through its mounting hole AND where part B was aligned parallel to the test bar, then drew the outline of part A on its underside. This was so I could determine possible location(s) for the screw shown in photo 3 of this sequence. I chose to place the hole close to the end of part A so there would be plenty of clearance between the two screws. This also would produce the largest angular adjustment range of the blade guide mounting hole.
After making and installing the two blade guides the saw blade can be twisted with hardly any displacement, as shown below. With this setup it was pretty easy to get vertical cuts. A minor adjustment of the vice's fixed jaw achieved the same thing on the other axis.


