First facing cut - carbide insert - 5/8" brass round

Ok, thanks again you guys. I really appreciate all of the great feedback. Based on comments I’ve got things moved around so I’m looking for a little more feedback. Please ignore the carbide insert, it's just there for a placement photo. My quick change tool post may need to be adjusted because if I put the loading bars at 9 and 12 o'clock the tightening down handle almost collides with the height adjustment when clamping it down. Here’s where it sits now.
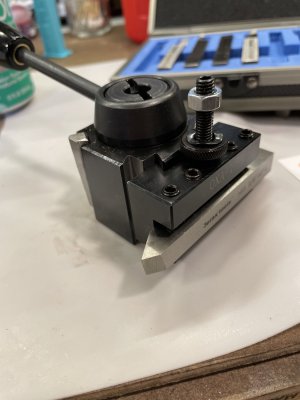
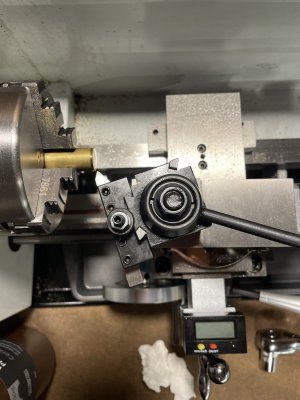
Now your getting closer! The orientation looks good in this photo. As @Firstram pointed out, you will need to disassemble and reassemble moving the handle. When the handle is tightened, it should be around the 4-5 o'clock position, around 2 o'clock in the loose position.

Make sure to set your elevation on your HSS tool top at the midpoint of your material. We are going to get there!
 
Tell me something. Are the shiny dynamic parts of the wedges flush or above the top of the tool post or are they below when loose? Look at my pic and see how mine look. If they are above or flush with the top then proceed with what is stated above. If they are below the top when loose, the tool post may simply be upside down. As you tighten the handle, the dynamic portion is driven downward expanding the wedge, when loosened, the dynamic portion should move upward.
 
Looks like a threading tool.

For facing it needs to have a different angle.

Imagine a plow, the face of the plow is 99 degrees to the face of the work, parallel to the work, push across the face.


Sent from my SM-G781V using Tapatalk
 
Ok, I’ve separated the 8 bit set and removed the task specific bits like thread and parting. These 4 look like cutters, so I’m wondering which is best for facing and turning. My money is on the bottom one in this pic
 

Attachments

  • image.jpg
    image.jpg
    161.3 KB · Views: 11
Ok, I’ve separated the 8 bit set and removed the task specific bits like thread and parting. These 4 look like cutters, so I’m wondering which is best for facing and turning. My money is on the bottom one in this pic
That's the standard cut.
 
Another pic
 

Attachments

  • image.jpg
    image.jpg
    175.7 KB · Views: 19
  • image.jpg
    image.jpg
    228.6 KB · Views: 19
My question now is, how much of the tools point should make contact? Should I aim to have the point and about .0625” of the left side making contact?
 
That one should work find as it appears to have a flat top. I think you need to angle it toward the chuck a little more as it looks like the left face is closer to the chuck than the point. Remember, the point is what you want to contact the work first, everything else must clear, otherwise you are rubbing, not cutting.

Don't worry so much about distances, just angles. Usually 7 to 10 degrees is a good starting point.

If you are interested, there are tons of videos on youtube about lathe tool setup. I would recommend Blondihacks. She has a complete series about beginning with a lathe. I have watched many of them more than once when I need to go back and get a refresher. Follow her advice in the first couple of vids and you will be making great chips in no time. Most of them are about 30 minutes long.
 
For a facing cut you will be moving the tool into the work using the cross slide. Just make it so the point of the tool is the leftmost and foremost point in the direction of travel.

When you touch the point to the outside corner of the work, you should see the tool angle away from the work in both directions. Set you depth of cut by moving the saddle to the left until the point "touches off" on the corner, then move left a little. I would think 0.010" would be fine for a first cut. You don't have to be precise, just kind of eyeball it. Then lock the saddle to the bed (if you have a lock) and advance the tool into the work using the cross slide handle. Try to turn it smoothly and at a steady rate but don't sweat that, just turn it in and watch the tool cut the work.

If the DOC (depth of cut) is too much it will be difficult to advance the tool, just move the saddle a little to the right and take a smaller cut. Even if you are just grazing the surface not not getting a full cut, it is good practice. Run the tool all the way into the center of the work and then back out and move over and make another pass.

Don't sweat the numbers or the surface finish or how quickly you can get it done. Just do it! By the time you have made 10 small facing cuts you will have a pretty good feel for how that works. Then you can try a cut along the length. Same rules apply, make the point be the leader of the tool in the direction you are going. Make sure the rest of the tool angles away from the work so that the point is doing the work. Lots of small DOC passes and you will soon be able to move on to more advanced tasks!

Ok, thank you!

My last question for today is: how do you keep the compound rest from moving when doing this type of facing cut? I was able to do very light facing cuts, but the material being brass it’s definitely pulling the tool into it. I don’t see a lock for the compound, or am I missing something? The lathe is in a neutral position so no lead screw movement, and I have the half nut locked.
 
Back
Top