

- Joined
- Oct 30, 2019
- Messages
- 197
A while back I posted about the process I used to identify and fix the leaks on a radiator from a 55kw standby generator. That repair has held up perfectly
Eventually I did decide that it was impractical to keep the generator for use at home, since the house+shop already have 30a inlets and portable 120/240 generators sufficient for the minimum requirements at both (the shop one is an ancient rusty 4000 watt thing that was given to me in trade for a favor a while back).
So I started working through a list of items to put this in good condition for sale:
- Load testing (done, put 100a of single-phase load on each pair of phases one at a time)
- Fluids+filters (done, I happened to have exactly enough precharged coolant and 15w-40 diesel oil around from a recent auction, and I otherwise don't use these items)
- Give the wheels+bearings a once-over, in case buyers ask about the viability of using this trailer for actual transport instead of just off-road occasional usage like relocating it every few years
For my shop+truck capacity, this thing is a bit of a beast -- I estimate around 10,000 lbs between the 5000-6000lbs generator and the remainder for the trailer which clearly was repurposed from something else. It would be good to have it be able to roll a couple miles off-highway and not completely eat its bearings up.

I set to work on the last one, jacking up each side, pulling the hubcap to check the state of the bearings, making sure the wheel turned reasonably. That's about it. A few observations:
- This does/did have electric brakes at some point, the wiring has been cut off
- One hubcap is missing, so that bearing is rusty
- Another hubcap has a hole punched in it, probably from a wheel being dropped on it - that bearing is worse since the hubcap let moisture in but also prevented it drying out fully
- For highway use, the trailer would need at minimum bearings on all 4 wheels plus all new wiring for the brakes and missing lights, etc. Also tires, the ones on there are old (not on split rims at least) and rotted from just being parked all the time.
I wanted to at least have 4 good hubcaps on the bearings when this got sold, and clean/repack the two rusty ones. This meant buying or making the missing hubcap. I figured it would be a good exercise to try fabricating one, specifically from material I have around the shop instead of buying material. Also, at first glance I don't see these hubcaps for sale anywhere new or used, and would rather spend the time making this from some scrap than gambling on a few items that look right but may not actually fit (the items that look like they do fit don't publish specs/dimensions sufficient to prove fitment)
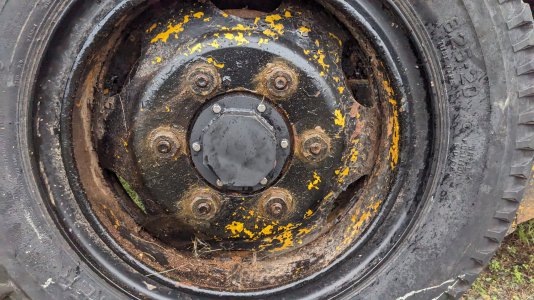
Here is what the bearing and axle looked like, under the hubcap that had a hole punched in it. The one with the missing hubcap wasn't much better.

I don't have any steel pipe of the required diameter (~4"), but did have the following:
- A piece of 3/8" rusty steel plate that was a drop from a flame cut, that came in a pile of auction stuff this summer
- Some 1/8" steel sheet metal cut out from an old water pressure tank, not flat (curved) but could be hammered and clamped flat
- Some 1/8" or 3/32" flat stock left over from brackets I made when building the awning for our tractor parking spot
I figured I would use the 3/8" plate for the base flange, the sheet metal from the pressure tank as the outermost face, and the flat stock to make an octagon ring that would take the place of pipe.
I started by cutting the 3/8" plate into roughly an octagon shape, so that it could be turned to a circle later on on the lathe, then set it up in the 4-jaw chuck
The plan is to bore out the middle to 3.5" which is for clearance around the axle and bearing retainer hardware, then hold it from the inside to turn the outside edge concentric.
Started with a center drill, 3/8" pilot hole, then an odd 1.75" taper-shank drill I had in the drawer -- not certain if this is effectively just stub length twist drill, or if it is something more esoteric but it worked fine


At this point my phone screen failed so I didn't have pictures, but it wasn't anything special:
- Drilled the initial through-hole
- Bored to 3.5" ID
- Faced the first side
- Also made a slight counterbore to match what the original hubcap would have around the center, to give clearance for the bearing cage
- Flipped the chuck jaws around and held the flange from the new ID with the faced side against the chuck jaws, indicated off the space between the jaws
- slowly turned the rough octagon down to the desired OD, which I think was around 4.75"
- Faced the other side
I also don't have pictures but I bent the flat bar into an octagon (a bit sloppily but massaged it in the vise with a hammer later), and tack welded it to the piece of now-flattened sheet metal from the water tank. Then at the bandsaw I cut the sheet metal roughly to the profile of the octagon.

Then I fully welded the mating surface of the two parts (once the flange is on, access would be worse), and used an angle grinder to bring the cover to the plane of the octagon edges.
also at some point I transfer punched the 6-hole pattern from one of the OEM hubcaps onto this new one. It was much faster/easier to do that for the precision needed (or lack thereof), instead of measuring the hole pattern and laying it out by hand or on the mill.
The flat side on the OD of the flange is just a spot where the original material was a bit small, and it wasn't worth trying to turn the OD down further to clean it up.


Now I welded the flange on and wire wheeled everything. I was being very fast with my welds because the gauge on my MIG gas bottle was just above 0 for a while now.

Side by side with an OEM cap:


Finished product with a 5-minute primer and paint job


Compared to an original:


And the bonus repair.. as mentioned one of the hubcaps had a hole punched in it, like 0.75x1.25. I think when someone was taking a wheel off or on, they dropped it down and cracked a hole in it. They're aluminum, so the best I could think to do was clean it up and JB weld a piece of aluminum flashing from the inside. This worked out well enough, clamped a thin piece of flashing in and the JB weld squeeze-out ended up puddling and filling in the hole which was unintended but nice

Thanks for reading
Epilogue -- this all took place about a month ago, after I had the generator listed for sale for a few weeks and had limited interest. since then it has been sold and picked up, helping replenish the Shop Fund for a while (or filling the shop-shaped hobby cashflow hole)
Eventually I did decide that it was impractical to keep the generator for use at home, since the house+shop already have 30a inlets and portable 120/240 generators sufficient for the minimum requirements at both (the shop one is an ancient rusty 4000 watt thing that was given to me in trade for a favor a while back).
So I started working through a list of items to put this in good condition for sale:
- Load testing (done, put 100a of single-phase load on each pair of phases one at a time)
- Fluids+filters (done, I happened to have exactly enough precharged coolant and 15w-40 diesel oil around from a recent auction, and I otherwise don't use these items)
- Give the wheels+bearings a once-over, in case buyers ask about the viability of using this trailer for actual transport instead of just off-road occasional usage like relocating it every few years
For my shop+truck capacity, this thing is a bit of a beast -- I estimate around 10,000 lbs between the 5000-6000lbs generator and the remainder for the trailer which clearly was repurposed from something else. It would be good to have it be able to roll a couple miles off-highway and not completely eat its bearings up.
I set to work on the last one, jacking up each side, pulling the hubcap to check the state of the bearings, making sure the wheel turned reasonably. That's about it. A few observations:
- This does/did have electric brakes at some point, the wiring has been cut off
- One hubcap is missing, so that bearing is rusty
- Another hubcap has a hole punched in it, probably from a wheel being dropped on it - that bearing is worse since the hubcap let moisture in but also prevented it drying out fully
- For highway use, the trailer would need at minimum bearings on all 4 wheels plus all new wiring for the brakes and missing lights, etc. Also tires, the ones on there are old (not on split rims at least) and rotted from just being parked all the time.
I wanted to at least have 4 good hubcaps on the bearings when this got sold, and clean/repack the two rusty ones. This meant buying or making the missing hubcap. I figured it would be a good exercise to try fabricating one, specifically from material I have around the shop instead of buying material. Also, at first glance I don't see these hubcaps for sale anywhere new or used, and would rather spend the time making this from some scrap than gambling on a few items that look right but may not actually fit (the items that look like they do fit don't publish specs/dimensions sufficient to prove fitment)
Here is what the bearing and axle looked like, under the hubcap that had a hole punched in it. The one with the missing hubcap wasn't much better.
I don't have any steel pipe of the required diameter (~4"), but did have the following:
- A piece of 3/8" rusty steel plate that was a drop from a flame cut, that came in a pile of auction stuff this summer
- Some 1/8" steel sheet metal cut out from an old water pressure tank, not flat (curved) but could be hammered and clamped flat
- Some 1/8" or 3/32" flat stock left over from brackets I made when building the awning for our tractor parking spot
I figured I would use the 3/8" plate for the base flange, the sheet metal from the pressure tank as the outermost face, and the flat stock to make an octagon ring that would take the place of pipe.
I started by cutting the 3/8" plate into roughly an octagon shape, so that it could be turned to a circle later on on the lathe, then set it up in the 4-jaw chuck
The plan is to bore out the middle to 3.5" which is for clearance around the axle and bearing retainer hardware, then hold it from the inside to turn the outside edge concentric.
Started with a center drill, 3/8" pilot hole, then an odd 1.75" taper-shank drill I had in the drawer -- not certain if this is effectively just stub length twist drill, or if it is something more esoteric but it worked fine
At this point my phone screen failed so I didn't have pictures, but it wasn't anything special:
- Drilled the initial through-hole
- Bored to 3.5" ID
- Faced the first side
- Also made a slight counterbore to match what the original hubcap would have around the center, to give clearance for the bearing cage
- Flipped the chuck jaws around and held the flange from the new ID with the faced side against the chuck jaws, indicated off the space between the jaws
- slowly turned the rough octagon down to the desired OD, which I think was around 4.75"
- Faced the other side
I also don't have pictures but I bent the flat bar into an octagon (a bit sloppily but massaged it in the vise with a hammer later), and tack welded it to the piece of now-flattened sheet metal from the water tank. Then at the bandsaw I cut the sheet metal roughly to the profile of the octagon.
Then I fully welded the mating surface of the two parts (once the flange is on, access would be worse), and used an angle grinder to bring the cover to the plane of the octagon edges.
also at some point I transfer punched the 6-hole pattern from one of the OEM hubcaps onto this new one. It was much faster/easier to do that for the precision needed (or lack thereof), instead of measuring the hole pattern and laying it out by hand or on the mill.
The flat side on the OD of the flange is just a spot where the original material was a bit small, and it wasn't worth trying to turn the OD down further to clean it up.
Now I welded the flange on and wire wheeled everything. I was being very fast with my welds because the gauge on my MIG gas bottle was just above 0 for a while now.
Side by side with an OEM cap:
Finished product with a 5-minute primer and paint job
Compared to an original:
And the bonus repair.. as mentioned one of the hubcaps had a hole punched in it, like 0.75x1.25. I think when someone was taking a wheel off or on, they dropped it down and cracked a hole in it. They're aluminum, so the best I could think to do was clean it up and JB weld a piece of aluminum flashing from the inside. This worked out well enough, clamped a thin piece of flashing in and the JB weld squeeze-out ended up puddling and filling in the hole which was unintended but nice
Thanks for reading
Epilogue -- this all took place about a month ago, after I had the generator listed for sale for a few weeks and had limited interest. since then it has been sold and picked up, helping replenish the Shop Fund for a while (or filling the shop-shaped hobby cashflow hole)
Attachments
Last edited:
")