Electrical Probe for CNC

Don B

Active User
Registered
Joined
Mar 31, 2014
Messages
607
I'm looking for some input please on the pros and cons of using a Electrical Probe for for setting the Z axis on my CNC, is anyone using one of these devices on their CNC?

I've come across this.
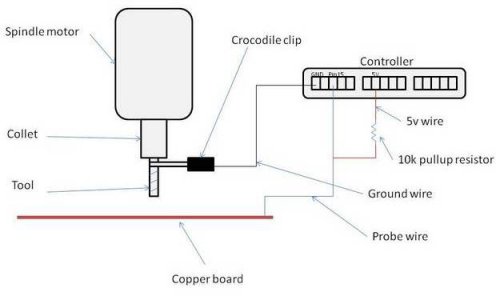
probediagram.jpg

The setup instructions are here.
http://www.autoleveller.co.uk/cnc-probe-guide/

It seems a little to good and simple to be true, I have the connections open on my CNC (NM 145)
Setting aside the potential for physical damage to the machine can I hurt anything electronically by trying this?
On the drawing there is a 10K pullup resistor, is this a special resistor? Or is this terminology for the resistors function?:thinking:

I would appreciate any advice or guidance with this, my apologies in advance but I'm electronically challenged so any answers will really need to be dumbed down.

Don B

probediagram.jpg
 
It will work if your touch plate is insulated. It might or might not work if it isn't, depending on details of the construction of your machine. In any case it can do no harm. "Pullup" describes the function of the resistor.

Rick Sparber has a pretty good paper on one of these:

http://rick.sparber.org/rctf.pdf

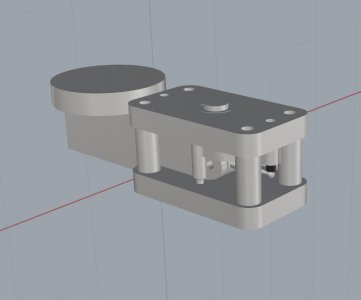
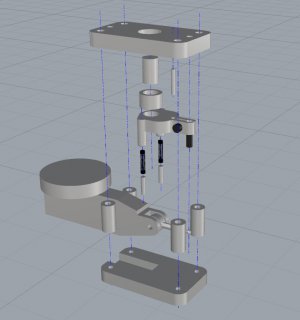
Thank you very much John, I'm planing to make a touch plate with a spring under the plate, I'm a little leery of a tool coming down on a solid plate, so an isolated design shouldn't be a problem, I've been drawing up a low profile Z tool (1 inch high) that utilizes a test indictor but this looks a much better way to go if it's reliable.

Low Profile Zero Tool 1.jpgLow Profile Zero Tool 2.jpg

Low Profile Zero Tool 1.jpg Low Profile Zero Tool 2.jpg
 
I have three probes on my mill and on my router. They are all wired to the same input pin on their respective controllers. One probe is my fancy 3D probe, which I swap between the two machines as needed. Each machine has a fixed plate for measuring tool lengths during tool changes. Finally, each machine has a "mobile" plate for probing the Z height of the work piece. On the mill, this is a piece of single sided 3mm PCB board. Single sided to insulate it from metal of the table or work piece. On the router I use a piece of aluminum bar stock since the table is wood. I find using the non-3D probes very reliable and simple. The 3D probe has been a bit troublesome since it was abused by the prior owner and had a tendency to not trigger.

I have found that if your axis motors can handle the weight of your spindle and head, and your probes reliably trigger, these kinds of probes are worth having. I would recommend wiring your probes to use active low signal since most spindles are grounded. If you use conductive tooling and/or your spindle is not insulated from ground, you don't need to clip it to ground.

Think about how you are using the probe. Do you want to do just Z, or also X and Y? If the "mobile" plate is small enough you can place it against the side of your work piece and probe X or Y.

My setup allows for plugging in arbitrary mobile probes. On the mill I have a probe made of delrin round turned to fit my TTS holder. I bored the center to hold a 3/4in copper pipe cap pressed inside. I use it to probe and center round tools mounted on the table.

3D probes can be problematic. You get what you pay for. Unfortunately, if you have trouble with reliable triggering your machine can turn an expensive probe into trash, or destroy probe tips - which are not cheap. I have gone through many tips myself before I was able to make my 3D probe serviceable. Again, make sure you have the electrical side sorted to provide reliable triggering. I try really hard to make it a habit to test the probe signal before I initiate any probe operation. Testing before probing is better than being fast on the E-stop - which I am not.


Sent from my Xoom using Tapatalk
 
I have three probes on my mill and on my router. They are all wired to the same input pin on their respective controllers. One probe is my fancy 3D probe, which I swap between the two machines as needed. Each machine has a fixed plate for measuring tool lengths during tool changes. Finally, each machine has a "mobile" plate for probing the Z height of the work piece. On the mill, this is a piece of single sided 3mm PCB board. Single sided to insulate it from metal of the table or work piece. On the router I use a piece of aluminum bar stock since the table is wood. I find using the non-3D probes very reliable and simple. The 3D probe has been a bit troublesome since it was abused by the prior owner and had a tendency to not trigger.

I have found that if your axis motors can handle the weight of your spindle and head, and your probes reliably trigger, these kinds of probes are worth having. I would recommend wiring your probes to use active low signal since most spindles are grounded. If you use conductive tooling and/or your spindle is not insulated from ground, you don't need to clip it to ground.

Think about how you are using the probe. Do you want to do just Z, or also X and Y? If the "mobile" plate is small enough you can place it against the side of your work piece and probe X or Y.

My setup allows for plugging in arbitrary mobile probes. On the mill I have a probe made of delrin round turned to fit my TTS holder. I bored the center to hold a 3/4in copper pipe cap pressed inside. I use it to probe and center round tools mounted on the table.

3D probes can be problematic. You get what you pay for. Unfortunately, if you have trouble with reliable triggering your machine can turn an expensive probe into trash, or destroy probe tips - which are not cheap. I have gone through many tips myself before I was able to make my 3D probe serviceable. Again, make sure you have the electrical side sorted to provide reliable triggering. I try really hard to make it a habit to test the probe signal before I initiate any probe operation. Testing before probing is better than being fast on the E-stop - which I am not.

Thanks for the info, I think I mostly understand what you mean, for now I'm just trying to do the Z axis, I usually just use paper which is OK when every thin is dry, but after some coolant is splashed round........ soggy paper doesn't work so well for tool touch offs..!
Is your probes wired like the diagram I posted, using the resistor?
Usually by the time my brain tells my thumb to push the E-stop bad things have already happened and it's finished anyway.
 
HI
If your running mach 3 you can use this very simple and works great.
 

Attachments

  • How to setup touch plate[1].doc
    224.5 KB · Views: 46
HI
If your running mach 3 you can use this very simple and works great.

Thank you very much, yes I'm using Mach3, that "VB Code for Auto Tool Zero Button" is something I've been trying to pin down, seems to be several examples around and there all just different enough to confuse me, do you use this yourself? The reason I ask is that I've ben contemplating making a spring loaded touch off plate in case the tool should run past, and I'm wondering if I'm wasting my time?
If you do use this method have you ever broken or damaged a tool?
I started to work on this Monday, then aggravated a ruptured disk in my back and things have been at a stand still, hopefully I can complete this by Christmas, LOL, but at the moment it's not looking good.

Thank you very much for the post.

Don
 
Hi Don
Yes I have used it but now a lot since I just found it too.
If you look at the routine the number after the f is for speed so you can really slow it down. Also to est it put some foam under the touch plate when you try it. remember to check the thickness of your plate to put the into the routine so it makes the correction to be at 0" after.
I too had make a spring loaded touch point but discarded it when I found this routine.
Sorry to hear about your back that is some bad stuff to deal with

Tom:jester:

Thank you very much Tom:))

Don
 
Back
Top