I've recently installed flood coolant on my hydraulic surface grinder. It makes a world of difference, especially with thin parts like parallels (they can be ground a lot more aggressively).
My grinder already has the (rather low) factory splash shields and drainage. I just added a pump (I tried few) and a nozzle(also few were tried).
First, let me ask here if anyone managed to DIY a cool-grind style, coherent jet type nozzle for their surface grinder. And if yes, please post photos!
I started with a piece of blue plastic flexible "coolant hose". My grinder uses 1in wheel thickness so realistically I could aim the jet on the front or the back of the wheel, not both.
Also I found and tested a very useful tip. Point your coolant nozzle at the wheel a little in front of the grinding arc. Not directly at the workpiece/wheel interface. Flood coolant works much better this way. The explanation I read was that the wheel has a high speed layer of air around it. That air gets compressed in the grinding arc so it is very difficult to overcome this pressure with coolant. It just gets deflected. But if you wet the wheel slightly before, it carries the coolant where it needs to go.
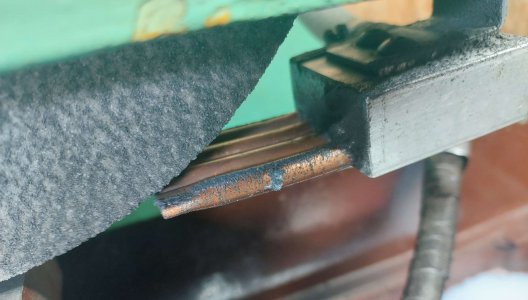
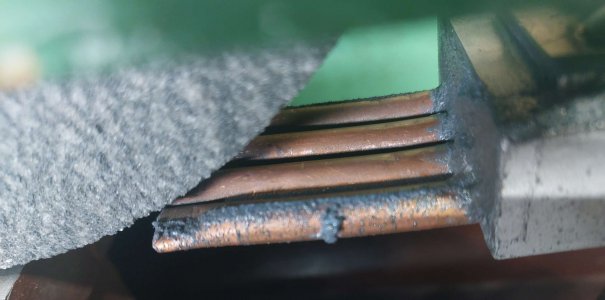
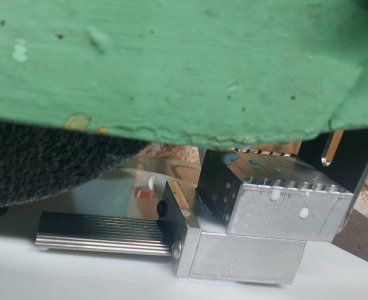
But, the plastic nozzle was useless. I decided to make one similar to cool-grind grind-loc. I took a small block of aluminium, I drilled a bunch of intersecting holes. One became coolant supply, other 4 had quarter inch copper tubes glued in(I only had 6.5mm drills while quarter inch is 6.3mm so I had to use glue to secure the tubes). I deburred the tubes very carefully. Then I crushed about half inch long section on the ends(with a press) inserting 1mm shims to prevent tubes collapsing. The holes were separated by 1mm on each side so after crushing they touched. The entire length was 32mm.
This nozzle worked sort of OK. However I had to crank up the flow and pressure for the jets to go straight far enough to hit the wheel (about 3/4in).
So I tried crushing those tubes some more, but this time with pliers. Trying to adjust each tube openings with small flathead screwdriver. The result was horrible. Some jets ended up turned by 90 degrees, others started spraying instead of remaining coherent... I had to grind off half of the crushed sections to get back to the original performance.
I decided to leave it like that for now (I'll take some pictures and I'll post them later if there is interest). As mentioned. It sort of works, but the volume and pressure of coolant causes some splashing through the screens.
So after watching another cool grind product online (hypo grind) I decided to forego crushed tubes and use thinner uncrushed tubes. Some time ago I bought a bunch of tiny stainless tubes (2mm OD, 1.75mm ID) for an unrelated experiment. These seem ideal. So when I have some time I'll be making the new nozzle. I'm pretty confident it should work.
The original hypo-grind nozzle has a ball-swivel joint that is a hydraulic fitting at the same time. It let's one adjust the nozzle angle, then tighten to immobilise. Does anyone have any info how such "swivel ball fitting" should look like internally? I would love to replicate one.
Edit: Adding photos. Sorry for grinding "mud" on the nozzle. I didn't have anything handed to clean it with at the time.


Also, regarding filtration.
I'm grinding hardened steel so magnets are great for capturing chip dust. I had few tiny neodymium magnets which I put in the coolant tank (this served me well with a bandsaw before). Also I put two big magnetic welding squares almost fencing off the table drain. So any coolant draining has to pass very close to the magnets. Then when I stop grinding I can vacuum the magnets for a quick cleanup.
Still I'm considering additional filtration and skimming.
One option is to use bag filters on the return line. I doubt this will work, but I ordered a bag filter to try anyway.
The second option is to place a household type filter on the high pressure side. I haven't done so yet, for the worry it will clog instantly. Do people have good experiences with such filters? If so what kind of filter insert to use?
My grinder already has the (rather low) factory splash shields and drainage. I just added a pump (I tried few) and a nozzle(also few were tried).
First, let me ask here if anyone managed to DIY a cool-grind style, coherent jet type nozzle for their surface grinder. And if yes, please post photos!
I started with a piece of blue plastic flexible "coolant hose". My grinder uses 1in wheel thickness so realistically I could aim the jet on the front or the back of the wheel, not both.
Also I found and tested a very useful tip. Point your coolant nozzle at the wheel a little in front of the grinding arc. Not directly at the workpiece/wheel interface. Flood coolant works much better this way. The explanation I read was that the wheel has a high speed layer of air around it. That air gets compressed in the grinding arc so it is very difficult to overcome this pressure with coolant. It just gets deflected. But if you wet the wheel slightly before, it carries the coolant where it needs to go.
But, the plastic nozzle was useless. I decided to make one similar to cool-grind grind-loc. I took a small block of aluminium, I drilled a bunch of intersecting holes. One became coolant supply, other 4 had quarter inch copper tubes glued in(I only had 6.5mm drills while quarter inch is 6.3mm so I had to use glue to secure the tubes). I deburred the tubes very carefully. Then I crushed about half inch long section on the ends(with a press) inserting 1mm shims to prevent tubes collapsing. The holes were separated by 1mm on each side so after crushing they touched. The entire length was 32mm.
This nozzle worked sort of OK. However I had to crank up the flow and pressure for the jets to go straight far enough to hit the wheel (about 3/4in).
So I tried crushing those tubes some more, but this time with pliers. Trying to adjust each tube openings with small flathead screwdriver. The result was horrible. Some jets ended up turned by 90 degrees, others started spraying instead of remaining coherent... I had to grind off half of the crushed sections to get back to the original performance.
I decided to leave it like that for now (I'll take some pictures and I'll post them later if there is interest). As mentioned. It sort of works, but the volume and pressure of coolant causes some splashing through the screens.
So after watching another cool grind product online (hypo grind) I decided to forego crushed tubes and use thinner uncrushed tubes. Some time ago I bought a bunch of tiny stainless tubes (2mm OD, 1.75mm ID) for an unrelated experiment. These seem ideal. So when I have some time I'll be making the new nozzle. I'm pretty confident it should work.
The original hypo-grind nozzle has a ball-swivel joint that is a hydraulic fitting at the same time. It let's one adjust the nozzle angle, then tighten to immobilise. Does anyone have any info how such "swivel ball fitting" should look like internally? I would love to replicate one.
Edit: Adding photos. Sorry for grinding "mud" on the nozzle. I didn't have anything handed to clean it with at the time.


Also, regarding filtration.
I'm grinding hardened steel so magnets are great for capturing chip dust. I had few tiny neodymium magnets which I put in the coolant tank (this served me well with a bandsaw before). Also I put two big magnetic welding squares almost fencing off the table drain. So any coolant draining has to pass very close to the magnets. Then when I stop grinding I can vacuum the magnets for a quick cleanup.
Still I'm considering additional filtration and skimming.
One option is to use bag filters on the return line. I doubt this will work, but I ordered a bag filter to try anyway.
The second option is to place a household type filter on the high pressure side. I haven't done so yet, for the worry it will clog instantly. Do people have good experiences with such filters? If so what kind of filter insert to use?
Last edited:


