DIY diffuser for a laser monochromatic light.

Flynth

Registered
Registered
Joined
Dec 27, 2017
Messages
310
A cheap green powerfull DPSS laser pointer is an excellent monochromatic source of light to use with optical flats. It has extremely narrow spectral line width (orders of magnitude better than diode lasers), it falls right into the part of the spectrum human eye is most sensitive to and it emits lots of light (1W etc).

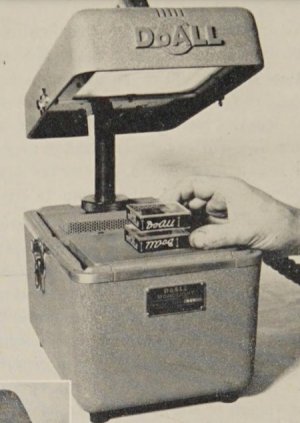
However, the best kind of light to use with optical flats is diffuse light scattered or emmited from a large surface. See a picture of a DoAll light as an example :
Screenshot_20230511-211636_Xodo.jpg
The flat sheet on top is the diffuser.

So the problem with the DPSS laser is its very narrow beam width even with no lens and difficulty in expanding it (more about it later). I've previously used a red laser by removing it's lens and shining it at a white piece of paper suspended above the flat. This doesn't work with a DPSS laser. For one the beam is too narrow. Also the beam seems to reflect off white paper rather than scatter. I bought some frosted acrylic hoping to use it as a diffuser, but the beam at this intensity just passes through it with very little scattering.

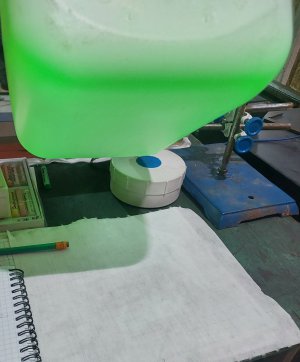
The best diffuser I found is a 1L bottle made from white, non translucent plastic. I shine the laser inside at the top while holding the bottle horizontally abd the entire bottle emits very nice diffuse green glow that works beautifully with my optical flats. However, the bottle is only 3.5in in diameter. So I can't illuminate the entire one of my biggest optical flats. This makes interpreting the pattern difficult.

I saw the youtube video where a guy used a pingpong ball as a diffuser. For some reason it seems no one is selling pingpong balls around here so I can't test it. Also such a small source will suffer from the same problem (inability to illuminate the entire flat in a way that light reflects towards the user).

So, I'm looking for ideas for a better diffuser or something else that will help me to use that DPSS laser comfortably with my large 6in optical flat.

Edit: One more thing. The diffuser has to also decohere the laser beam, because if it remains coherent it produces so called speckle which messes with the observability of the fringe patterns. Typically scattering the laser light in thick plastic does that.
 
Last edited:
I know almost nothing about this subject but perhaps try repurposing a frosted light bulb? Also, maybe break the beam up with a multifaceted prism like a chandelier pendant inside said light bulb? Dunno, but now I'm following.:)
 
I understand the laser emitter puts out a nice frequency for this purpose. But the problem you are having is diffusing collimated light, so why not move away from collimated light? A green LED instead? Nothing wrong with filtered light, either.

I'm kinda thinking that light scatters as a function of wavelength, 1/(lambda)^4 (Raleigh's), so I'd guess that the green would scatter more readily than red when shining it at things around the room. I also bet that the reason that isn't what it looks like from subjective tests has more to do with the spectral density of the red beam at Class 3A wattage being substantially higher and having a stronger response on retinal rods than green (watt for watt) has. Greens look dimmer because at the same power output (the regulated factor), they are, as far as our eyes can tell.

I have used color-filtered and color-emitting LED lamps (not laser diodes) for several color-critical processes, they can be ordered to put out a narrow band if that's what is important to you. Neon, halogen arc, and filtered incandescent is another possibility. It's easy to impregnate a piece of glass with things that are opaque to specific frequencies, they've been doing that since the early 19th century.
 
I understand the laser emitter puts out a nice frequency for this purpose. But the problem you are having is diffusing collimated light, so why not move away from collimated light? A green LED instead? Nothing wrong with filtered light, either.
LEDs have horrible spectral line width for the purpose (great for lighting thought). The fringes will be much harder to read (more smeared out) than with very narrowband source.

Just using a laser is not that much better than using a LED. Your typical red or UV laser diode has 3nm wide emission band.

The green DPSS laser is very special in this regard. It is wonderful we can buy stuff like this for $4 (that's how much I paid fotr mine). How is it special? The light it produces is not made by a laser diode. There is a laser diode there, but it "charges up" a small NdYVO crystal. This crystal emits much better light than diodes in itself, but it is not the end. The NdYVO crystal emits light of a wrong color. So there is another crystal there called a KTP frequency doubling crystal. This crystal is very selective and the resulting light is way better than anything that can be produced with diode lasers (or LEDs). Comparable to low pressure sodium and HeNe light used in the industry in quality, but green in color which is actually better for human perception.

Another advantage of using a laser is that you're not limited to only diffuse light. You can bounce your (sufficiently widened) laser beam off your object with the optical flat on it and you can project a nicely zoomed in picture of the fringes on the wall next to you. I much prefer seeing the entire surface, but if one wants to check for example surface roughness for which a magnified view is better this is a really cool way to use it.


I'm kinda thinking that light scatters as a function of wavelength, 1/(lambda)^4 (Raleigh's), so I'd guess that the green would scatter more readily than red when shining it at things around the room. I also bet that the reason that isn't what it looks like from subjective tests has more to do with the spectral density of the red beam at Class 3A wattage being substantially higher and having a stronger response on retinal rods than green (watt for watt) has. Greens look dimmer because at the same power output (the regulated factor), they are, as far as our eyes can tell.

I have used color-filtered and color-emitting LED lamps (not laser diodes) for several color-critical processes, they can be ordered to put out a narrow band if that's what is important to you. Neon, halogen arc, and filtered incandescent is another possibility. It's easy to impregnate a piece of glass with things that are opaque to specific frequencies, they've been doing that since the early 19th century.
My first choice was low pressure sodium. But the cost is silly :-(

As for filtering I saw it mentioned in few places, but realistically, are those filters anywhere near as monochromatic as required? I would expect 5nm wide band to an absolute maximum for precise flatness measurement and less for surface roughness.
 
Bouncing the laser off a polished convex surface would produce a diverging beam. Maybe a nice, clean ball bearing. Smaller diameter = greater divergence.

But that won't scramble the coherence length -- long coherence length is one of the things that can cause speckle, and because your DPSS laser has a narrow bandwidth, it also has a relatively long coherence length. Directing a diverging laser beam into a tube with a polished ID will mix up the path lengths pretty good. A fiber optic illuminator element might do the same thing. Maybe, haven't tried it.

Anther alternative would be to focus the laser onto the end of a slab of plastic with polished surfaces so the beam experiences a lot of internal reflections before it exits. This assumes the beam is diverging. If it's collimated it will just travel to the other side without scrambling the coherence length. To reduce reflection loss at the air/plastic interface you'd want the laser beam to enter at the Brewster angle, dependent on the plastic's index of refraction. But with a 1 watt laser maybe reflection loss is not a problem. But it is a hazard. Make sure you have good eye protection, it's all too easy to damage your retina with high power lasers! I think I may have some retinal damage from inadvertent exposure to work-related 1064nm laser radiation so I try to be pretty careful these days.

A commercial light pipe like one of these would work quite nicely but you probably don't want to spend that kind of money.
 
Thanks for the ideas :)
Bouncing the laser off a polished convex surface would produce a diverging beam. Maybe a nice, clean ball bearing. Smaller diameter = greater divergence.
That was the first thing I tried :) Unfortunately either the ball bearings I had must had pretty big finish flaws or I should've aimed the laser better because instead of expanding the beam equally in all directions like a sphere would it produced a very thin line. Like those projected by laser levels.

I've been looking for cheap acrylic lenses to make use of the coherent light, but I haven't found them at big enough diameter. I'd like to expand the beam to 4in and have it expanding to 8in within let's say 20in distance. This would allow me to use my biggest optical flat comfortably and project on an 8in screen. Let's say that's a future project :)
But that won't scramble the coherence length -- long coherence length is one of the things that can cause speckle, and because your DPSS laser has a narrow bandwidth, it also has a relatively long coherence length. Directing a diverging laser beam into a tube with a polished ID will mix up the path lengths pretty good. A fiber optic illuminator element might do the same thing. Maybe, haven't tried it.
They use something called "agitated micro fiber" to scramble light coherence in one paper I found on the subject. They just use a vibration motor from a cellphone to agitate the fiver so that is simple enough, but I have no way to couple the cheap laser to a fiber without loosing the majority of light in the process..

Anther alternative would be to focus the laser onto the end of a slab of plastic with polished surfaces so the beam experiences a lot of internal reflections before it exits. This assumes the beam is diverging. If it's collimated it will just travel to the other side without scrambling the coherence length. To reduce reflection loss at the air/plastic interface you'd want the laser beam to enter at the Brewster angle, dependent on the plastic's index of refraction. But with a 1 watt laser maybe reflection loss is not a problem. But it is a hazard. Make sure you have good eye protection, it's all too easy to damage your retina with high power lasers! I think I may have some retinal damage from inadvertent exposure to work-related 1064nm laser radiation so I try to be pretty careful these days.
That's the problem with laser Illumination. I use higher powered UV lasers with my cnc router for various things(cutting, burning, exposing photo resist) so I have good eye protection that covers green band too. However, how to use eye protection when you're using a laser for Illumination? You're trying to see the light not block it... So the only protection in such situation is to not shine the laser in your eyes and relying on the properties of the thick white plastic I now use to scatter the beam to not transmit sufficient amount of that light to cause any eye damage. A projection screen would be safer in this regard.

A commercial light pipe like one of these would work quite nicely but you probably don't want to spend that kind of money.
No, but it might be something that could be improvised with a cheap borosilicate glass rod? But for now I'm fairly happy with a pretty simple solution. I mentioned using the white bottle before. I found a bigger 5L bottle made of the same plastic. It used to contain deodorised petrol solvent. It is some sort of fairly soft plastic that seems to contain lots of white particles (titanium oxide perhaps). It works great until I get the optics for the projection setup. It looks a bit j
anky, but it does the job. Both the bottle and the laser are held in glassware clamps. The laser clamp actually depresses it's button (one has to twist the laser to depress it). This has an added benefit of if the laser falls out, the button is no longer depressed and it switches off. So there is a measure of safety in this.
20230514_193409.jpg
 
Before retirement I spent quite a lot of time in the R&D field of solid-state optoelectronics. I have two suggestions for you.

1) This is imperative, not optional. Go to lasersafety.com and buy a good quality set of laser safety glasses for the 532 nm wavelength. Do this now, before you use the laser again. The OD (optical density) must be matched to power and beam size of the laser. You need a known good brand so that you don't get lenses that will bleach (turn more transparent) with exposure to high light power. You may burn your skin or hands as well but that will heal after a brief bit of negative reinforcement (been there, done that). Even if the laser is class 2A (which I doubt) you should do this. I would not trust my eyes to the drive current out of a cheap laser power supply.

2) You are tackling a "known difficult problem". Expanding a laser beam uniformly without expensive optics is a real challenge. Scambling the phase of a laser beam is actually easier but also expensive. I suggest you borrow from the edge-lit LED flat panel industry as follows.

Get a small silvered mirror. Just an and inch or so in size as a first trial. You want a cleanly cut edge on at least one of the edges. A good scribe and break ought to be okay. Use your sandblaster ( you have one?) and blast the non-silvered "front" face of the mirror until it just turns frosty white. Now launch your laser beam into the clean cut edge. You ought to see the light scatter inside the mirror and bounce out of the frosty surface. Try different launch angles and study the resulting output light pattern. Try a simple convex lens to focus the beam just inside the cut edge of the mirror. This will aid in starting the scattering process. The huge variation in beam path lengths before each "beamlet" escapes the glass panel will effectively decohere (reduce the coherence length) the beam.

This technology is now few decades old so you should not need to be inventing things, just figuring out how to DIY it within your budget. there lots of variations on this and many way to make the illumination more efficient and uniform. Just imagine how annoyed you would be if your LED TV was noticably brighter at the edges than the middle. What I offer above is my attempt at giving you a cheap and easy starting point. At a higher price-point you can buy special films comprised of reflective dots and pyramids to stick onto the surface.

here is a link with something like this concept as it is used in big screen LED TVs.


Now, go buy some laser glasses
 
A cheap green powerfull DPSS laser pointer is an excellent monochromatic source of light to use with optical flats. It has extremely narrow spectral line width (orders of magnitude better than diode lasers), it falls right into the part of the spectrum human eye is most sensitive to and it emits lots of light (1W etc).

However, the best kind of light to use with optical flats is diffuse light scattered or emmited from a large surface. See a picture of a DoAll light as an example :

So, I'm looking for ideas for a better diffuser or something else that will help me to use that DPSS laser comfortably with my large 6in optical flat.
You can coat a mirror or sphere by burning a small piece of magnesium ribbon. The vapor will stick on the cold surface giving it a 99.8% diffuse reflection. This technique is used in color meters and I have used it some 30 years ago.
The magnesium ribbon should be pretty pure, the kind that is used in laboratory's.
 
The sandblasted mirror and shining the laser into a cut edge is a great idea.

I do have OD4+ laser safety goggles(two pairs, one of them covers 532nm) . Not the big name brand (these are of course the best as in you know what you're getting), but I got a good pair of cheap ones. When I got my first UV laser I did quite a bit of research into various cheap brands. In the end I got the model I can (sort of) trust. Still, I don't trust them 100%.

Before retirement I spent quite a lot of time in the R&D field of solid-state optoelectronics. I have two suggestions for you.

1) This is imperative, not optional. Go to lasersafety.com and buy a good quality set of laser safety glasses for the 532 nm wavelength. Do this now, before you use the laser again. The OD (optical density) must be matched to power and beam size of the laser. You need a known good brand so that you don't get lenses that will bleach (turn more transparent) with exposure to high light power. You may burn your skin or hands as well but that will heal after a brief bit of negative reinforcement (been there, done that). Even if the laser is class 2A (which I doubt) you should do this. I would not trust my eyes to the drive current out of a cheap laser power supply.

2) You are tackling a "known difficult problem". Expanding a laser beam uniformly without expensive optics is a real challenge. Scambling the phase of a laser beam is actually easier but also expensive. I suggest you borrow from the edge-lit LED flat panel industry as follows.
Indeed. I treat it as two separate problems. The scattering with the large bottle works well enough that I might make a permanent enclosure for it.

The projection option, is just a future project idea at the stage.
Get a small silvered mirror. Just an and inch or so in size as a first trial. You want a cleanly cut edge on at least one of the edges. A good scribe and break ought to be okay. Use your sandblaster ( you have one?) and blast the non-silvered "front" face of the mirror until it just turns frosty white. Now launch your laser beam into the clean cut edge. You ought to see the light scatter inside the mirror and bounce out of the frosty surface. Try different launch angles and study the resulting output light pattern. Try a simple convex lens to focus the beam just inside the cut edge of the mirror. This will aid in starting the scattering process. The huge variation in beam path lengths before each "beamlet" escapes the glass panel will effectively decohere (reduce the coherence length) the beam.

This technology is now few decades old so you should not need to be inventing things, just figuring out how to DIY it within your budget. there lots of variations on this and many way to make the illumination more efficient and uniform. Just imagine how annoyed you would be if your LED TV was noticably brighter at the edges than the middle. What I offer above is my attempt at giving you a cheap and easy starting point. At a higher price-point you can buy special films comprised of reflective dots and pyramids to stick onto the surface.

here is a link with something like this concept as it is used in big screen LED TVs.


Now, go buy some laser glasses
Thanks.

You can coat a mirror or sphere by burning a small piece of magnesium ribbon. The vapor will stick on the cold surface giving it a 99.8% diffuse reflection. This technique is used in color meters and I have used it some 30 years ago.
The magnesium ribbon should be pretty pure, the kind that is used in laboratory's.
This is a very interesting way of doing it :) thank you for the tip.
 
For a beam expander, a simple telescope works; maybe a microscope objective lens, nice short
focal length, to fan the beam out, and a plastic Fresnel panel to re-collimate it; once the beam is
expanded, it cannot be much hazard to your eyes (hey, most of a footwide beam will miss your eyeball).
Since the light is monochromatic, color-corrected lenses aren't required.
The inner layers of the light panel behind a dead LCD display include good white
translucent material (is there a dead display somewhere in the closet?).
 
Back
Top