After watching BladesIIB make his video about a shop made boring bar, I finally got motivated to make one myself. I have a 12x36 lathe, so I didn't need one as big as his, but since the largest round bar my AXA toolpost can handle is 3/4" diameter, I decided to make one 1" diameter with a 1/2" shank to fit my toolholders.
I had some 1215 bar stock on hand in 1" diameter and used that. It might too soft for long-term use, but for now it will be fine. I didn't think to take pictures as I was making it, so these pictures are afterwards. I faced both ends on the lathe to a length of 9" and then milled a flat 6" long and about 3/8" wide that became my reference surface for further operations. By milling 3/8" wide, I left a bit of the radius on each side so that I didn't need to chamfer it. I placed a dial indicator against the end of the bar stock and zeroed it out so that when I rotated the bar for the next operations, I could put it back into the same spot. I didn't have anything I could bolt to the table for a reference length, so that will probably be a future project.
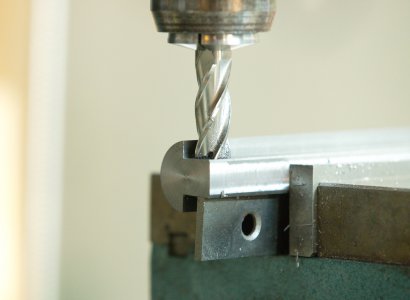
The flat was placed against the vice rear jaw with parallels underneath to raise it up enough to mill a recess 1/2" wide and 1/4" deep. After the first one was done, I flipped it and had the reference surface against the front jaw to mill the second recess. I know that is not ideal, but it worked fine.

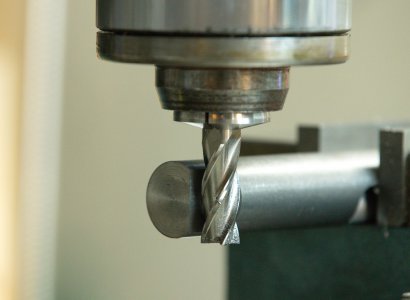
Once those were completed, I needed to mill the cutting end to make a flat for the set screws. By placing the reference surface against the bottom of the vice, it put the bar in the proper oriental to mill this flat with and end mill. I didn't have a face or shell mill that could radius or chamfer this in one operation.

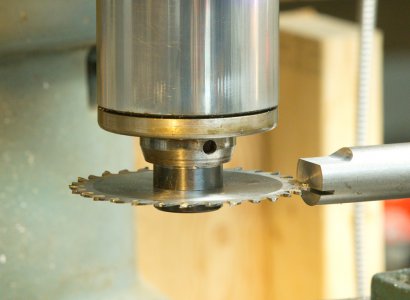
Now on to the slot for the tool bit. I have a thin slitting saw, but it was on the dull side, so I decided to try a carbide trim saw blade I bought on a trip to China many years ago that that had the wrong size arbor hole for my trim saw. I needed to make an adapter bushing for the mill arbor since the hole is 20mm and my arbor has inch steps in it. Once completed, the saw blade ran true enough to cut the slot. The saw blade is 2mm thick, I wanted a slot slightly bigger than 1/4" with the top of the bit on the centerline and decided on 0.26" height and 0.25" deep. I don't have a DRO on the quill or knee of my mill, and I tend to forget how many turns of the handles I have done when I need to make a bunch of passes, so I used a calculator with the height I wanted to mill the slot and the subtracted how much I raised the knee for each pass (don't forget to include the thickness of the blade for the first pass). That worked well and I might start using that more often.

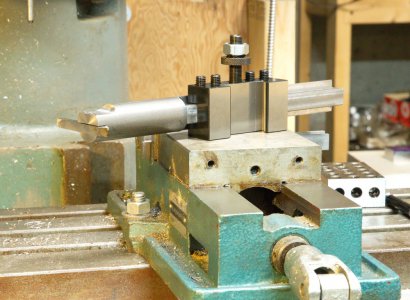
Once that was done, I put in three setscrews to hold the tool bit and now I am waiting on a project where I need this large of a boring bar. Ignore the length of the tool bit in this last photo, I know it's too long, I just picked one out of my drawer to show it complete.

This was a nice and easy project to do, if the 1215 doesn't last long, I now know how to make one in a more durable material.
I had some 1215 bar stock on hand in 1" diameter and used that. It might too soft for long-term use, but for now it will be fine. I didn't think to take pictures as I was making it, so these pictures are afterwards. I faced both ends on the lathe to a length of 9" and then milled a flat 6" long and about 3/8" wide that became my reference surface for further operations. By milling 3/8" wide, I left a bit of the radius on each side so that I didn't need to chamfer it. I placed a dial indicator against the end of the bar stock and zeroed it out so that when I rotated the bar for the next operations, I could put it back into the same spot. I didn't have anything I could bolt to the table for a reference length, so that will probably be a future project.
The flat was placed against the vice rear jaw with parallels underneath to raise it up enough to mill a recess 1/2" wide and 1/4" deep. After the first one was done, I flipped it and had the reference surface against the front jaw to mill the second recess. I know that is not ideal, but it worked fine.

Once those were completed, I needed to mill the cutting end to make a flat for the set screws. By placing the reference surface against the bottom of the vice, it put the bar in the proper oriental to mill this flat with and end mill. I didn't have a face or shell mill that could radius or chamfer this in one operation.

Now on to the slot for the tool bit. I have a thin slitting saw, but it was on the dull side, so I decided to try a carbide trim saw blade I bought on a trip to China many years ago that that had the wrong size arbor hole for my trim saw. I needed to make an adapter bushing for the mill arbor since the hole is 20mm and my arbor has inch steps in it. Once completed, the saw blade ran true enough to cut the slot. The saw blade is 2mm thick, I wanted a slot slightly bigger than 1/4" with the top of the bit on the centerline and decided on 0.26" height and 0.25" deep. I don't have a DRO on the quill or knee of my mill, and I tend to forget how many turns of the handles I have done when I need to make a bunch of passes, so I used a calculator with the height I wanted to mill the slot and the subtracted how much I raised the knee for each pass (don't forget to include the thickness of the blade for the first pass). That worked well and I might start using that more often.

Once that was done, I put in three setscrews to hold the tool bit and now I am waiting on a project where I need this large of a boring bar. Ignore the length of the tool bit in this last photo, I know it's too long, I just picked one out of my drawer to show it complete.

This was a nice and easy project to do, if the 1215 doesn't last long, I now know how to make one in a more durable material.


