Diametrical Pitch Gears, what do ya got

Bi11Hudson

Artificer00
H-M Lifetime Diamond Member
Joined
Feb 13, 2017
Messages
2,138
Location
Home (Retired)
I just stumbled across an "advert" that resembles what I see on eBay. Very nice gears, but no sizes, tooth counts, or pitch. A pretty picture but no useful information. It brought to mind an old timers trick. With a piece of light sheet metal, roof flashing works good, cut a notch three point one (3.1) inches long. Wrap the sheet metal around the gear, the number of exposed teeth is the DP for that gear. If it is a very(!) large gear, make the notch 6.2 inches, if a very small gear, 1.6 inches. Then adjust the tooth count to match the multiple of the gauge.

The difference between 14, 16, and 18 DP gears is hard to judge by eye. Such a gauge is handy for that. It doesn't figure in pressure angle, but for older gears, 14-1/2 degree is a good guess. Metric modulus gears are simple enough to measure, sometimes DP is a problem. A quick and dirty solution.

EDIT: Corrected the larger size notch.

.
 
Last edited:
Bill, I always enjoy reading your comments. I just happened to be reading "Gears & Gear Cutting" by Ivan Law. Cutting gears is something that I would like to try. Made a copy of your post and stuck it in my book.
 
The calculations for DP are quite simple, count teeth and measure approximate pitch diameter, or if you need to frequently determine DP, buy a set of stamped gear gages, and they usually have two sides with both 14 1/2 and 20 degree PA.
 
The easiest way to determine the D.P. of an unknown gear is measure the o.d. in inches and divide that number into the number of teeth plus two.

For metric gears, measure the o.d. in millimeters and divide that number by the number of teeth plus two to get the modulus.
 
If you have the gear in hand, use Machinerys Handbook comparison pictures.
 
I just stumbled across an "advert" that resembles what I see on eBay. Very nice gears, but no sizes, tooth counts, or pitch. A pretty picture but no useful information. It brought to mind an old timers trick. With a piece of light sheet metal, roof flashing works good, cut a notch three point one (3.1) inches long. Wrap the sheet metal around the gear, the number of exposed teeth is the DP for that gear. If it is a very(!) large gear, make the notch 6.2 inches, if a very small gear, 1.6 inches. Then adjust the tooth count to match the multiple of the gauge.

The difference between 14, 16, and 18 DP gears is hard to judge by eye. Such a gauge is handy for that. It doesn't figure in pressure angle, but for older gears, 14-1/2 degree is a good guess. Metric modulus gears are simple enough to measure, sometimes DP is a problem. A quick and dirty solution.

EDIT: Corrected the larger size notch.

.
Bill, I have a problem with your method.

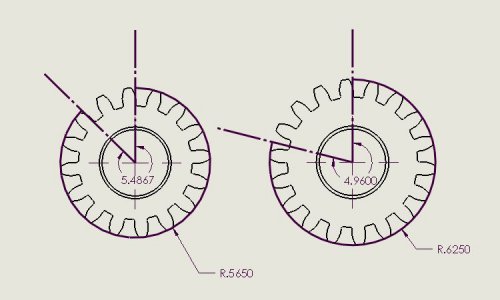
Here are 2 16 D.P. gears, one 16 tooth and the other 18 tooth. A 3.1" arc is laid around the circumference of each. As can be seen, 2 teeth are uncovered for the 16 t. gear and 4 teeth are uncovered for the 18 t. gear.
Gears.JPG

The correct calculation should be subtract the number of uncovered teeth from the total number of teeth and add 2.

This works for the following reasons. For any ideal gear, the p.d is equal to the number of teeth on the gear divided by the D.P. Also, the relationship between the p.d. and the o.d. is o.d./p.d. = (t+2)/t where t is the number of teeth. Finally, the 3.1" arc length is approximately pi inches which is the ratio of the circumference of an arc divided by the radius of the arc.
 
For shop use, a pencil and paper and Machinery's Handbook is about the best one can do for measuring gears. Oh, and a measuring stick. . . The gimmick /tool /guage that I described I last used many years back when prowling a pile /stack of gears in the back of a fellow's garage. He had been incapacitated and was under medical care. A partner(?) was supervising the salvage operation by several people. I had essentially sole access to dozens of middlin' sized gears, nobody else was interested. I made the guage on the spot to seperate the 12, 14, 16, and 18 DP gears, using a sheet of paper. The 16 DP being what I was interested in. The guage served me very well in those circumstances.

Bill, I have a problem with your method.

Here are 2 16 D.P. gears, one 16 tooth and the other 18 tooth. A 3.1" arc is laid around the circumference of each. As can be seen, 2 teeth are uncovered for the 16 t. gear and 4 teeth are uncovered for the 18 t. gear.
View attachment 375297

The correct calculation should be subtract the number of uncovered teeth from the total number of teeth and add 2.

This works for the following reasons. For any ideal gear, the p.d is equal to the number of teeth on the gear divided by the D.P. Also, the relationship between the p.d. and the o.d. is o.d./p.d. = (t+2)/t where t is the number of teeth. Finally, the 3.1" arc length is approximately pi inches which is the ratio of the circumference of an arc divided by the radius of the arc.
I'm not fully awake yet but there apparently is some misinterpretation(?) in your theoretical analysis as stated. I have used the "guage" on a few occasions and it worked as advertised. No calculations were involved, just counting teeth exposed. 3.1(4159) is "Pi", which is directly related to the diameter of the gear. So stated in your response. The "multiplications" I refered to, both up and down, have not been tried. I admit to going out on a limb there. As stated, I have made the guages from a sheet of paper. There could well have been an incorrect measurement in the making. But making the same mistake several times sounds a little fishy to me.

.
 
Bill, I think there is some misinterpretation on my part. Is this what you mean by a notch?Gear Gage.JPG

If so, you are nearly there. If this were laid along the pitch diameter, the number of teeth exposed in the pitch would be the pitch diametral pitch. Laid on the o.d., you will be short by 2 teeth due to the difference between the o.d. and the p.d. The heavy black line in my previous drawing would represent the notch.

The difference between the p.d. and o.d becomes less significant as the diameter of the gear increases. For a rack,which is essentially a gear of infinite diameter. your notch method will give the correct D.P.
 
:busted:Having slept on the matter, it occurs to me that you are correct. The guage you point to is correct. My memory may well be playing a little game with me. The stroke that put me in a wheelchair was the sixth. Somewhere along the line, one may have taken part of my memory. If, for smaller gears in the 14-18 DP range, a gear had, say, 150 teeth, it would be necessary to add 2 to the total exposed. It has been well over 20 years since I last used the technique myself. I recalled having used it on a "salvage" operation. It did work, when I got the gears home I matched them to my Atlas(Craftsman) built machine, where they did match. The machine was not "commissioned" at the time, just sitting on sawhorses. The gears I had "acquired" were not for the Atlas specifically, I just liked the size (DP) of them. They (dozens) mostly ended up on a shelf. I have used some. . . The rest are just sitting there.
The bottom line is that the "old timer's" trick probably was to count the exposed teeth and add two. :headache:

The stunt was not intended to replace proper measuring in the shop. It is a "field expedient" for when proper measuring instruments and documentation is not available. Such occasions do occur, and some method is required to make an estimate. Travel from a job site to the shop often takes more time than the repair itself. I have traveled 8 or 10 hours for a 1 hour splicing job. I am sure mechanical repairmen face similar situations. My concern is that if this happens for mechanical matters, how much error can seep into my electrical advising. I need to stand down on electrical, I suppose. But if I do, then what purpose do I serve now. It worries me. . .

.
 
Last edited:
:busted:Having slept on the matter, it occurs to me that you are correct. The guage you point to is correct. My memory may well be playing a little game with me. The stroke that put me in a wheelchair was the sixth. Somewhere along the line, one may have taken part of my memory. If, for smaller gears in the 14-18 DP range, a gear had, say, 150 teeth, it would be necessary to add 2 to the total exposed. It has been well over 20 years since I last used the technique myself. I recalled having used it on a "salvage" operation. It did work, when I got the gears home I matched them to my Atlas(Craftsman) built machine, where they did match. The machine was not "commisioned" at the time, just sitting on sawhorses. The gears I had "acquired" were not for the Atlas specifically, I just liked the size (DP) of them. They (dozens) mostly ended up on a shelf. I have used some. . . The rest are just sitting there.
The bottom line is that the "old timer's" trick probably was to count the exposed teeth and add two. :headache:

The stunt was not intended to replace proper measuring in the shop. It is a "field expedient" for when proper measuring instruments and documentation is not available. Such occasions do occur, and some method is required to make an estimate. Travel from a job site to the shop often takes more time than the repair itself. I have traveled 8 or 10 hours for a 1 hour splicing job. I am sure mechanical repairmen face similar situations. My concern is that if this happens for mechanical matters, how much error can seep into my electrical advising. I need to stand down on electrical, I suppose. But if I do, then what purpose do I serve now. It worries me. . .

.

Bill, I'm sorry to hear about your stroke. Hopefully, you will regain some of your former function over time. My mind isn't as sharp as it used to be either. If asked, my wife will confirm that.

I did some more research and as you get a higher number of of teeth on the gear, your approximation gets closer. More than likely enough to decide between the commonly available pitches.

The method that I gave is exact if the gear tooth is a standard profile. This is due to the addendum or distance from the pitch diameter is 1/D.P. and the O.D. of the gear is equal to the pitch diameter plus twice the addendum. Since the pitch diameter is equal to the number of teeth divided by D.P., this makes the O.D. = (N+2)/D.P. or D.P. = (N+2)/O.D.

Where is varies is when gears aren't made to the standard. The O.D. can be slightly smaller or larger and irt will still be a serviceable gear. However, it's usually close enough to identify the D.P and even to tell whether it's an inch gear or a metric gear.
 
Back
Top