- Joined
- Dec 15, 2022
- Messages
- 65
I didn't have a good location to install a normal collet rack, so I figured why not make a custom solution. I wanted to store the collets together with the chuck (and its tools) and decided what better place than right under the headstock itself. I figured I could make a drawer with stuff I had on hand... nothing more than some scrap OSB for the "drawer", a handle from an old filing cabinet, and some old drawer slides I had lying around. I didn't want to make an actual drawer with any real depth since I wanted a quick grab-n-go form factor, plus I didn't want to make a tempting location for random junk to gather. I decided to just make the rack itself be slide out. Mounting the chuck body was a simple matter of drilling a few holes for the mounting pins.
The only trick was how to store the collets themselves on a slide out shelf. I assumed I could just blast some holes in the OSB, but I wanted the additional strength in the slide out so I doubled up the OSB base. Cutting angled holes was doable, but didn't want to give up on the base's rigidity. It dawned on me that I could use some type of foam to hold the collets, but styrofoam was too delicate and I hate all the white popcorn that falls off. Instead, I used a thin bit of pink foam insulation and bonded (spray glue) a thin piece of plywood (1/8" ?) to make it a little more impact resistant. The thickness of the foam board was the perfect thickness for my ER40 collets (1" or 2" I believe) so they could sit on directly on the shelf base; no need to poke any thru-holes in the underlying OSB itself.
I first took a piece of cardboard and cut it to the final overall size that would fit on the slide out shelf, followed by laying out the grid for all the collets. I then could transfer each hole's center from the cardboard onto my foam board and piece of thin plywood. With the grid transferred, I chucked up a hole saw in my drill press and cut out the holes. I kept the holes in the plywood a little undersized with the idea that I would finish each hole after I had bonded the plywood to the foam board.
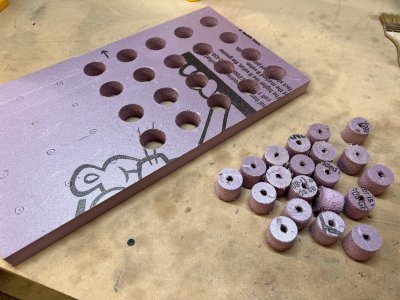
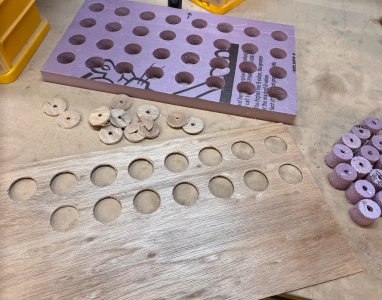
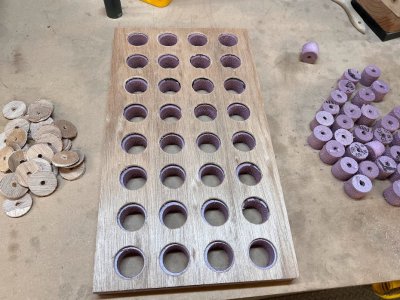
To cut a proper angle in the foam/plywood sandwich, I turned down a custom mandrel using a collet to pickup the correct angle; to this I glued some 80 grit sandpaper.
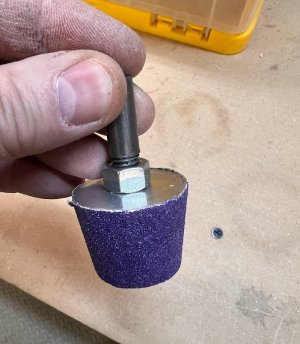
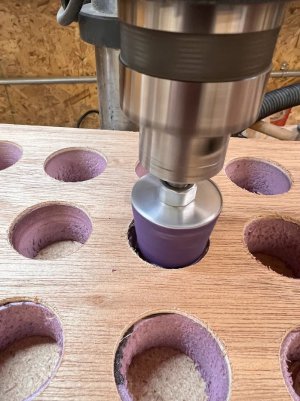
I chucked up the mandrel in the drill press and cut out the perfect receiver hole for a collet... the 80 grit cut both materials incredibly easy! Pro tip: it was definitely necessary to set my depth stop on the drill press so I didn't go too deep and enlarge the holes too much.
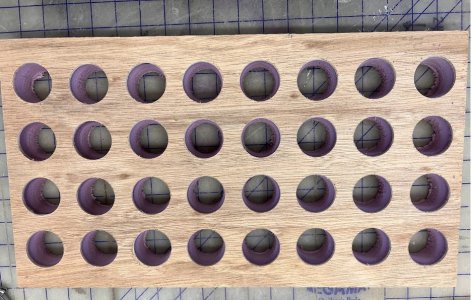
After this, I gave the whole thing a coat of oil-based paint to protect the thing from cutting fluids. Also printed up some labels for each size.
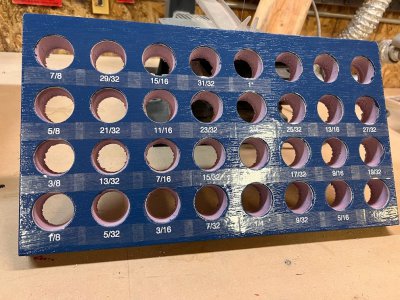
Lastly, took the trusty spray glue and bonded it to the slideout base. Fairly simple to build and has just the right proportion of "functional-while-still-ghetto" that I find works best for me.
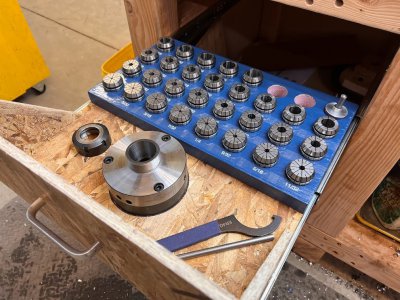
(I would have added a short video of it, but Imgur seems to not be working at the moment. )
)
The only trick was how to store the collets themselves on a slide out shelf. I assumed I could just blast some holes in the OSB, but I wanted the additional strength in the slide out so I doubled up the OSB base. Cutting angled holes was doable, but didn't want to give up on the base's rigidity. It dawned on me that I could use some type of foam to hold the collets, but styrofoam was too delicate and I hate all the white popcorn that falls off. Instead, I used a thin bit of pink foam insulation and bonded (spray glue) a thin piece of plywood (1/8" ?) to make it a little more impact resistant. The thickness of the foam board was the perfect thickness for my ER40 collets (1" or 2" I believe) so they could sit on directly on the shelf base; no need to poke any thru-holes in the underlying OSB itself.
I first took a piece of cardboard and cut it to the final overall size that would fit on the slide out shelf, followed by laying out the grid for all the collets. I then could transfer each hole's center from the cardboard onto my foam board and piece of thin plywood. With the grid transferred, I chucked up a hole saw in my drill press and cut out the holes. I kept the holes in the plywood a little undersized with the idea that I would finish each hole after I had bonded the plywood to the foam board.


To cut a proper angle in the foam/plywood sandwich, I turned down a custom mandrel using a collet to pickup the correct angle; to this I glued some 80 grit sandpaper.

I chucked up the mandrel in the drill press and cut out the perfect receiver hole for a collet... the 80 grit cut both materials incredibly easy! Pro tip: it was definitely necessary to set my depth stop on the drill press so I didn't go too deep and enlarge the holes too much.


After this, I gave the whole thing a coat of oil-based paint to protect the thing from cutting fluids. Also printed up some labels for each size.

Lastly, took the trusty spray glue and bonded it to the slideout base. Fairly simple to build and has just the right proportion of "functional-while-still-ghetto" that I find works best for me.


(I would have added a short video of it, but Imgur seems to not be working at the moment.

