Colchester master cross-feed problem

Brain Coral

Active User
Registered
Joined
Jul 26, 2013
Messages
584
Hello all,

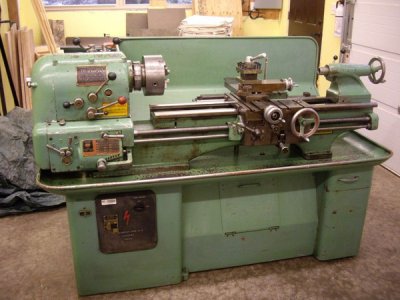
I bought this lathe a couple of years ago and within the last few months, the cross-feed has pretty much stopped working or is very jumpy at best. The lathe is a 1967 gap bed model.

Here's a picture of the lathe...
IMGP0041800x600.jpg

I have managed to remove the compound, cross-slide and taper attachment from the saddle, as well, I have pulled both the feed rod and leadscrew and then dropped the apron. I realize that it wasn't necessary to remove the compound and cross-slide, but I figured that while I was at it I might as well. I will also remove the saddle and make sure that there aren't any trapped chips underneath.

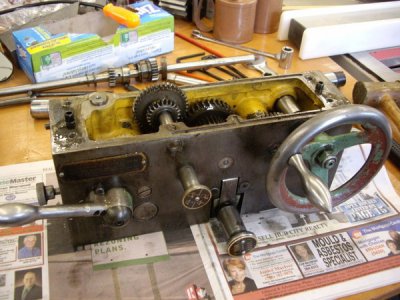
Here's a couple of pics of the apron assembly...
IMGP0718800x600_zpsa146a71a.jpg

IMGP0720800x600_zpscc26c8fa.jpg

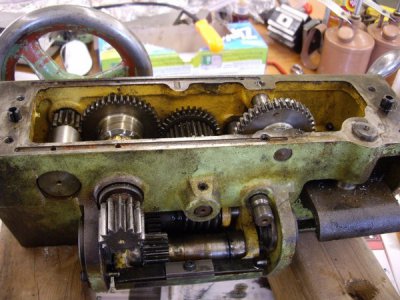
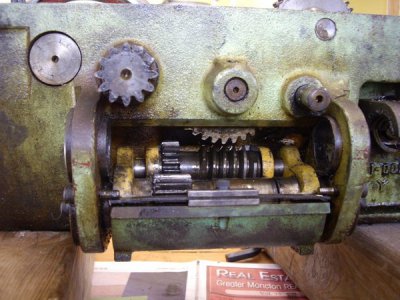
This last picture is of the apron wormbox...
IMGP0721800x600_zpsbc929c49.jpg

When engaging the cross-feed, there is a jumpy movement of the wormbox, so I'm suspecting that the problem lies in there. But upon an inspection of the gears and the movements of them, nothing stands out at all. There aren't any missing or chipped teeth, although the pinion gear in the wormbox shows some wear, but not excessive in my opinion.

There are some springs and adjusting screws in the wormbox shaft, but I think that the adjustment is for the kick-out.

Does anyone have any ideas... ?

Cheers... :)

Brian
 
I am not too familiar with your lathe, but here are a few general questions:

1) Is the long feed still working fine?

2) Is there a lot of play in any of the gears inside the apron? I had to replace a couple bushings on mine, one was the final drive gear from the apron to the cross feed screw.
 
Hello Henry,

Yes, the long feed works just fine and no, there doesn't seem to be excessive play in the main gear train, so I concentrated my efforts on the cross-feed gear chain. I decided to remove the wormbox assembly from the apron and take that apart.

Here's that picture again...

IMGP0720800x600_zpscc26c8fa.jpg

You can see the pinion gear and shaft at the forefront which meshes with the wormshaft gear. Upon taking the pinion shaft and gear apart, I discovered that on the left end of the shaft, it was scored as was the bearing and seemed to be much looser than on the right end. I'm wondering if this is the culprit and causing a bad gear mesh. The right hand bearing is in real good shape, so I may trade the bearings from left to right and see if that fixes it.

Before I put it all back together, I will see if a friend of mine has those parts as spares from a parts lathe that he has and replace them if I can.

Thanks for the reply... :)

Brian
 
I always thought those were good lathes. I think they use to call them round heads (round head stock)
Good solid machine, coarse can be abused but it looks good from the pics. I'd replace those bearings at both ends. Bearing house should handle that easily. good reason for it to jump. Any other parts that look worn or feel sloppy. Now's the time! You'll have a hardworking lathe if you do. You might look at the drive rod under the screw just to make sure it's solid. I'd also venture to say that might be the original color.
dickr
 
Hello dickr,

Yes, that is the original paint. I don't think that it was worked too hard, as the apron had very little in the way of chips in it. It looks like a chip got, caught at some point, between the bearing and shaft. The bearings are a cast iron unit with a triangularly shaped head... not something that a bearing house would have, but my friend is going to have a look at his spare Colchester parts to see if he has a replacement for me.

Thanks for your thoughts... :)

Brian
 
It turns out that my friend didn't have those particular parts, so I worked on the lathe for a couple of hours today, starting by trading the bearings from right to left and then took the front saddle clamp off the saddle to have a look underneath. It was suprisingly very clean, with no sign of scoring, whatsoever. This was also a good opportunity to see if the ball spring oilers were working properly. Only one of them would allow the oil to flow freely. The rest were gummed up with what looked like old grease. I used compressed air to blow them out and followed up with oil and repeat.

Then the saddle went back on with fresh way oil, attached the front saddle clamp and then the rear saddle clamp, adjusting the tension until there was no movement up and down, but it still slid freely on the ways. The saddle went back on next, then the cross-slide assembly slid on from the rear, followed by the croos-slide screw; also fed in from the rear. Next was installing the cross-slide screw keep followed by the cross-slide handwheel, which was adjusted for a smooth but not binding fit.

Next, the taper attachment assembly was pushed onto the locating pins and fastened into place, followed by the outboard bearing and nut. This was also adjusted for a smooth and non-binding revolvement of the screw.

Now came the installation of the compound assembly.

Next came the lead-screw which was fed through the saddle and on into the change gear box, sliding the leadscrew locking collar, the leadscrew gear, clutch gear, retaining collar and snap ring as I fed it into the gearbox. I found that the feedscrew had to be "not" installed before the leadscrew, in order to line up the gears and splines. Once the retaining collar was adjusted and the setscrew tightened, I then "pinned" the feed rod in place.

Before I tore the lathe down to the point that I did, I was hesitant and outside of my comfort zone.... but having a very detailed parts list and going about it methodically and keeping all of the families of parts labelled and separated into baggies, as well as taking photos of the different stages, it gave me the confidence to delve in. I ended up not having to refer to the photos, but am glad that they were there, just in case.

So, with the lathe back together, I fired it up and put it through all of the speeds and feeds and the cross-feed seems to run like silk. Mind you, that's not under load, so tomorrow I will experiment with some cuts and see how it does.

I hope that this post doesn't come off as me boasting. I thought that it may be of some use to others and by going into some detail, it may inspire others to not be fearful of taking something apart and fixing it.

Thanks for your interest... :)

Brian
 
Last edited:
I hope that this post doesn't come off as me boasting. I thought that it may be of some use to others and by going into some detail, it may inspire others to not be fearful of taking something apart and fixing it.

Thanks for your interest... :)

Brian
Why would it come off as boasting.... It was broke and you fixed it! Good mechanics do that sort of thing every day. :high5:
 
Hi Brian,
I just read your posting about the colchester. Very interesting, as I have a strip down job to do on mine. I have a square head version but I think these are pretty similar to yours. I need to replace the half nut on mine and have just posted a new thread asking for guidance. You seem to have gone through what I'm about to go through so would you mind if I pick your brains?
Can you tell me exactly what you did to get at the insides of the apron? I don't want to remove more bits than necessary, and I obviously don't want to cause any damage and leave the machine in a worse state that when I started. So a step by step breakdown would be really helpful, if you have the time, also anythings to watch out for such as dowels that can't be seen, bits that will fall to the floor if not supported etc.

Regards,

K

Hello K,

I'd be glad to lend you a hand. I'm heading down to the shop to work on a set of cabinets for a client and will be busy getting them out the door to the spray shop, so I won't be able to reply in any detail until later on this evening.

Cheers... :)

Brian
 
Back
Top